When we think of adding useful plants to our garden, we often imagine planting vegetables to enjoy in the kitchen, flowers to add beauty to the home, or medicinal herbs to stock our medicine cabinets. But have you ever thought of growing plants that add color to fabrics and clothes?
Indigo is one of the most popular dye plants, and for good reason. When treated properly, the plant’s leaves produce a brilliant blue dye you can use to create deep blue shirts and sky-blue tablecloths. And while you can purchase indigo dye, growing the plant at home brings a whole new layer of learning and fun.
Join me to learn more about the uses of indigo and how to grow and harvest this plant at home.
Overview
| | |
What Is It?
 Differentiate between indigo species for successful growth and care.
People use the common name indigo to refer to a few plant species. Most of these species, including true indigo (Indigofera tinctoria) and Guatemalan indigo (Indigofera suffruticosa), belong to the Indigofera genus. However, people sometimes shorten the name Japanese indigo (Persicaria tinctoria) to indigo.
So, before learning how to grow and care for indigo, know what species you’re dealing with! In this article, assume the term indigo refers to true indigo. This plant belongs to the legume family and was one of the first sources humans used to create deep blue dye.
Characteristics
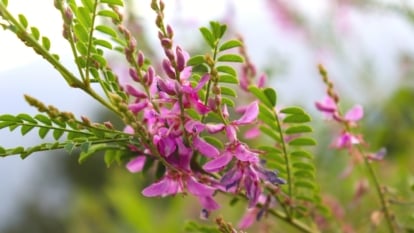
 Sprouting vibrant flowers, true indigo thrives in warm regions.
True indigo is a tender perennial native to tropical regions of the world. When grown in zones 10 and above, it remains green year-round. In cooler regions, it acts as an annual and dies back in the winter.
Regardless of where you live, expect true indigo to grow as messy small to medium shrubs with slender stems. Long, compound leaves emerge from the plant’s stems, and 7-15 leaflets appear on each leaf. If you’re growing the plant in a warm region that allows it to overwinter, the plants may produce woody stems and trunks. Since the smaller plants have a sprawling form, they often act as ground covers.
True indigo plants send out clusters of pink or purple flowers in the summer. As the year goes on, the flowers give way to seed pods that resemble snap beans. Each pod contains numerous small seeds.
Native Area
 True indigo’s origins remain uncertain, but its cultivation spans millennia.
Most people think true indigo originated in parts of South Asia or Africa. However, it’s hard to say for sure since humans have cultivated this plant for thousands of years. True indigo has naturalized on those two continents and in South America, but it was most likely brought there when humans traveled across the Pacific Ocean.
People began growing the plant in the southeastern United States as a cash crop in the 1700s. It has since naturalized in pockets of the Southeast, where you can currently find it growing wild.
Uses
While you might be familiar with indigo’s use as a dye plant, humans also have other uses for this plant. Here are some of the most popular indigo uses.
Dye Plant
 Originating from ancient India, indigo gained fame as a textile dye.
Indigo is famous for its use as a natural dye. Many historians believe that people living in modern-day India were the first to cultivate this plant and extract dye from its leaves. Not only did they use this dye to add a brilliant blue color to yarns and textiles, but they also exported the dried dye to Europe. Romans called this dye indicum, which later gave way to the common term indigo.
Extracting indigo dye involves fermenting the leaves in water. As the leaves ferment, enzymes convert a compound known as glycoside indican into glucose and indoxyl. At this point, the indigo mixture looks green.
Humans then expose the mixture to air, and the indoxyl becomes indigotin. This indigotin produces the blue color that indigo is known for, but it’s insoluble in water. Since it settles out from the water, humans can collect the indigotin and save it for later use.
One dyers have indigotin on hand, they prepare it to use as dye. First, they mix the indigotin with a reducing agent like fructose, sodium hydrosulfate, and henna to convert the water-insoluble indigotin into water-soluble leucoindigo. However, since these reducing agents will only work in a basic (low pH) environment, they must also add a base, such as slaked lime, to the mixture. The resulting solution will appear green in color, but the top of the mixture that is exposed to air will appear deep blue.
Now, the indigo vat is ready to receive materials! When plant-based materials like linen or animal textiles like wool are dipped into the indigo, the leucoindigo clings to the material. Dyers then remove the fabrics from the vat, where the leucoindigo is exposed to oxygen and transformed into blue indigotin. Since indigotin is insoluble in water, this dye will remain with the material even after it’s washed in water.
Soil Improvement
 True indigo enriches the soil by converting atmospheric nitrogen for plants.
Since true indigo belongs to the legume family, it helps increase soil nitrogen. Like all legumes, indigo roots contain tiny nodules that host beneficial bacteria like rhizobia. These bacteria help the plants out by converting atmospheric nitrogen into a plant-available form, and the plants help the bacteria by providing them with sugars. Since the indigo plants don’t use all the nitrogen the bacteria produce, the excess nutrients enter the soil and become available for other plants.
Planting
If you want to experiment with natural dyeing, true indigo is one of the top plants to grow. Since it’s often difficult to find transplants, growing from seed is often the best option.
Transplanting
 Plant indigo transplants after the last spring frost, ensuring sunlight.
If you can find transplants, wait under the last spring frost has passed to plant them outdoors. Choose a location with full sun or a few hours of afternoon shade and ensure the soil is well-draining. Since indigo plants grow two to four feet wide, ensure they have enough area to grow without smothering other plants.
Once you’ve found a suitable area, dig a hole that’s a few inches larger than the plant’s rootball. Place the transplant in the hole, cover with soil, and water well. Keep the soil moist during the weeks following transplanting to limit plant stress.
Growing from Seed
 Start true indigo seeds indoors for spring planting success.
If you can’t find true indigo seedlings for sale near you, keep an eye out for seeds. Even if you can’t locate indigo seeds nearby, you can order them from an online retailer. Since people use the common name indigo to refer to various plant species, make sure to look for the scientific name Indigofera tinctoria if you want to grow true indigo. Order the seeds in the winter so you have them on hand when it’s time to plant.
Once you have your seeds, follow these steps to plant:
- Start your seeds indoors six to eight weeks before the last predicted spring frost. If you live in an area without frost, start seeds in late winter.
- While soaking the seeds is optional, it helps encourage germination and speed up germination times. Place the seeds in water and allow them to soak for 12-24 hours.
- Fill a seed starting tray or other container with well-draining potting mix.
- If you soaked your seeds, remove them from the water. Sprinkle the indigo seeds on top of the potting mix and cover with a quarter inch of potting mix.
- Water until the potting mix is moist. Both bottom watering and top watering work well.
- Place the seeds somewhere between 70-80°F (21-27°C). If you keep your house below this range, place the containers on a heat mat.
- Water regularly to keep the soil moist but not soaking wet.
- Indigo seeds germinate within two to four weeks, so don’t be alarmed if you don’t see seedlings emerging immediately.
- Once the first seedling appears, move the trays to an area with 10-14 hours of bright light. Unless you have access to a greenhouse, place your seeds under a grow light to ensure they receive the necessary light.
- Continue to keep the soil moist and raise your grow lights as the seedlings mature. Once the plants have their second set of true leaves, begin to harden off the seedlings to prepare them for their lives outdoors.
How to Grow
Indigo is easy to grow as long as you live in a warm enough area. The plants don’t require any specialized care and rarely face problems with pests and diseases.
Light
 Indigo plants thrive in bright light with some afternoon shade.
Indigo plants require lots of bright light, but they can benefit from afternoon shade in hot areas like the Deep South. Try placing them in an open area or next to an east-facing structure.
Water
 For healthy growth, maintain consistently moist soil for true indigo.
True indigo grows best in constantly moist soil. They can tolerate a day or two of dry or wet soil, but they won’t thrive if the soil moisture consistently fluctuates between soaking wet and bone dry.
As long as you plant indigo in well-draining soil, expect to water mature plants one to three times a week. Adding mulch around the base of the plants helps conserve soil moisture and limit the amount you need to water.
Since seedlings lack robust root systems, keep the soil moist during the first few weeks after transplanting. Once the plants have acclimated to their new homes, you can decrease the amount you water. Some drought is tolerable for established shrubs.
Soil
 For optimal growth, enrich the soil with compost or organic matter.
True indigo plants grow best in rich, well-draining soil that remains moist between waterings. If you’re dealing with soil that’s high in clay or sand, you can still successfully grow indigo by mixing a few shovels of compost into your native soil. This compost will improve drainage in heavy clay soils and improve the water-holding capacities of sandy soil.
If you don’t have access to high-quality, finished compost, you can add coco coir or peat moss to your soil. Both of these types of organic matter will improve soil structure, but they won’t add the nutrients and beneficial microbes present in compost.
Temperature and Humidity
 Indigo thrives in 60-90°F temperatures but won’t survive frost.
True indigo grows best at temperatures between 60-90°F (16-32°C). While it can survive temperatures below this range, below-freezing temperatures will kill it. Therefore, you should treat it as an annual if you live in an area with regular frosts.
Fertilizing
 Feed indigo with a 0-5-5 fertilizer in spring for growth.
Since indigo is a legume, you don’t have to worry about adding nitrogen to the soil. However, indigo plants benefit from fertilizers that contain the two other macronutrients: phosphorus and potassium. Look for an organic fertilizer with an NPK ratio of 0-5-5 and apply it to the soil in the spring. A slow-release fertilizer will provide nutrients for a longer period throughout the season.
Maintenance
 Let indigo thrive naturally, but consider pruning for neatness.
Indigo is a low-maintenance that happily grows without help from humans. So feel free to let it do its thing!
However, since the plants can become unruly, you may want to take steps to contain them. You can prune back the stems to encourage bushier growth or tie them to a structure like a lattice wall or arbor.
Propagation
You can propagate indigo plants from seeds and cuttings. Saving and planting the seeds is a more common method, but rooting cuttings is a quicker way to produce new plants.
Propagation from Seed
 Harvest seeds from pods in fall for propagation simplicity.
The easiest way to propagate indigo is by seed. When fall arrives, pollinated flowers will turn into bean-like seedpods. Opening the pods gives way to many small seeds that are ready for planting. Follow the steps outlined above to propagate new indigo plants from seed.
Propagation from Cuttings
 Root stem cuttings in spring for effortless propagation success.
Another way to propagate indigo is by rooting cuttings. During the spring or early summer, use a sharp pair of pruning shears to take an eight to ten-inch long stem cutting. Remove the leaves from the bottom half of the cutting, then dip the cut end of the cutting in a rooting hormone.
Place the cutting in a pot filled with well-draining potting mix. Then, cover it with an airtight dome or piece of plastic. This covering will trap humidity and prevent the cutting from drying out. Continue to keep the potting mix moist but not wet.
Within a few weeks, the cutting will begin to form roots. Once the roots are about an inch long, you can move the cuttings to individual pots.
Alternatives to True Indigo
Remember when I said people use the word indigo to refer to numerous plants? Well, here are some popular alternatives to true indigo.
Japanese Indigo
 This is a compact alternative to true indigo for dyeing.
In recent years, many commercial growers and home gardeners have chosen Japanese indigo (Persicaria tinctoria) over true indigo. These plants belong to the knotweed family and remain between one and two feet tall. They grow well in most environments and are easily propagated by seeds and cuttings.
Guatemalan Indigo
 This indigo variety yields rich dye from its leaves.
Another common dye plant, Guatemalan indigo (Indigofern suffruticosa) is native to regions in Central and South America. You can use its leaves to produce indigo dye.
Blue False Indigo
 Baptisia australis offers indigo-like aesthetics without dye production.
If you like the look of indigo plants but aren’t interested in dye production, consider blue false indigo (Baptisia australis). This plant produces leaves that resemble those of true indigo and also sends out spikes of deep blue flowers. And since it’s hardy in zones three through nine, it makes a great addition if you live in a colder climate.
Common Problems
 Indigo plants are remarkably pest-resistant, requiring minimal intervention.
One of the great aspects of growing indigo is the lack of pests and diseases. While aphids and whiteflies sometimes appear on the plants, they’re relatively pest-free. If you see an alarming amount of sap-sucking pests on your plants, start with a strong stream of water from a hose. Then follow up and spray them with neem oil or insecticidal soap if the water didn’t cover all your bases.
Preparing for Dyeing
 Harvest indigo leaves just before flowering for optimal dyeing.
If you want to try your hand at natural dyeing with indigo, aim to harvest your leaves right before the flowers begin to open. The amount you harvest depends on where you live. In cold climates, indigo will not survive the winter, so you can harvest all the leaves if you’d like. However, if you live in a warm area and treat indigo as a perennial, never harvest more than half the leaves at once.
You can remove the leaves any way you like. However, an easy method involves cutting the base of the leaves with a pair of pruning shears. Once you collect the leaves, you can either immediately process them for dye or dry them for later use.
Frequently Asked Questions
Still want to learn more about growing indigo? Check out these frequently asked questions.
Blue indigo dye originally came from plants in the Indigofera genus including true indigo (Indigofera tinctoria) and Guatemalan indigo (Indigofera suffructicosa). People also created indigo dye from Japanese indigo (Persicaria tinctoria). Today, most indigo dye is created from synthetic materials.
Indigo is easy to grow as long as you live in a warm enough environment. The plants prefer temperatures above 60°F (16°C), full sun, and moist soil.
True indigo grows as a perennial in zones 10-12. Since it’s not frost-tolerant, it will die back in colder areas. If you live in zone nine or below, you can still grow indigo if you treat it as an annual.
Final Thoughts
Growing indigo is a wonderful way to experiment with natural dyes. And even if you’re not interested in turning fabric and clothes into brilliant shades of blue, you can still add this plant to your garden to enjoy its beautiful flowers and soil-enriching properties.