

Fruit trees are not generally known for their compact size. This presents a problem for gardeners in small spaces with little backyard room who still want a mountain of fruits to harvest every season. While several fruit trees grow well in containers, there is another, more aesthetically pleasing option called espalier (pronounced eh-spal-ee-ay).
Espalier is a technique that trains plants along horizontal supports to create lateral branches and a two-dimensional look. Rather than taking up several square feet of space when planted normally, this practice allows gardeners to grow trees along fences or walls, saving space without sacrificing yield.
Espalier may have a formal and complicated look, but it’s not difficult to achieve with the right preparation. In just six easy steps, you can master the art of fruit tree espalier in your garden.
What is Espalier?
This pruning and trellising method trains trees to grow flat for space-saving and aesthetics.
Espalier has been around for centuries but became particularly popular in Europe a few hundred years ago. The word is French, originating from Italian spalliera, meaning “something to rest the shoulder against.” Initially, orchardists developed this technique to maximize fruit production in limited spaces and decorate castle and monastery walls. You’ll often see espalier trees in historical gardens across the continent.
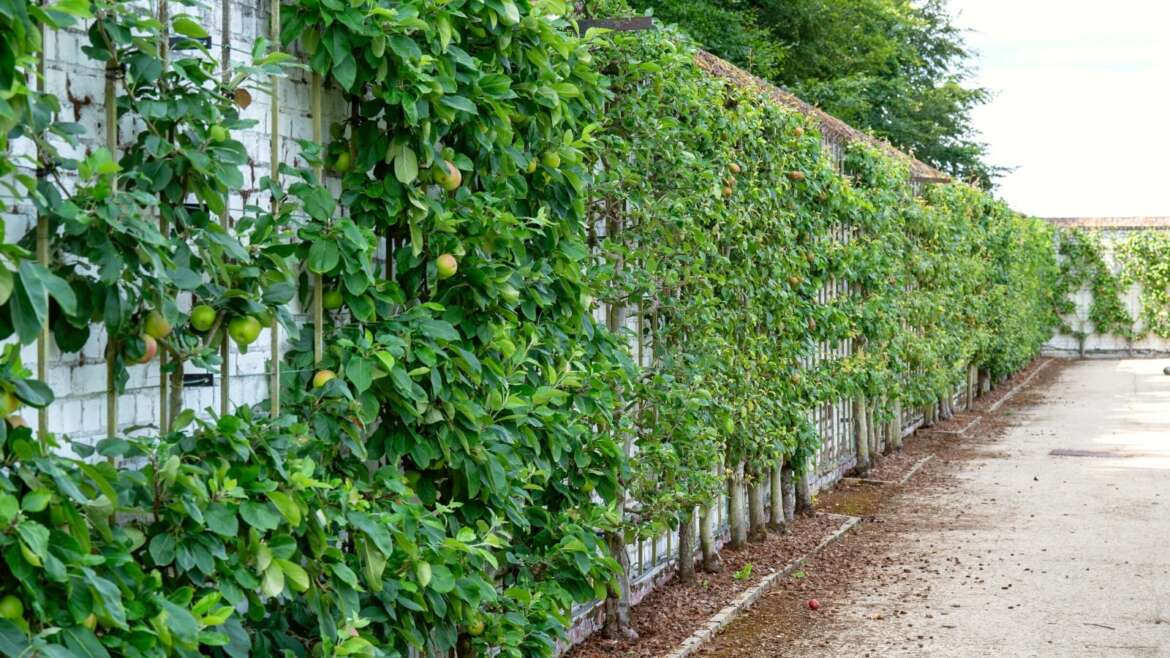
Espalier involves training fruit trees (or shrubs and climbing plants) to grow flat against supports, such as fences or walls, almost two-dimensionally rather than how they grow naturally. There are many reasons to espalier, but the primary motivation is saving space. Even in a small garden, you can grow an abundance of fruits using this technique.
One of the other major benefits of espalier is aesthetics. Trees have plenty of ornamental value on their own, but espalier trees have an artistic or architectural quality that adds sophistication to any garden.
There are many different patterns and forms, along with formal and informal espalier. We will look at steps for a basic horizontal pattern, but once you get the hang of the process, you can get creative.
What Plants Are Suitable For Espalier?
 Choose flexible trees or shrubs with spurs for espalier gardening.
When choosing plants for espalier, the most suitable candidates are trees or shrubs with flexible branches. Espalier fruit trees should produce spurs along the branches to boost production. Spurs are short growing stems that shoot from main branches.
Apples and pears are the most popular choices, responding well to training and producing masses of fruits in a small space. But you can also espalier ornamental plants, particularly climbing plants like roses or jasmine, to create the same architectural shape.
Here are some other popular favorites for espalier:
- Crab Apple
- Japanese Maple
- Viburnum
- Fig
- Citrus
- Peach
- Grapes
- Almond
How to Espalier a Fruit Tree in 6 Steps
Espalier may look like a complex process, but it doesn’t have to be. With the right preparation, espalier fruit trees and vines can actually be quite low maintenance. The initial setup is important, but it’s not as hard as you may think once you get the hang of it.
Choose a Location
 Choose the right location, considering sunlight and soil quality.
Correct location is essential to success when planting anything. Trees won’t grow properly or produce fruit when growing in the wrong spot.
Sunlight is the first consideration, especially when it comes to fruit trees. South or west-facing spots are usually your best bet, providing plenty of sun for the horizontal orientation of an espalier. If you’re working with a plant that prefers a bit of shade, east-facing is better, catching the morning light but providing shade from the harsher afternoon sun.
In cooler regions, training a tree against a south-facing wall can help with temperature regulation. Walls can store heat during the day when the sun is up, maintaining warmth around the branches even as the sun goes down. This is ideal for heat-loving species like citrus, boosting fruit production.
Most fruit trees need rich and well-draining soil to establish quickly. Giving them the best start now will avoid any struggles with watering or nutrient deficiencies later on. Mix in some compost before planting, and make sure your soil type matches the preferences of your chosen species, giving your espalier a strong foundation.
Install Your Supports
 Espaliered trees need sturdy supports like fences or trellises for growth.
Espaliered fruit trees obviously don’t stay flat on their own. They need a bit of help in the form of supports (and pruning) to grow in two dimensions. For fruit trees, a sturdy support system is also key to preventing branches from breaking under the weight of their own fruits, particularly for longer horizontal branches far from the central supporting trunk.
If you’ve got a strong fence, wall, or trellis already in place, use these to form your structure. They need to be capable of holding up the branches once the tree reaches maturity (in other words, aim for longevity). For walls, setting up heavy gauge wires at regular intervals (15 inches apart) can replicate a fence or trellis structure for training.
Building new supports is an option if you don’t have anything suitable in your garden already. This is also a great way to split your garden into ‘rooms’ or zones, using the espalier trees as living fencing. I prefer clear fencing for espalier from scratch, as it keeps the focus on the structure of the tree. You can pound 4×4 wooden posts into the ground or opt for metal T-posts or star pickets for longevity.
Plant Carefully
 Plant trees 8-10 inches from supports, ensuring proper spacing and airflow.
When the supports are in place and you’re ready to plant, choose a spot about 8 to 10 inches away from your support structure. This distance is close enough for easy training but far enough away that the roots have room to establish without interference. Airflow around the branches is important to prevent issues with fungal disease.
Dig a hole at this distance and plant your tree or shrub at the same depth as it was in the container or bag it came in. Plant it upright and gently firm the soil around the base to secure it in place. If you’re planting multiple trees, consider the mature size so the roots don’t compete for resources.
After planting, water immediately. This initial watering helps the roots settle into their new environment, encouraging them to establish quickly. The better your start, the easier the plant will be to train.
Pruning
 Prune trees to create tiers, stimulating lateral growth and desired structure.
Pruning is the most critical step, typically carried out in fall or winter immediately after planting. The first cut will create the first espalier tier, around 15 inches above the soil line. Each set of branches is another tier, created over time as the tree grows.
To start, cut the central stem about 2 inches below the first horizontal support, just above a healthy bud. This encourages the emergence of new branches from this point, stimulates lateral growth, and encourages a new central stem.
As your tree grows, continue this pruning process every year in late summer when the central stem reaches the next tier level, about 15 inches above the first. Remove any lateral branches that aren’t part of your design to concentrate the plant’s energy into the desired growth, ensuring a strong and tidy structure.
Attach to Supports
 Gradually train lateral branches to support optimal growth and health.
After pruning, you may want to attach the branches to the supports straight away. However, you may need to wait if the branches are rigid. Pulling the branches down at a sharp angle can actually hinder growth, limiting development in the branches and the new central stem.
Instead, allow the lateral branches to grow naturally at first. Identify the strongest shoots on each side of the plant and attach these chosen branches to lightweight poles or stakes positioned at a 40 to 45° angle. This promotes strong and straight growth while gradually acclimatizing the branches to their later orientation.
By late summer, once the branches have completed their growth phase, you can lower the fruit tree limbs to align with the first set of espalier supports. Don’t wait too long to move them, as stiff branches will be difficult to train.
Use flexible ties to attach them, as stiff wires can cut into the branches and cause damage as they grow. Wounds can also increase the risk of pests and diseases, so ensure you give your branches enough room to move.
Continue applying this technique with each new tier of growth, pruning any unnecessary shoots to maintain shape. This takes some patience and attention over time, so don’t be discouraged if your espalier doesn’t look impressive and professional in just a couple of weeks.
Maintenance
 Regular pruning and maintenance are vital for a healthy, balanced espalier.
Consistent pruning is key to maintaining the desired shape of your fruit tree espalier. Without regular pruning, the tree will return to its natural untrained form, becoming top-heavy. The tree’s lower branches may begin to thin out or die off, an imbalance that’s almost impossible to rectify once it happens.
Beyond pruning, perform regular plant maintenance to keep your tree healthy. Regular watering, feeding, and mulching according to the species’ needs will ensure your espalier looks lush and healthy rather than sparse.
Final Thoughts
Whether you’re stuck with a small space and want an impressive harvest, or you just want to try a new technique in the garden, espalier is easier than you may expect.

