When you add a potted basil plant to your kitchen windowsill or fill your raised beds with dill and cilantro, you probably imagine sprinkling fresh herbs over meals or using them to create flavorful sauces like pesto and chimichurri. And while there’s no replacing that fresh texture and flavor, dried herbs also have a place in the kitchen! Rather than purchasing jars from the store, why not dry your homegrown herbs?
Drying allows you to take advantage of bountiful harvests and also preserve your plants for use during the winter months. Plus, custom, dried herb blends are thoughtful and unique gifts for friends and family.
Fortunately, drying herbs is easy, even if you’ve never done it before. I’ll share how to harvest fresh herbs for optimal flavor, dry them well, and store them for future use. By the time you finish reading, you’ll be ready to fill your pantry with garden-grown herbs.
How to Harvest
 For maximum flavor, begin with aromatic plants.
If you want your dried herbs to pack a flavorful punch, you have to start with fragrant plants! Harvesting during the morning will provide the best flavor, but the evening is the second-best option. No matter what harvest window you choose, pick as quickly as possible and bring them into a cool, dim area ASAP. While some people think letting them wilt in the sun just speeds the drying process, it can zap the plants of flavor.
You can pick herbs throughout the growing season to dry, but I really like to capitalize on two times of the year: the beginning of summer and the week before the first frost.
When the cold spring days disappear and the long summer days arrive, many herbs take off. Perennial herbs like rosemary, oregano, and thyme put on new growth, and annual herbs go from seedlings to mature plants. Since the plants often produce too much growth to use fresh in the kitchen, I like to dry the extra material. Not only will this help you fill your pantry, but the regular trims will keep herb plants healthy.
Frost-sensitive types like basil and dill become damaged by frost, so I like to harvest the remaining healthy growth before this first fall cold snap arrives. Rather than tossing the bags full of herbs in the compost, you can dry them for future use.
How to Prepare
 Preparing for drying involves washing the plants in water to eliminate dirt and pests.
Once you have a basketful, it’s time to prepare the herbs for drying. First, wash the plants in water to remove any dirt as well as pesky pests like aphids, then set the wet herbs on a kitchen towel to dry.
I typically like to dry full herb stalks rather than individual leaves. This makes them easy to handle and also saves some work upfront. However, you can remove individual leaves to dry, as long as you aren’t planning on hanging the plants to air dry.
While freshly harvested herbs will provide the greatest flavor, you can also dry those that have been sitting in your fridge for a few days. If you think you won’t get around to using a bunch of dill or cilantro before it goes bad, dry it instead of tossing it in your compost pile.
How to Dry
There are a few different ways to dry fresh herbs, and one method isn’t necessarily better than another. I like to choose my drying method depending on the type and quantity of herb I’m drying as well as whatever else I have going on in my life.
Sometimes, spending an hour tying and hanging bundles of rosemary and sage is a relaxing way to spend an evening. But other times, I’d rather stick them in my dehydrator and be done with it.
Read through the drying methods below and choose one (or more) that’s right for you.
Use a Dehydrator
If your dehydrator has temperature settings, opt for a range between 100–125°F (38-52°C).
Have a dehydrator? Go ahead and put it to work! Dehydrators are a reliable and consistent way to quickly dry fresh herbs. One downfall of this method is that it limits the amount you can dry at once. But since fresh herbs dry within a day, you can dry multiple batches in a single week.
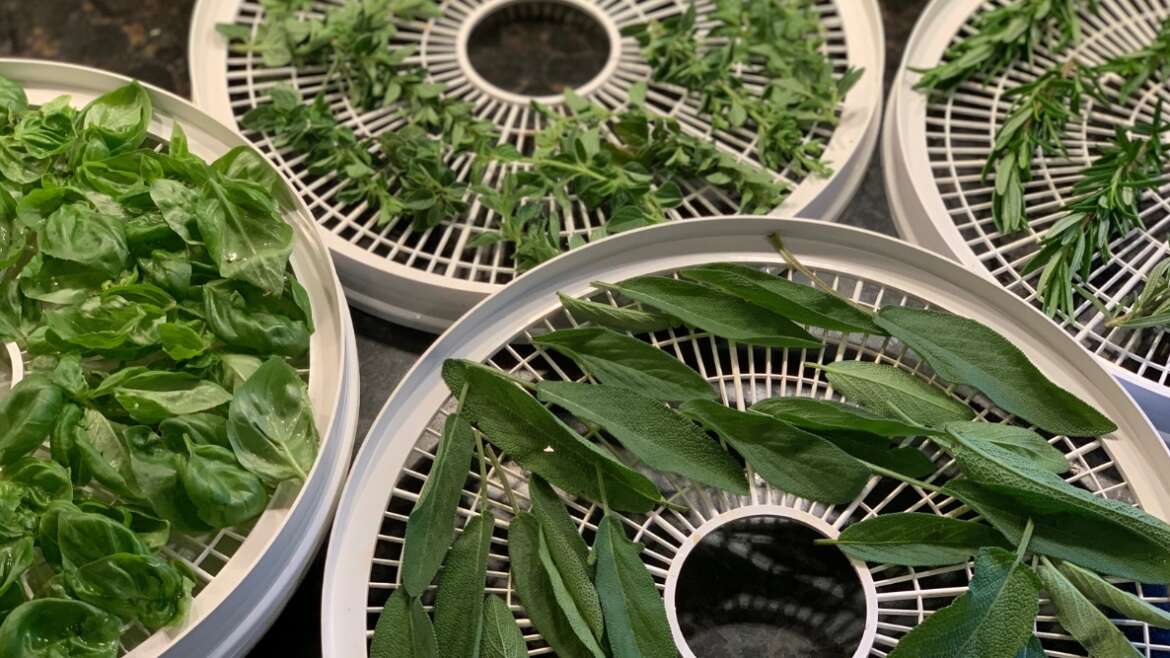
As with all drying methods, start with freshly picked herbs. You can either dry entire stems or individual leaves—the choice is up to you. No matter which option you choose, layer them in a single layer on the dehydrator sheet and turn it on. If your dehydrator has multiple temperature settings, choose one between 100–125°F (38-52°C).
Smaller herbs like basil, dill, cilantro, and oregano may be dry within a few hours. However, thicker types, like rosemary and sage can take up to twelve hours to fully dry. Check on them every few hours and remove them when they’re dry.
Dry in the Oven
 To simulate a dehydrator environment, set the oven temperature as low as it can go.
If you don’t have access to a dehydrator but want to quickly dry a large batch, turn to your standard kitchen oven. Setting the oven temperature as low as possible creates an environment that’s similar to a dehydrator. However, since most ovens bottom out around 170°F (77°C), the temperature will be higher in the oven than in the dehydrator. That means they will dry faster, but they’ll also lose some of their sought-after flavor.
To start drying in the oven, cover a baking sheet with a piece of parchment paper. While you can dry the plants directly on the baking sheet, the foldable parchment paper makes it easy to transfer the dry herbs to a storage container. Lay a single layer on the baking sheet and pop them in the oven.
They should be fully dry within one to three hours—as soon as they crumble, you can take them out. Once they cool, store them in an airtight container.
Hang to Dry
 To air-dry herbs effectively, harvest entire herb stems instead of individual leaves.
If you live in a dry climate and aren’t in a rush to dry your herbs, you can let them air dry. This method works best for low-moisture types like sage, rosemary, and lavender, although it can also work for delicate plants like basil, mint, and cilantro. Just keep an eye on these tender herbs since they can develop mold if they dry too slowly.
The best way to air-dry is to hang them by their stems, so you’ll need to harvest entire herb stems rather than individual leaves. Bundle a few stalks together with a piece of string or rubber band, then hang the bundles upside down from a shelf, rope, or other object. The bundles should be small enough that air can get between each individual stem—a few smaller bunches work larger than one large one.
While you may be tempted to hang them in front of a sunny window, don’t do this! Bright light will speed up the drying process, but it will also diminish the plant’s flavor. And flavor is what herbs are all about!
Instead, choose an area out of direct light. Adding a fan will help improve airflow and accelerate drying, but it’s unnecessary as long as the humidity is low. Depending on the herb type, temperature, and humidity, they will be fully dry in one to three weeks. Check on them every few days and discard any plants that have developed mold.
Dry in the Microwave
 Larger herbs will require more time to dry compared to smaller, delicate ones.
While microwaving isn’t the most conventional method, it’s certainly the quickest! Popping herbs in the microwave removes the moisture and leaves you with dried leaves ready for storage. And while you may think the microwave zaps them of flavor, herbs dried in the microwave actually remain more pungent than those dried in the oven.
Start by placing a single layer of clean, dried herbs on a plate, then cover them with a paper towel. Microwave for 30 seconds, then check the herbs. Continue microwaving until they are dry. As with other drying methods, larger herbs will take longer to dry than smaller, more delicate ones.
Repeat this process until you’ve dried all the herbs you like.
How to Store
 Regardless of the container type, remember to label it with the contents and date.
After you dry your herbs, take the time to place them in a proper storage container. Any airtight container works well, but I like to use glass jars since they keep out air and prevent them from getting crushed to smithereens. Mason jars work well, as do old spice containers. No matter what type of container you choose, make sure you label it with the contents and date.
If you’re drying herbs for tea, you can store the loose-leaf tea in glass or metal canisters. Or, you can place the dried herbs in individual satchels and then store them in an airtight container.
Once the herbs are in their containers, place them somewhere cool and dark. As long as you store them properly, they will remain good for one to three years. While they won’t technically go “bad,” they’ll lose their flavor as time goes on. Therefore, it’s a good idea to replace your dried herbs every couple of years.
Final Thoughts
If you have extra fresh herbs on hand, don’t fear! Drying herbs allows you to save the harvest so you can enjoy homegrown herbs all year long.