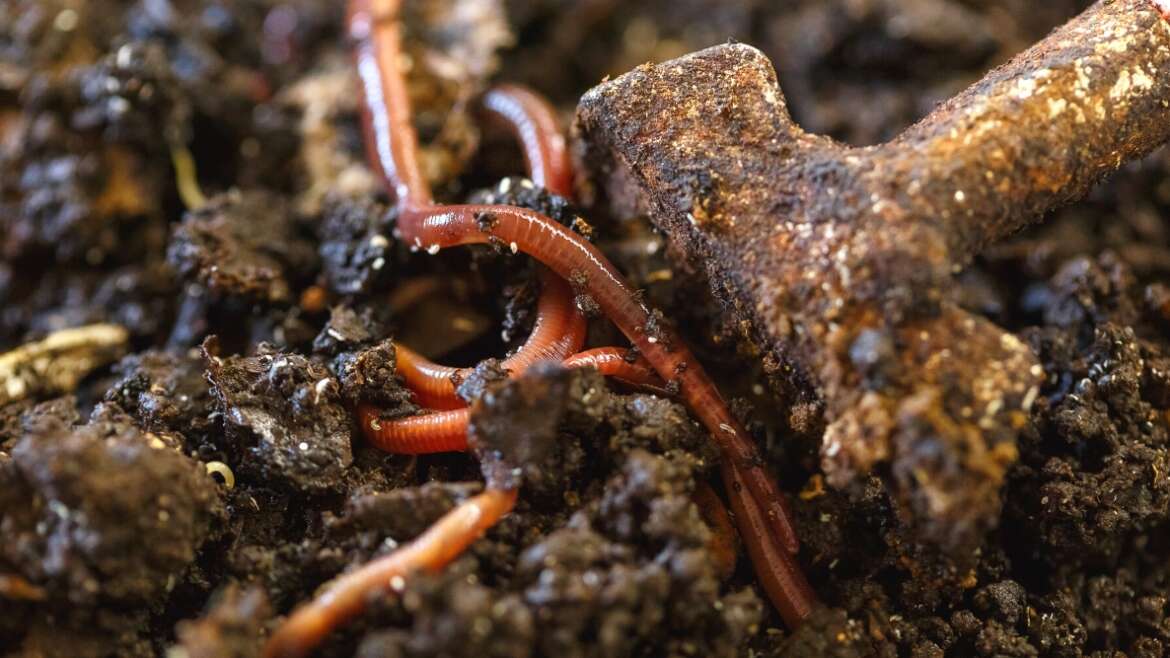
There are many ways to compost out there. Some prefer the tried and true compost pile methods, while others like fermentation methods like bokashi. Today, we’re here to discuss composting with worms, also known as vermicomposting, and whether it’s all it’s made out to be!
Getting started with vermicomposting takes a little effort, but it’s a sustainable option for many gardeners. If you’ve got small children, they’ll be fascinated by the little squirmy worms eating the watermelon rinds and apple peels, too. Not only do you get a sudden plethora of new “pets” and compost allies, but you also get worm castings to use in the garden. This seems like a win-win situation – so is it?
The Short Answer
Vermicomposting is definitely worth it for the worm castings. Worm castings, while not strictly a fertilizer, provide an abundance of great benefits for gardens. Taking care of worms is easy once you learn to troubleshoot any small issues that might arise.
What is Vermicomposting?
Vermicomposting utilizes epigeic worm species to transform food scraps into useful soil amendments.
Vermicomposting uses worms to break down food scraps or plant waste and turn it into a soil additive. You should not dig up worms from your garden and use them; the endogeic worm species common in most gardens are deep dwellers (up to 6 feet below the surface) and won’t survive in a home vermicompost system. Instead, you need epigeic worms.
Epigeic worm species live in the debris at the soil’s surface or in the upper few inches. These are decomposers that break down plant debris in the upper soil horizon. While they do consume debris and food scrap waste, they aren’t after the waste itself. The worms feast on the microbial activity on the waste products.
As the waste products pass through the worm’s digestive system, they’re broken down into rich worm poop called worm castings. This dark-colored organic matter helps improve the soil tilth, retains up to ten times its weight in water, and provides food for the microbiology that lives in our soil.
Whatever material the worms don’t consume will break down naturally into compost. The combination of worm castings and cold-process compost is referred to as vermicompost and is what most home bins produce.
Choosing a Worm Bin
 Many commercial vermicomposting bins are available for purchase.
Setting up a worm bin is easy. You have a variety of available ready-made options to choose from or can opt to make your own DIY version.
Ready-Made Options
The ready-made Urban Worm Bag will make your job as a worm wrangler much easier. This type of system is referred to as a continuous-flow vermiculture system; you’ll add fresh bedding and food waste at the top, and as the worms chew through it, their castings will sink to the bottom, where they can be harvested once a good layer has built up. The worms will continue to eat through the newer waste, staying above that casting layer.
A continuous-flow system is the easiest for most people to start with. Still, many opt for a tower system like the HotFrog composter (shown above) or another worm tower system like the Worm Factory.
These off-the-shelf systems have multiple tiers that can hold bedding, food waste, and worms. Still, for a beginner, they’re more complex to deal with as the worms have a hard time traveling between the different levels in the system, resulting in the waste rotting without the worms reaching it.
DIY Bins
Are you more of a DIYer? If so, you can make your own worm bin. For the simplest type, you only need one plastic bin, although this system doesn’t have any drainage, and may be trickier to maintain for a newbie. The following video will give you some added insight into this process:
A more elaborate DIY version uses multiple plastic bins, some with holes drilled in the underside to allow leachate drainage. This style of system mimics the worm towers I mentioned above. However, the elaborate DIY solution has the same difficulties that a worm tower can have for a beginner. When starting, opt for a single bin or a continuous-flow system like the Urban Worm Bag.
No matter what system you have, monitor to ensure that no leachate or liquid is building up in the bottom of your system. Contrary to popular belief, the leachate is not a form of compost tea. It’s just residual moisture that was in your food waste. You can use this to keep the contents of your bin damp, but I don’t recommend using it on edible plants. It can often become anaerobic and smelly, drawing insects to your plants.
Setting Up The Worm Bin
 Provide bedding in the form of carbon-rich materials like shredded paper and cardboard.
Worms need two major things aside from the bin itself: bedding and food.
In regular composting, you have both “brown” waste and “green” waste. Brown waste is carbon-dense material that does not heat up when it breaks down, plus it absorbs moisture. Green waste is a fresh, nitrogen-dense material like our kitchen scraps that can heat up when it breaks down.
Unlike in a standard compost pile, we don’t want the worm bin to heat up, so we have to use a lot more carbon-dense material to prevent the material inside from getting too hot and potentially harming the worms. If you are ever questioning whether you have enough brown materials, you can probably add more without causing harm, but adding too much green waste is a recipe for disaster!
Bedding Options
Good options for brown bedding materials are shredded paper or cardboard, coconut coir or peat moss, shredded dry leaves, chopped straw, or even your favorite soilless and unfertilized potting mix. I like to use a mix of coconut coir and micro-shredded paper in my bins, as the coir prevents the paper from matting together.
Begin by mixing your brown materials well while thoroughly dampening them. You want the resulting bedding to be damp to the touch but not soggy. It should hold about the same amount of moisture as a wrung-out sponge, and if you grab a handful and squeeze it, you shouldn’t have more than a drop or two of water come out. If there’s too much moisture, your worms can drown due to a lack of oxygen.
If you’d like, add a handful of dirt from the backyard or some azomite or powdered eggshell; this acts as a grit. Worms, like chickens, have a gizzard that helps break down the material they consume, and a little bit of grit helps them to digest better. They don’t need much of it, and some of it will remain in their gizzard between feedings. Periodically, you can add more after harvesting the bin, but it’s unnecessary every time you feed them.
Once your bedding is prepared and placed into the bin, your bin is set up and ready to use. We’ll get more into feeding the worms later, but let’s talk about which worms you should use and which you shouldn’t!
Worm Types
 The most popular worms for vermicomposting are Red Wigglers.
Epigeic, or surface-dwelling worm species, are ideal for composting. They naturally live in plant debris or the upper few inches of soil. They are accustomed to this shallow part of the soil profile and don’t need many feet of depth to burrow through. These species are also more comfortable in a compact space.
An endogeic, deeper-dwelling species will try to escape your worm bin because it’s not deep enough for them. These endogeic species comprise most of the earthworms in the average garden.
Best Worm Types for Vermicomposting
The most popular species for vermicomposting by far is Eisenia fetida, also called red wigglers. These worms tend to be red and narrow-bodied, with a pronounced clitellum towards the tail end. (The clitellum is the little ring around the worm’s back end.)
The next most popular, and likely the most popular among most serious vermicomposters, is Eisenia hortensis, the European nightcrawler. These are more pink than red, usually thicker and longer than the red wigglers, and are more popular for a reason. Not only do they eat a bit more (as a larger worm), but these are excellent bait for fishing!
A third type has become more common in the US in recent years: the Malaysian blue worm (Perionyx excavatus). They have a bluish, almost reflective tint to their red skin. Blues are much more prone to trying to escape a worm bin and are faster-moving than the two mentioned above. They’re often mistaken for red wigglers but are an entirely different species.
There is one group of worms you never want to buy for composting: any Amynthas genus worms, including Amynthas agrestis, Amynthas diffringens, or Amynthas corticis. Often referred to as Asian jumping worms, crazy worms, snake worms, or Alabama jumpers, these species are considered invasive in the northeastern United States and must be reported when found.
How Many Worms Do You Need?
Now that you know what type of worms to get, how many worms you get will largely depend on the size of your worm bin. An Urban Worm Bag can house up to 6 pounds of worms!
In most cases, starting with a pound of worms is adequate; they are self-regulating and will increase their population based on the available space and food supply. A very active worm bin can handle more worms as there is more food and bedding, but for a beginner, a pound or two of worms is plenty!
Feeding Your Worms
 Most of our fruit and vegetable waste can be fed to your worms.
It’s easy to be tempted to give your worms all of your food waste starting the day they arrive, but that’s not a good idea. When they first arrive from the worm farm, many worms have spent days in shipment. They’re often a bit dehydrated and need some time to recover from their travels and settle into their new home.
If your supplier sent along some dry worm chow, use that for the first two weeks, then swap over to your food waste.
How Much Should You Feed Them?
Base the amount you feed your worms on the weight of the worms you originally purchased. In ideal conditions, a red wiggler can eat half its weight a day, but this will be a combination of your food scraps and the worm bedding. A good rule of thumb is that if you have 1 pound of worms, feed no more than 1/4lb of food waste per day; that way, they’re eating 1/4lb of food scraps, an equivalent volume of bedding, and they’ll likely increase their population over time.
Try to avoid overfeeding when possible. Overfeeding can result in the worm bin getting too hot as the material inside composts down, which can threaten the health of your worms.
What Can They Eat?
Many sources online recommend not feeding a whole laundry list of things to worms. In general, worms can eat anything organic, but most people avoid feeding meat or dairy products to the worm bin as they have a much stronger and unpleasant scent and can attract insects like flies. Stick with things like fruit and veggie scraps, old leaves, or grass clippings. We have additional information on what to feed worms if you need it!
Generally speaking, if the worms won’t eat something, they ignore it, and you’ll quickly learn what they’ll eat and won’t eat just by seeing what’s left in the bin.
Feeding Methods
Two methods are commonly used for feeding worms: flat feeding and pocket feeding.
In flat feeding, you place a layer of food on the surface of the bedding, covering it with additional bedding if desired to keep pests at bay. Try to keep this layer of food less than an inch thick at any specific point when possible, as too much in one spot means it will take longer to break down. This method is especially popular with those who feed a dry worm chow when they don’t have other fresh food scraps to feed.
Pocket feeding allows a new worm composter to control and see the results. In this method, you make a pocket in one corner of the bin and feed there once a week, providing all the food the worms will need for the week at once; cover the food with more bedding. The next week, move one corner over and make another pocket, feeding there.
Repeat this process each week until you’ve filled all four corners with pockets of measured food by weight. When you finally return to the first pocket you fed, all the food there should have been consumed, and you can feed again at this corner. This method ensures the worms work circularly around the bin. If desired, you can add a fifth pocket in the center of the bin to ensure they work the middle, too!
Worms will eat half-composted stuff from other composting methods like tumblers or regular compost piles, so there’s no need to preserve excess food scraps by freezing or storing them. Let nature start to break them down and then feed the half-composted material to the worms!
Maintaining Your Worm Bin
 Keep your worm bedding damp but not soaking wet, and maintain temperatures between 60 to 75 degrees Fahrenheit.
Worms must have access to both moisture and air simultaneously. This generally means you must keep your bedding damp but not wet. Worms need water against their skin to stay hydrated. Too much water, and they lose access to oxygen and die. Add more dry bedding to soak up extra moisture when needed. Adding extra bedding while feeding a particularly wet food like melon is often a good call.
Troubleshooting
When worms die en masse, the stench is horrific, so it’s important to avoid that! And it’s not just moisture or air levels that can cause a worm die-off. Here are a few critical issues to watch for:
Excess heat or cold can kill your worms. Red wigglers can tolerate the most heat at up to 85-90° F, although the hotter it gets, the more likely they’ll try to escape. European nightcrawlers don’t like it to be over 80° F.
Red wigglers can survive temperatures down to 40°F. European nightcrawlers and blues like it 50+ at all times.
The “ideal” range for most worm species is to aim for 60-75° F at all times. Keep the bin out of direct sunlight, especially in summer. In the winter, provide insulation by bringing the worms into the garage or indoors.
Try to avoid digging through the worm bin too often. While many people like to check on the worms, imagine how you’d feel if someone went and rummaged around your home, throwing everything everywhere. It’s similar to a happy worm colony in their worm bag. The less disturbance you provide to the worms, the better they can do their job!
If worms are trying to escape the bin, there is a reason they’re doing so. Pay attention to what your worms are doing. Worms hanging out above the bedding on the sides of the bins are likely either too hot, too wet, or don’t like some food you’ve added. Think about what you’ve put in the bin recently, and if you don’t believe you’ve added anything problematic, look at temperature and moisture to troubleshoot why they’re trying to break free.
Finally, if there’s no drainage, leachate from food waste can pool in the bottom. This will become anaerobic and start to smell bad. If liquid is sloshing around the bottom of the tote, gently slide some of the bedding out of the way and add dry bedding to absorb the moisture in the bottom of the container. Then, reduce wet food scraps for a week or so.
Harvesting the Compost
 Harvesting the castings from your worm farm is the pinnacle of the worm wrangler’s journey.
There are multiple ways to harvest worm castings. While we have an in-depth article that provides insight into four different ways to harvest, I will focus on two widely used methods, one for the Urban Worm Bag and the other for a standard plastic tote-style bin.
The first method is for the worm bag. As this is a continuous-flow system, you’ll add the food scraps and bedding to the top, and as the worms process it, the vermicompost sinks to the bottom. 4-6 months after starting your worm bin, you should first be able to harvest a decent amount of castings. Place a large container, like a concrete mixing tray, on the floor under the bag.
Open up the flap and loosen the drawstring at the bottom of your bag, exposing the castings inside. With your hand, start scooping out the finished vermicompost. When you see identifiable bedding or food scraps, stop harvesting and close up the bottom. Any bits of unfinished compost can be tossed back in on top, and this harvest style reduces the likelihood that worms will end up in the finished material.
When harvesting a plastic tote, two weeks before you harvest, start feeding only one-half of the tote. This will attract most of the worms to that side of the bin. Once they’ve migrated to the food side, pull back any unfinished material and harvest the finished compost on the worm-free side. Add some fresh bedding and gently level out the remaining contents.
There are other methods you can use, but these two are simple and a great starting spot for new worm composters!
But What About the Smell?
 A healthy worm bin shouldn’t smell, but if it does, there’s an issue to fix.
An aerated, healthy worm bin should not have a smell. If it does, it should smell rich and earthy. Anything that smells foul indicates that you have a problem.
The things that can stink the most are an excess of leachate that’s gone anaerobic, an excess of food that’s started to rot and smell because the worms didn’t eat it fast enough, or a complete die-off of your bin. Clearly, you don’t want any of these things to happen!
Most things won’t cause a big stink, but even a small stink can cause a problem, particularly in an outdoor bin. You risk attracting flies or fruit flies to your bin at that point. These will lay eggs in the bin and will start seeing fly or fruit fly larvae. These can become infuriating, but while they’re not a risk to the worms, they’re certainly an annoyance to us as humans.
Prevent and Fix Odor Causes
For outdoor bins, skip things that can have a pungent aroma while decomposing. This doesn’t just mean meat and dairy (the two biggest offenders in this regard, which produce a really bad smell), but also some brassicas like broccoli or large chunks of onion. Provide smaller bits of these types of plants to reduce aromas.
Finally, cover all your feedings with bedding and maybe an additional cover. I can’t emphasize this enough. I use an Urban Worm Blanket in my bin. This jute cover provides two important functions: one, it reduces evaporation from the bedding, keeping things consistently damp below, and two, it prevents fruit flies or other insects from reaching the food underneath.
If you bury your feedings in the bedding, you’ll reduce odors, and the blanket on the surface above the bedding adds another layer of protection. If you don’t need this specific product, use a sheet of burlap or other natural fiber to cover the top of the bin.
Vermicompost in Your Garden
 Mix your castings into potting mixes or place them under transplants.
Worm castings provide a few major benefits for your garden:
Worm castings do provide some nutrients. One study performed by Trent University in Canada established that a ratio of 15% worm castings to 85% peat moss provided enough nutrient density to support basil plants for their eight-week test study.
However, it should be noted that basil is not a heavy feeder, plus these were younger and smaller plants. The NPK value of worm castings varies widely depending on what you might have fed the worms. Most commercial castings in the US are marked as extremely low NPK ratios and should not be relied upon as a sole fertilizer, particularly for hungry plants like tomatoes.
Even if castings are not the dream fertilizer they’re made out to be online, that doesn’t mean they don’t benefit your garden. What castings do hold is a ton of beneficial microbial life. This microbiology can help your plants. In addition, worm castings can hold up to ten times their weight in water, meaning they’re like a sponge for the soil. Organic matter is a great soil additive that reduces compaction and breaks up clay-type soils.
How to Use Worm Castings
I like to add a small handful of worm castings underneath tomato plants when I transplant them into my garden. This puts the castings right at the root level, where they benefit the plants most. Similarly, I’ll work a small quantity (usually between 10-15%) into a potting mix to provide added moisture retention and improve the organic content of the potting blend.
Avoid going over 15-20% worm castings by volume in any potting mix. Once you get past about 15%, there are no added benefits, but the more worm castings you add, the more moisture the growing medium will hold. A higher volume of worm castings can create an environment where damaging fungi can thrive, posing a risk of root rot or other fungal infections for your plants.
Some people like to top-dress with worm castings, but this does not use them to their full potential. Castings on the surface rapidly dry out and do not act as the little soil-improving sponges they are. To add castings to an established planting, use your fingertips to work them under the surface.
Is Vermicomposting Worth it?
 Vermicomposting produces a powerful soil amendment that can help plants thrive.
Whether worm composting is worth it depends on how much effort you want to put into your compost routine. If you, like me, would prefer not to go out and hand-turn a large compost pile every week, checking it regularly and hosing it down to ensure it hot-composts ideally, worm composting may be your solution.
Worms can thrive on neglect, and you often don’t need to check on them more than once a week (maybe twice in hot weather to ensure they have enough moisture). They don’t like light, prefer the temperatures we often maintain in our homes, and don’t need much space.
In most cases, worm composting is a set-it-and-forget-it solution that works great for people who want a simple solution. It’s one of the only small-space solutions for apartment dwellers that works well indoors! And kids find the worms fascinating, too; if you’re trying to build a budding naturalist, teaching them all about worms and how they consume our garbage is a great first step.
Worm composting is not my only composting method, but it’s one of my constant ones year-round. My worm bin lives next to my kitchen and is easily accessible when I need it; if I have an overage of compost, it goes out into my compost tumbler or stationary bin, and the worms will eat it later when I’m short on fresh scraps.
So, for me, vermicomposting is worth it; I’ve been composting with worms for nearly two decades. It’s a simple, effective solution that may take a little work initially but yields great rewards over time: an abundance of black gold to use in the garden!
Final Thoughts
Vermicomposting may not be your only solution, but it certainly is a great method of composting that works well with most gardening. Don’t be squeamish about having a bunch of wiggly worms in your house or garage; these tiny little creatures produce an abundance of useful organic material that will help your garden to grow!
But if the idea of keeping worms as composting pets is off-putting, consider purchasing worm castings as fertilizer for your garden to reap the same benefits.