A few sights will make any houseplant parent shiver – the drop of a leaf, the gentle flutter of a fungus gnat, or, worst of all, the signs of root rot.
This common disease is often found in houseplants or container plants outdoors. The primary causes are oversaturated soil and lack of airflow. This encourages various harmful fungi to settle in and attack the roots.
If you’re concerned about root rot in your houseplants, don’t panic. As long as you catch it early, there is a path to revival. Follow these seven steps if you suspect a case of root rot in your houseplants.
Make Sure It’s Root Rot
Before treating any issues, ensure you correctly identify the issue.
Before you start to panic or begin any treatment process, make sure you have identified root rot as the problem.
Several signs to look out for include wilting, yellowing leaves, and mushy stems. However, root rot isn’t the only cause of these issues. Wilting is usually a sign of underwatering rather than overwatering. Yellowing has a long list of causes (from nutrient imbalance to old age). Mushy stems can be caused by pest problems unrelated to soil conditions.
If you follow the steps in treating root rot when it is not the cause, you will only increase the stress on your plants. This can worsen the problems. Not only that, but you won’t have resolved the actual root cause, meaning your houseplant likely won’t return to normal.
The best way to confirm is to check your plant’s roots up close. Houseplants with root rot will have soft and mushy roots that are dark or even black in color. They will also smell bad, especially if the problem is severe.
Don’t be afraid to do a close inspection. Check whether the signs above the soil are the result of fungus or some other care issue. If you’re sure root rot is the cause, you can move on to the next steps. If not, do some detective work to find the error in care or environmental conditions to resolve the problem.
Trim The Roots
 The disease affects roots, and you must completely remove the fungal infection by using sharp pruning shears to cut out affected areas.
Soggy conditions and lack of oxygen may cause root rot, but rectifying those concerns won’t remove the rot altogether.
The disease is primarily caused by fungi (usually Pythium, Phytophthora, or Fusarium) residing in the soil and attacking the roots. As sections die off and rot, the issue spreads to healthy areas until all roots are affected. You must remove the fungal disease completely to stop it from spreading to presently unaffected parts of the plant.
To do this, all you need is a sharp pair of pruning shears. Avoid blunt scissors – you want to make clean cuts to allow the plant to heal quickly.
Take the plant out of its current pot and remove some of the soil to get a closer look. Don’t worry about keeping the soil around; you’ll get rid of it later. Identify the sections where rot is visible and cut back to the point of healthy growth, removing all infected areas. Continue trimming until only healthy, firm roots are left.
If all roots are affected, it’s unlikely that you’ll be able to save the plant. Instead, identify remaining healthy cuttings above the soil to trim off and root in water if you want to keep growing, or cut your losses and discard the plant. As tough as it may seem, it’s often better to simply purchase a new healthy plant and save yourself the stress of trying to revive a dying one.
Dry The Roots
 After root trimming, allow roots to partially dry out before repotting.
After you’ve trimmed and are sure all signs of rot are gone, wash them under water to remove any remaining soil. Fungi can stick around in old soil, potentially spreading again once you’ve repotted.
After rinsing, allowing the roots to dry out a little before repotting is best. Sitting in an excessively moist environment probably led to the issue in the first place, so thrusting them back into a moist environment immediately won’t help with stress.
You don’t need to leave them out for days to dry completely. This will probably do more harm than good anyway. Wait a couple of hours – less than a day – until the roots are dry to the touch and don’t feel soggy before repotting.
This is most important for succulent plants. These plants prefer dry conditions over wet ones and can be left out to dry for much longer than tropical houseplants before replanting.
Sterilize The Container And Shears
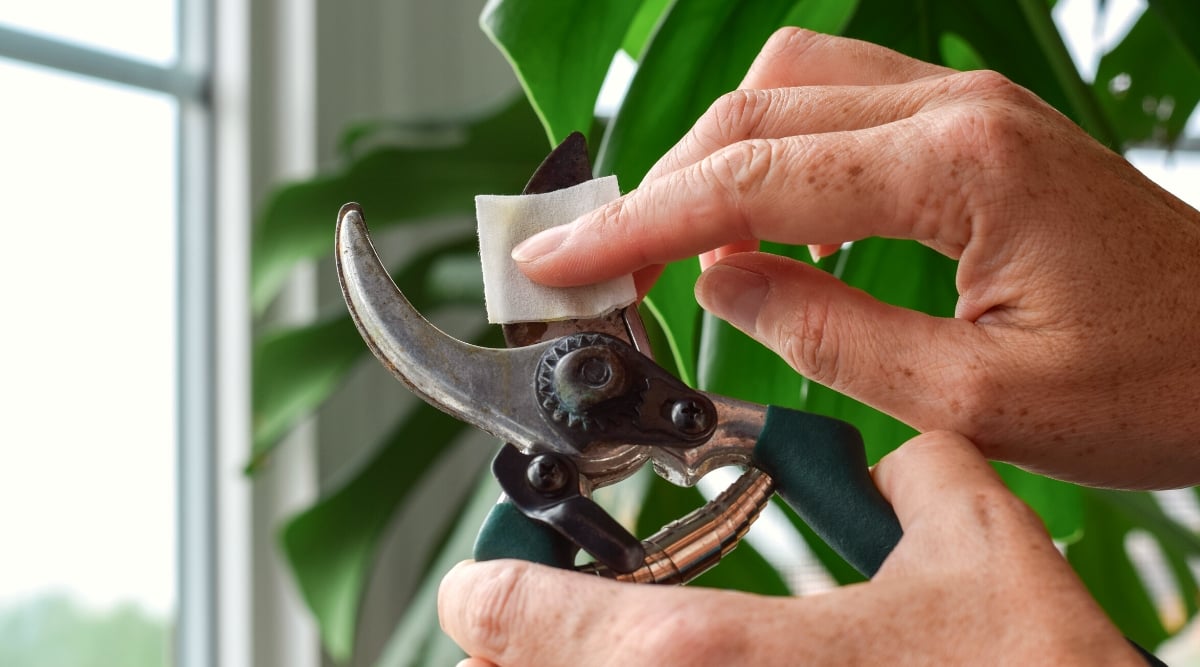 Cleaning prevents the reintroduction of pathogens.
While you’re waiting for the roots to dry out, you can tackle some other essential chores. Namely, cleaning the plant’s container and the pruning shears you used to trim the affected roots.
As unlikely as it may seem, the fungus that causes root rot can stick around on the pot or shears after use. Without cleaning the container, you risk reintroducing the problem to the affected houseplant, even if you’ve adjusted your care. The concern is worse for your shears, as you may unknowingly spread disease to completely different houseplants that weren’t a concern to start with.
Fungal spores are tricky to tackle, so don’t assume if you can’t see a problem that it’s not present. To be safe, clean the container before repotting it with a diluted bleach solution. You can also use this to disinfect your tools, wiping them down with a cloth. A 10% bleach solution is the most commonly recommended for tackling fungal issues.
After cleaning, rinse the pot and your tools with water to remove any remaining bleach residue. Allow both to dry before using them again.
Change The Soil
 Replace the soil with a well-draining mix to reduce sogginess.
Next, you’re ready to repot. There should be no trace of the old soil left around the roots or in the container to avoid harboring harmful bacteria. It’s also important to replace the soil carefully to prevent issues in the future and limit stress and shock after planting.
Most houseplants require airy, well-draining potting soil to grow successfully. This makes up for the limited evaporation indoors, allowing air to flow around the roots and excess moisture to drain away. Unless you’ve planted in a pot with no drainage holes, lack of drainage in the soil is probably the reason why you’re dealing with root rot in the first place and an essential problem to fix. And if your pot doesn’t have drainage holes, swap it for one that does!
Regular potting soil is usually too dense for most tropical houseplants. Instead, amend a potting mix with coconut coir and perlite to lighten the mixture and increase the spaces between particles, boosting drainage and airflow. My standard mix is two parts potting soil, one part coconut coir, and one part perlite, adjusted according to the needs of the specific plant.
Succulents are slightly different. They generally prefer gritty soil that doesn’t retain as much moisture as tropical houseplants. In these cases, you’ll want to look for a specialized succulent and cactus potting mix to provide the conditions these plants prefer.
Getting the new soil mix wrong will make it harder for your houseplant to adjust and may increase your risk of rot in the future. Ensure you get this step right according to your plant’s needs to prevent further damage.
Don’t Fertilize
 Don’t rush to fertilize your recovering plant; it can hinder its recovery process.
To boost new growth in the dying houseplant, panicked owners often apply fertilizers, believing that the additional nutrients will help the plant recover faster and return to normal. However, the opposite result is usually the case.
Root rot and the subsequent trimming and repotting is an incredibly stressful experience for your houseplants. For them to return to normal growth, they need time to adjust to their new conditions and recover completely.
Fertilizers will interrupt this process rather than help it. The roots will focus on recovering and new growth, absorbing fewer nutrients than usual. The excess nutrients can cause further root damage, especially if you use more than the packaging recommends.
If you’ve planted in high-quality houseplant mix, the soil will contain plenty of nutrients for the plant to use up over time. Wait for the roots to recover completely and for new growth to appear before you consider fertilizing again.
Prevent Future Issues
 Never water if the top layer of soil is still damp to the touch.
Once you’ve gone through the entire process of attempting to bring your plant back to life, you don’t want to repeat it all again, making the same mistakes.
Preventing root rot is far better than treatment, especially considering this problem is not always treatable. Make sure the container you’ve planted in has enough drainage holes and that the soil drains well enough for the houseplants you are growing.
Watch your watering schedule closely, and never water when the top layer of soil is still wet. The right time to water will differ depending on your plant and environmental conditions. However, it’s typically best to err on the side of underwatering rather than overwatering. One problem is much easier to fix than the other.
Finally, if you do accidentally overwater, don’t rush to go through these steps in a panic. Light overwatering won’t always lead to disease. Inspect the soil closely for signs of a problem before tackling it. If not, you may just need to let the soil dry out a little more between waterings.
Final Thoughts
Root rot is not a fun condition to treat, but it’s also not impossible to resolve if you catch it early enough. Follow these steps as soon as you spot a problem, and your houseplants will return to normal in no time.