Whether it’s pests, diseases, or physiological conditions, garlic-growing problems are no fun! They’ll threaten your coming harvest and turn turgid cloves into mushy messes. The best way to have problem-free garlic is to practice healthy garden methods that encourage strong, resilient plants. If this doesn’t work, mitigation strategies help minimize the damage and prevent it from happening again.
Garlic is aromatic, hardy, and resilient to most pests and diseases. You may be fine growing garlic while other fussy crops like tomatoes or cabbage struggle. Whether or not you experience growing problems depends on your garden’s climate, ecoregion, and the species you’re growing.
For best results, select disease-free cloves from reputable sources to start. Grocery store garlic sometimes has growth inhibitors that growers spray to keep cloves from sprouting. This helps them last longer in the store but prevents them from thriving in your garden’s soil. If you have patience, try starting garlic from bulbils for exponential harvests!
No matter what’s plaguing your cloves, there are prevention and management strategies that can help them get back on track. Here are the 15 garlic growing problems you should watch for during the growing, harvesting, and curing stages.
Yellowing Leaves
Nutrient shifts occur as plants focus on bulb growth.
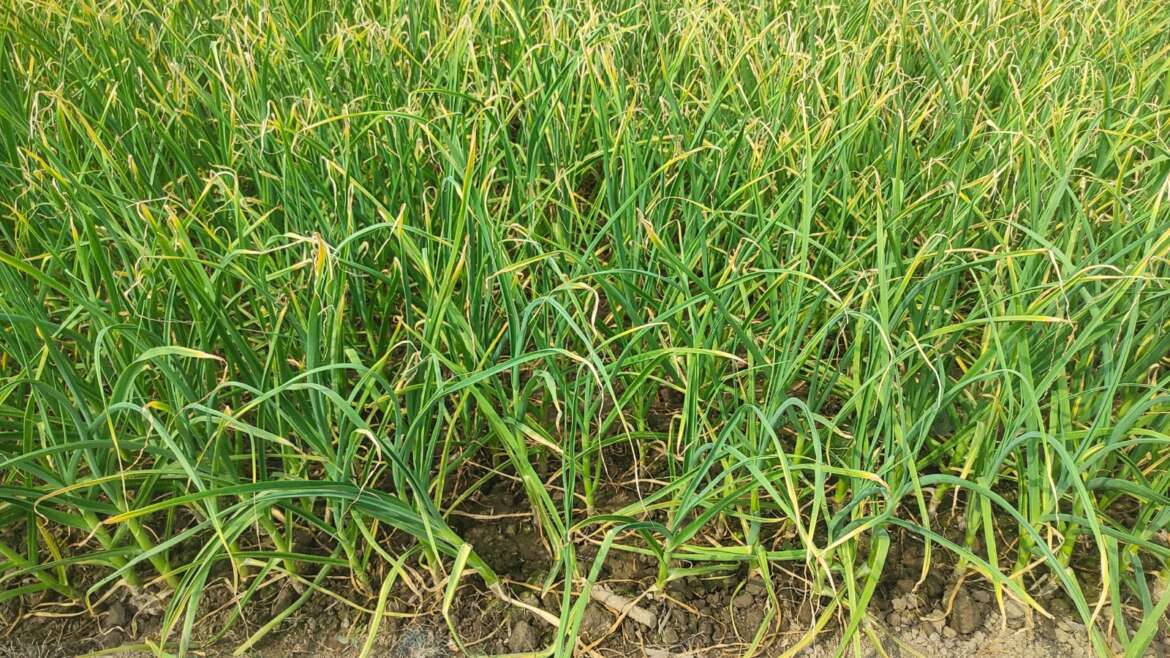
Yellow leaves are a normal part of garlic’s growth cycle. Summer heat triggers the plants to produce scapes and bulbs, then yellow their leaves. This yellowing happens because the plants suck in all the nutrients from the leaves to make bigger bulbs. For every yellow leaf on a plant, there will be an equivalent layer of papery skin on the bulb.
Yellow leaves are not normal when they occur early in the growing season. This may be from overwatering, standing water, or pests. Mushy yellowing leaves are especially troubling, as they point to growing issues below ground.
Identify yellowing, decaying leaves as a problem if they occur in early spring or summer. You’ll notice yellow tips, yellowing on outer leaves, or entirely yellow leaves. Depending on how the yellowing occurs, it could be a nitrogen deficiency, a disease, or an issue from overwatering.
Prevent yellowing leaves by growing garlic in free-draining, fertile soil with lots of organic matter. Water is one of the most common causes of this problem, as too much can drown young cloves. Without access to air, their roots may suffer, wither, and die. Practice good watering routines by applying water when the soil dries out. Don’t let it get bone dry, but wait to water until the first one or two inches of soil dries on the surface.
Garlic needs nitrogen for green leaves and plenty of phosphorous and potassium for big bulbs. Apply compost regularly to the site, and practice crop rotation every year to discourage disease and pest buildup.
If the leaves are yellowing early in the season from the tips, and growth is weak overall, your plants may have a nitrogen deficiency. Apply a regular dose of high-nitrogen fertilizer every two weeks until the yellowing disappears. If entire plants are yellow and die in spring, it’s most likely an issue with rot, mold, or overwatering. We’ll learn about rots and molds below, and how to banish them entirely from your garden!
Crunchy, Brown Leaves
 Crunchy leaves indicate dehydration or possible plant pathogens.
Crunchy, brown leaves are also a normal part of the garlic life cycle, unless they occur early in the growing season. When you harvest and hang cloves to dry, their leaves will dehydrate and turn crunchy—they’ll also dry up if you leave cloves in the ground instead of harvesting them in late summer or fall.
If your cloves sprout leaves that quickly fade and decay, they could be thirsty or dealing with a plant pathogen. This often occurs in early summer as temperatures warm and rainfall decreases. Without extra irrigation, most garlic varieties will suffer.
Crunchy leaves are a problem early in the growing season. They signal that the cloves underground are struggling to survive. You’ll notice yellowing or browning starting at the leaf ends and continuing down their stalks. Outer leaves dry first, then the inner ones follow suit.
Prevent crunchy leaves by maintaining moist, not soggy, soil. Garlic is drought tolerant once it establishes itself, but appreciates regular water during the growing season. Compost or mulch layers on the root zone also keep your cloves happy, as they’ll have more access to moisture, nutrients, and pest resistance.
Remove brown leaves by pruning them off at the base of the plant, and leave any green or partially yellow leaves on the plant. If your garden beds are dry, water readily so the ground is moist but not soggy—maintain adequate moisture levels to prevent more leaves from drying out.
Overcrowding
 Proper spacing ensures healthy growth and full-sized bulbs.
This common problem occurs often when gardeners plant bulbils or small cloves close together in the fall. Although it may look like they have plenty of space to swell and divide into full bulbs, they may grow into each other and prevent full bulbs from forming, or it’ll cause misshapen ones.
Weeds also cause overcrowding, as their roots penetrate the soil near your precious garlic. They take up nutrients and water, preventing these resources from reaching your cloves. Maintain a weed-free garden bed, and plant cloves according to their spacing recommendations. Most need two to three inches or more distance between each clove for optimal harvests.
Overcrowding symptoms are easy to identify. You’ll notice cloves sprouting near or on top of each other, with lots of leaves poking out in a small space. Without enough space, garlic develops oddly formed, small, and weak rounds or bulbs.
The best way to prevent overcrowding is to space cloves out according to their planting instructions. Most varieties need two inches or more between each one, while bigger types like elephant garlic need at least eight to twelve inches. When buying seed garlic, look to the package or planting instructions for optimal spacing requirements that match the kind you’re growing.
If overcrowding is happening now with your garlic, you’ll want to pull up all the weeds in the space first. This will give you a better vision of how close the sprouts are to each other. If they grow closer than two or three inches near each other, pull up a few to let the rest have proper spacing. Use the pulled garlic fresh, chopping the leaves and small cloves into sauces, soups, and salads.
Weak Growth
 Low soil nutrients can cause weak growth, so enrich your soil.
Maybe your crop is growing green leaves but there are few, or they’re incredibly weak. Weak growth is a primary indicator of low nutrients in the soil, or of your garlic’s inability to draw up nutrients from fertile soils. No matter which it is, it’s easily correctable and preventable so you can salvage your harvest this year.
Annual weak growth is a sign that your dirt is nutrient-poor. Garlic needs nitrogen, phosphorous, potassium, and trace minerals like calcium and magnesium. A soil test is an excellent way to see what nutrients it needs, as well as how healthy your dirt is. It’s helpful if you are growing in a new home or garden, as it removes the guesswork of soil analysis and amendment.
Cloves experiencing nitrogen deficiencies sprout green leaves with yellow tips. If they continuously experience low nitrogen, growth will be thin, weak, and have an overall green-yellow tint. If other crops nearby exhibit weak growth, it’s probably a soil nutrition issue. If your garlic is the only crop with problems, it could be from watering infrequencies, the soil type, or low nitrogen.
Prevent most nutrient deficiencies by applying organic mulch like compost to the site annually. Organic amendments decay on top of the soil, adding minerals, worms, and microbes to your garden. If the amendment doesn’t add nutrients, the microbes it introduces will help increase nutritional availability each season.
If your crop has yellow leaf tips and weak growth in early spring or summer, apply a balanced organic fertilizer and see if the issue disappears. Avoid repeat applications of fertilizer, as garlic is typically a light feeder. If the leaves are yellowing or weak and it’s midsummer or later, simply leave them be. They naturally die back as cloves swell, dry, and mature.
Odd Harvests
 Single, large cloves can result from planting at the wrong time.
Did you encounter single, large cloves the size of bulbs when you harvested this year? This happens often if you plant softneck garlic later than fall or winter. Cloves use cold temperatures in these seasons to split up into multiple ones—when they grow in spring, they swell and create mature bulbs.
Rounds are single cloves that didn’t divide. If you plant during spring, they won’t have cool temperatures to divide themselves, but they’ll still grow and swell to create rounds, or “snow garlic.” You can still eat, cook, and preserve rounds the same way you would cloves. They have a mild flavor, with soft hints rather than strong pungent tastes.
Your aromatic bulbs may grow odd if they come from a bad seed source. Avoid planting grocery store garlic, since it may have growth-preventing hormones. Always source from a reputable seed seller that has disease-free, hardy cloves.
Rounds, or snow garlic, form when you plant softneck garlic later than fall or winter. You’ll notice rounds the size of bulbs when you pull your harvest out of the ground. A bad source of seed garlic manifests with slow growth or none in early spring, and a heavy presence of pests and diseases throughout the seasons.
Prevent abnormal growth by sourcing seed garlic from a certified reputable source, and by planting your cloves at the right time for your season. Fall through early winter is ideal in most regions with winter frost. If you garden with warm temperatures year-round, keep your cloves in the fridge for three months before planting them during the coolest months.
Once you notice your harvest is odd or misshapen it’s unfortunately too late in the season to correct it. If your grocery store garlic produced some small cloves, try planting those again in the fall. Their growth inhibitors should wear off by their second year, and you can grow them as you would any other variety.
Use single, large rounds in the kitchen, or plant them during autumn for larger harvests next summer. They’re milder tasting than small ones and work well in honey infusions, fresh recipes, and marinades.
Broken Stems
 Harvest with care to prevent damaging delicate bulb tops.
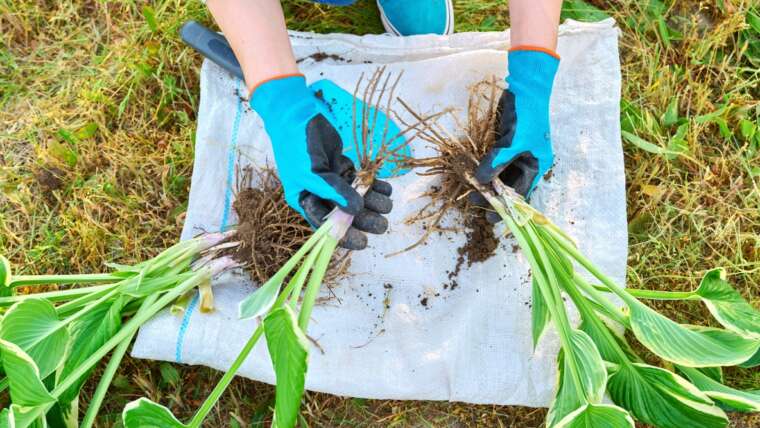
The first thing you’ll want to do when you harvest garlic is pull it out of the ground. I did the same thing when I first grew this vegetable out of sheer excitement. I found that the softneck varieties’ tops would split from the bulbs! This made harvesting even more difficult, as I had to dig up the bulbs without injuring them with my hard, metal trowel.
Hardneck varieties may pull out of the ground without issue, depending on your soil type. If they’re below thick layers of clay soil they won’t have the strength to stay connected. Wait to pull, and follow these instructions instead for best results.
Mark all the softneck varieties in your garden when planting so you know to harvest them differently than hardneck types. If you deal with clay soil, know you can’t pull any of your crop’s tops and will want to harvest using this simple method.
Prevent breakage by lifting the bulbs with a pitchfork, rather than pulling them from their tops. Stab the soil below the garlic so as not to injure it, then gently lift upwards until it comes free. Amend clay soil by adding compost to the site twice annually, or more if you’d like!
If you broke the stems already, worry not! Simply dig a deep hole a few inches around where the stems were. Work slowly and move the dirt away so you can spot the cloves while digging. By excavating around the perimeter, you’ll avoid stabbing the garlic while trying to uncover it.
Frozen, Heaving Soils
 Apply mulch to protect bulbs from winter upheaval.
If you live in hardiness zones 6 and below, freezing winters may cause your soils to heave. The constant freezing and unfreezing during cold months push the growing plants out of the dirt, where they freeze and wither. The plant itself is incredibly cold hardy, however, it struggles to deal with heaving soils.
You’ll find uprooted cloves from late fall through spring when freezing temperatures become more common. It’s more common after recurring freezes and thawing periods. You’ll see seedlings poking out of frozen soil, or bulbs pushing out of the ground.
Avoid this issue by adding a thick layer of organic mulch or compost to the soil after planting. This keeps young bulbs warm, well-watered, and safe from frozen upheavals. As spring approaches and frost dissipates, you may pull back the layer of mulch to help your soils warm up, which leads to faster shoot growth.
If it’s late in spring, place the upheaved cloves in a container with fresh soil. If it’s fall or winter and the ground is workable, dig and plant them again. They’ll grow well if they don’t have any clear signs of disease or rot. Add a thick layer of organic mulch on top to prevent future heaving.
Bulb Rot
 Prevent fungal diseases by practicing good soil management.
Bulb rot most commonly occurs from two fungal diseases, white rot and fusarium basal rot. White rot is a common fungal infection caused by the Stromatinia cepivora species, while basal rot is from Fusarium oxysporum species. Both cause leaf yellowing, mushy cloves, and weak growth. They’ll either harm your plants during the growing season or curing and storage.
These two fungi thrive under cool, wet conditions. Where garlic lives in clay or dense soil, the pathogens may be more prevalent as your plants struggle to stay disease-resistant. The best strategy for these rots is prevention, as they’re extremely difficult to eradicate once present.
Both rots have similar symptoms. You’ll notice:
- Weak, slow growth
- Mushy garlic with white growth on cloves
- Tiny black seed-like structures
White rot differs from fusarium basal rot because it forms tiny, black structures around the white mycelia that are like seeds. They stay dormant in the soil until they sense favorable growing conditions.
Prevent both of these rots by sourcing disease-free cloves or bulbils when planting. Practice safe gardening methods by sanitizing your tools often, especially after using them on diseased plants. If you sense these diseases starting to spread, pull up a garlic or two to inspect them. Remove any infested plants and dispose of them far from the growing site.
Both white rot and fusarium basal rot are difficult to eradicate once they start growing in your soils. Begin by ceasing growing onions, garlic, or chives in the region. Allium species can spread the disease, and reducing host plants helps starve the fungi.
If you want to try growing this vegetable again, use disease and pest-free cloves or bulbils. Start practicing crop rotation, as it’ll further discourage the fungi’s return. Crop rotation is a simple technique—plant all of your annual crops in the same family in different areas each year. Start by planting Allium species in new locations every year until the rots disappear.
Gray Mold
 Prevent wet conditions to protect plants from fungal infections.
Whereas bulb rot occurs from the bulb upwards, gray mold starts in the neck and moves downward. This is why it also goes by the name neck rot. The stem will be soft, mushy, and wet because of a fungal infection caused by Botrytis porri.
Other gray mold species infect strawberries, tomatoes, peppers, and corn. In mature growths, you’ll notice tiny black structures inside stems that indicate mold reproduction. This pathogen is common during fall or spring in wet, densely packed soils.
Gray mold occurs in wet, cool conditions, and is especially prevalent in clay soil. It starts softening the stems, causing yellowing leaves and floppy necks. Old infestations will have black fungal spots and lines inside the stem that can spread the fungus to nearby specimens. In extreme cases, the entire plant will die and fall to the ground.
Keep this wet-loving mold away by adding a thick layer of compost or another organic mulch around the garlic’s root zone. This helps maintain even moisture, and it keeps plants happy by introducing beneficial bacteria, fungi, and archaea. Reduce watering if using irrigation, and water once the soil is dry one or two inches down.
Reduce future infections by pulling any infected plants now. Dispose of them away from your beds, and reduce watering to weaken the fungus. If all of your bulbs have this disease for the first time this year, they may have already contained the infection when you purchased them. Use disease-free seed garlic from a reputable source to avoid introducing it.
Blue Mold
 Maintain dry conditions to prevent mold from spreading.
Unlike most other molds, blue mold doesn’t persist in soils. It lacks overwintering bodies that keep it safe and secure despite winter cold. This mold comes from fungal pathogens in the Penicillium genus, and it looks like gray-blue powdery growth.
Blue mold spreads through the air when infected cloves receive disturbance. Breaking or planting them causes wafts of spores to float around, where they then land on susceptible hosts. They infect healthy garlic through wounds, broken wrappers, and uncured stems. Although troublesome, this disease is easier to thwart and banish than most other molds and fungi.
You’ll notice blue mold during harvesting and curing. You’ll notice powdery gray-blue mold growth on bruised, broken, or cracked garlic heads. Once an infection takes hold it starts to spread throughout the head. This pathogen spreads mainly through infected cloves that gardeners plant. We’ll effectively prevent and remove blue mold by carefully inspecting and organizing our harvests.
Prevent blue mold from occurring by keeping soil moisture low during the final days before harvesting. Penicillium fungi prefer moist, warm conditions with low airflow, so plant your crop where they can dry under full sun with occasional wind. Continue to prevent blue mold by removing any diseased or damaged cloves during harvest, and by curing the heads quickly before infections can take hold.
Because blue mold spreads through infected harvests, you can remove this disease from your garden by removing any infected heads. It’s impossible to save them if they already have this mold, but you can prevent future infections. Don’t plant any heads that have signs of mold or disease. Keep your dry harvest safe by storing it in a cool, dark location. If you remove blue mold before it spreads, you shouldn’t have to deal with it next year.
Rust
 Keep plants healthy and rotate crops to prevent rust.
Rust looks like how it sounds—it manifests in orange-brown spots on garlic’s leaves and stems. You’ll see orange powder that resembles rust that forms on oxidizing metals. This “rust” is a fungus, like blue mold, and it infects susceptible plants like onions, garlic, and chives from the Allium genus.
Some onion plants are more resistant to rust than others. If rust is prevalent in your area, try growing elephant garlic instead. It holds up well to rust, and it produces giant, mild-tasting cloves that lend their flavor well in a variety of recipes like soups, casseroles, and oven-baked dishes.
Rust manifests as orange spots and markings on stems and leaves. Small patches form first—with time, they morph into larger patches and spread to other plants nearby. Rust returns year after year by overwintering in soils on onion family crop debris.
Prevent rust by practicing healthy cultural practices. Use disease-free seed garlic when planting, and remove any diseased plants from the onion family when you see the first signs of infection. Use well-draining soil, and ensure the heads don’t sit in standing water. If rust is present this year, grow your Allium species in a new area next year, and practice crop rotation every two to three years thereafter. Proper spacing also prevents this fungal disease.
Rust is difficult to remove once it takes hold, but it rarely affects your harvests. Extreme infections may harm your yield if they spread unchecked—use an organic fungicide in these cases. Start by removing damaged leaves. Sulfur or copper fungicides work well at removing rust that persists even after pruning. Continue applying it according to the package’s instructions for effective treatment.
Thrips
 Maintain moisture and encourage beneficial insects to deter pests.
Thrips love greenhouses and indoor conditions. They thrive with bright light, warm temperatures, and dry foliage. They’re tiny little hopping bugs that lay eggs inside leaves. This is why thrips are difficult to eradicate, as most surface insecticides target adults but struggle to harm their eggs.
Thrips are mostly a cosmetic problem that won’t harm your harvests. Grow garlic outdoors without the protection of a greenhouse, and predatory insects will target the pests for you. This pest spreads from other leafy plants like peppers, tomatoes, and onions, so grow them away from your beds to protect your harvest.
Thrips are tiny bugs smaller than a centimeter with yellow-green hues. They scatter when you disturb them, hopping about from leaf to leaf. Watch for adults and nymphs jumping about, and eggs in little markings on the leaves.
Prevent thrips by watering regularly during the growing season. Dry, stressed plants are more susceptible to these pests. Add compost or an organic mulch on top of the soil to inoculate your garden with disease and pest-resistant microbes.
Remove thrips from your plants by spraying their leaves with water daily. The wet conditions should discourage them from returning, and it’ll let predatory insects feast on them without getting hurt. Only spray organic pesticides like neem oil in extreme cases, as they also harm the good bugs. Spray during the morning or afternoon to avoid harming pollinators while they’re most active during the day.
Bulb Nematodes
 Use disease-free seeds and crop rotation to safeguard plants.
Nematodes are tiny little wormlike creatures that crawl into heads and feast on young garlic. They threaten the health of the entire plant, causing yellowing leaves and rotten bulbs. If the nematodes don’t kill the plants, secondary rot organisms like molds infect the wounds.
Nematodes travel from wet, cool soils and enter susceptible bulbs. They lay eggs that hatch into baby nematodes that feast on your crops. Once they’re in your soil they’re difficult, but not impossible, to eradicate.
Bulb nematodes are tiny and difficult to see with the naked eye. You’ll notice your plants’ foliage yellows, wilts, and dies. Pull up infected heads and you’ll see tunnel markings on rotting cloves. Mold, fungal, or bacterial infections may invade wounded tissues.
Always use disease and pest-free seed garlic from a reputable source. Nematodes often enter gardens from foreign soils, plants, and tools. Clean your tools regularly, and only import soil you know is nematode-free. Radish, mustard, and Siberian kale have natural compounds that keep nematodes away—use them in compost or dig them into your garden beds for an organic pest solution.
Remove infested heads as soon as you spot nematode damage. Next year grow your onion relatives in a different site away from the infestation. They can survive dehydrated below ground, so you’ll want to wait four years or more before planting near the original site.
Bulb Mites
 Healthy soil and pest-free seeds promote vigorous plant growth.
Bulb mites are nasty little critters that eat the space between the roots and bulbs. They cause weak, stunted top growth and root rot below ground. Few chemicals work on them, but healthy gardening practices prevent and thwart infestations.
They’ll often infest new fields from last year’s heads or are already present in soils and infest your mite-free seed garlic. Always strive to grow pest-free cloves in healthy, living soils free from mites. Fear not if your harvest has these pests on it, as there are some remedies to help.
Bulb mites are tiny but you can see them with a magnifying glass. You’ll notice little insects that are like miniature aphids. They feed on growing root tissue and slowly separate them from the heads. You’ll see yellow, weak crops that weaken throughout summer. If the mites don’t kill the garlic, secondary diseases will enter through the wounds and kill growing plants before you can harvest.
Avoid using grocery store garlic for growing, and only use seed cloves you buy from a trusted source. Add plenty of compost to your soil annually to introduce beneficial microbes, worms, and insects into your garden. They’ll help prevent mites by competing with them for resources.
Bulb mites are extremely difficult to eradicate once they’re already present. A hot water treatment before planting can reduce the risk of them returning to fresh soil. Follow these simple instructions, but note that this method may affect your garlic’s germination rates and could predispose it to other diseases.
Hot water method:
- Heat water to 130°F (54°C).
- Soak cloves for 10 to 20 minutes.
This different method avoids harming germination rates with some simple products:
- Create a solution of water, horticultural soap, and mineral oil.
- Make the solution 2% soap, 2% mineral oil, and 96% water.
- Soak the cloves for 24 hours.
Leafminers
 Predatory insects and cultural practices keep pests at bay.
Leafminers rarely threaten your harvest—their damage is purely cosmetic. Female flies lay eggs that hatch into hungry larvae. They tunnel inside the leaves and eat the tender foliage. After feasting, they morph into adult flies that lay more eggs.
You can decide to manage leafminers or let them be. Predatory animals will learn to target them if they reside near the same location every year. Leafminers will disappear from your garden with some cultural practices and Mother Nature’s help.
Before larvae damage the leaves’ insides, you’ll see white eggs on their undersides. The clusters hatch into the larvae, who then tunnel inside. Leaf damage turns brown with time as the larvae leave waste that helps decaying organisms establish themselves. Adult flies are small black and yellow flies with red-brown eyes.
Use row cover to prevent the flies from laying eggs during their active period. You’ll have to remove the cover as summer arrives and brings warm temperatures. Use organic gardening practices like pruning damaged leaves, and avoid spraying pesticides that could harm predatory insects. Leafminers won’t spread out of control in a balanced, biodiverse garden.
If you like getting your hands dirty, you can squish the white eggs if you see them under the leaves. Predatory wasps eat adult flies, and you can release them to reduce the pest’s population size. Remove leaves throughout the season if you see larvae crawling inside, and hot compost or dispose of them. Once leafminers are present, wait two weeks before planting any onion relatives. This starves them out before they can feast on your tender crops.
Frequently Asked Questions
Curing garlic heads allows the papery coatings to dry and protect the cloves inside. If molds, mites, or nematodes are present in the soil, they can spread during curing and drying.
Garlic needs cool, dry conditions with regular but weak airflow during the curing period. If you are drying it in hot temperatures indoors, it can cause problems to grow and spread. Try a shielded porch, patio, or garage instead.
Elephant garlic is relatively disease-free and rust-resistant. Try growing it instead of hardneck or softneck varieties if you experience frequent issues tending garlic.