Garlic is the backbone of nearly every cuisine. This pungent, spicy, flavorful allium is a close relative of onions and leeks, but has a complex taste that nothing else can match. But tiny hard-to-peel cloves can be frustrating to use in the kitchen. Moreover, grocery stores are sorely limited when it comes to the over 600 cultivated varieties from around the world.
Growing your own spicy cloves is ideal for expanding your kitchen and even saving your own seeds to passively breed your very own garden-specific garlic. You don’t need very much room to produce large, abundant bulbs. Better yet, you can plant this favorite crop on the opposite schedule of most vegetables. This bulb is ideal for fall planting and summer harvests.
Let’s dig into everything you need to know about cultivating this infamous bulb in raised beds.
Can You Grow Garlic in Raised Beds?
Bulbs need full sun and 200 to 300 days to mature.
Garlic thrives in raised beds thanks to extra drainage, looser soil, and less weed pressure. These infamous bulbs are fairly shallow-rooted, so you can save your deep beds for other vegetable crops. The plants only require about 6 inches of space and grow to approximately 24 inches tall. They require full sun and 200 to 300 days to mature. Fortunately, most of this maturity happens during the fall, winter, and spring when you are less busy in the garden.
How to Grow Amazing Garlic in Raised Beds
Also known as Allium sativum, this Amaryllidaceae (lily family) bulb is one of the oldest crops in the world. Historical records show that ancient Babylonians, Egyptians, Greeks, and Chinese produced garlic over 5,000 years ago. The plant is remarkably versatile in USDA zones 0-12, but proper varietal selection is crucial for success in your region.
This guide includes everything you need to know about preparing a raised bed, choosing the right variety, planting, tending, harvesting, and curing! Don’t worry; all of these tasks are spread out throughout the year. Most of their growth is very easy and hands-off for the gardener.
Choose the Right Raised Bed
 Ensure raised beds have an open bottom for root growth.
Superbly-developed roots can grow two to three feet deep, but most plants only reach about 12 inches into the soil. You can save your deepest raised beds for other vegetable crops and grow garlic in a short raised garden bed made of metal or wood. The plants are also willing to thrive in grow bags and containers.
The benefits of growing in a raised bed include:
- Better Drainage: The elevated soil ensures that water moves through quickly.
- Faster Spring Warming: Raised beds heat up more quickly than in-ground beds, which can mean earlier growth and harvests.
- Soil Quality: If your native soil is poor, a raised bed allows you to build rich soil from the ground up.
- No-Dig Preparation: You don’t need to use a rototiller or back-breaking digging to establish the bed.
- Aesthetic: Garlic crops look nearly ornamental when properly mulched and grown in a pretty raised garden bed.
- Less Weed Pressure: Grass and weeds are less likely to overtake a raised bed, especially in areas with perennial weed pressure.
When choosing a raised bed, be sure that the structure is non-toxic, food-safe, and sturdy. It should be placed in a south-facing orientation in your garden to ensure full sun exposure. Ideally, the bottom of the bed is open to the native soil below in case your plant roots want to dig deeper into the ground.
If you don’t have raised beds, you can always mound up the soil of in-ground beds. Use a shovel and rake to move soil from the walkway to the center, aiming for a four-to-six-inch-tall mound. You can also layer twigs, leaves, grass clippings, and compost for a mounded hugelkultur bed (“lasagna garden”). The lasagna bed style is great for growing garlic, potatoes, sweet potatoes, and squash. Just be sure the upper few inches are made of fine topsoil or compost.
Prepare the Soil
 Proper soil drainage is essential for disease prevention.
These plants do best in well-drained, loamy soil that is rich in compost. Heavy clay can easily become waterlogged or soggy, potentially causing the bulbs to rot. Rotting is particularly problematic in the early stages, right after you plant the cloves. If you don’t start with quality disease-free seed garlic or plant in waterlogged soil, the cloves may rot before they can sprout. This means they never grow into bulbs. If they do survive, the bulbs may become mushy or diseased before they can be harvested.
Drainage is also important in the late stages of production because garlic is primarily grown as a storage crop. Much like winter squash, the bulbs must be cured in order to properly store through the winter. However, if the crop is grown in poorly drained soil, the cloves may fail to produce sufficient wrappers (skins) to protect the cloves through storage.
Moreover, pathogenic fungi and bacteria are more likely to take hold in soggy soils due to the lack of oxygen. Anaerobic (low-oxygen) conditions in heavy soil create an ideal place for “bad guy” microbes to thrive. If you want to avoid diseases and ensure prolonged storage for your garlic, it is very important to ensure the soil is well-drained.
Drainage Test
 A drainage test checks if water penetrates soil quickly without pooling.
If you already have a raised bed in place, fluff it up with a garden fork and then try a drainage test. Fill a large watering can or use a hose to pour a gallon of water straight over the soil. The water should immediately penetrate the soil layers and flow through. If it puddles up or forms a pool on the surface, this is a clear sign that you need to improve the drainage.
Improving Drainage
 Incorporate peat moss or perlite to improve drainage.
Compost is the best amendment for fixing soil drainage issues. These plants appreciate lots of organic matter and richness in their beds. Add a few inches of compost to the surface of your beds. Optionally, use a broad fork or digging fork to mix it in. There is no need to aggressively stir or chop the soil, as this can actually harm soil structure. The aggregates (clumps of soil and compost) are beneficial for water management in a raised bed.
Other drainage-improving materials include peat moss, perlite, vermiculite, aged manure, leaf litter, and horticultural sand. On the opposite end of the spectrum, if your soil is already very sandy and overly well-drained, add more compost and peat moss to ensure water retention.
Choose the Right Variety
 Trying different cultivars offers a diverse and enjoyable gardening and culinary experience.
The most common variety in grocery stores is a softneck called ‘California Early.’ This cultivar produces bulbs loaded with small to medium cloves and lots of wrappers, making it ideal for storage and transport. However, most of us want to grow our own vegetables to explore varieties beyond the grocery store.
Thankfully, there are hundreds of incredible types you’ve probably never tried before. While you can technically plant organic cloves from the store, it is much more fun to experiment with unique cultivars like ‘Music,’ ‘Thai Purple,’ or ‘Xian.’ After you settle on a desirable variety, you can learn how to source quality seed garlic below.
Hardneck vs. Softneck Garlic
 The two types of garlic differ significantly beyond neck stiffness.
There are two main categories that differ in their growth habits, temperature needs, flavor, and size. In general, hardneck cultivars are best for northern regions, and softneck varieties are best for southern regions. However, southern growers can make modifications to grow hardneck types in their region (we’ll explain below!)
Another major difference between the two types is flavor. Hardneck varieties have a more intense, complex, rich, garlicky flavor. In contrast, softnecks are more mild. For this reason, southern growers often go the extra mile to get hardneck types to grow in their warmer climates. Culinary enthusiasts go wild for hardneck varieties!
The most obvious difference between the two types is the stiffness of the neck or the main stalk of the plant. But there are many more notable distinctions between them, explained in this comparison chart:
| Softneck Garlic | Hardneck Garlic |
| Best for warmer regions | Best for colder regions |
| Mild to hot, spicy flavor | Most complex, rich flavor |
| Little to no chilling requirement | Require proper chill hours (cold exposure) |
| Soft, flexible stalks | Stiff, hard stalks |
| More wrappers (more layers to peel off) | Thinner wrappers (easier to peel) |
| Most commercially available and common in garlic braids | Rarer varieties are less common in supermarkets |
| Smaller cloves | Larger cloves |
| Greater quantity of cloves per bulb | Fewer cloves per bulb |
| Do not produce scapes | Produce garlic scapes (must be harvested) |
| Longest storage life (9 months to 1 year) | Shorter storage life (4-7 months) |
Clove Structure and Wrappers
 Hardneck types have fewer, larger cloves arranged evenly around a stiff central stalk.
If you hold these two types together, you will notice a distinct clove structure. This becomes especially apparent once you start peeling them to use in the kitchen. If you hate tedious tiny clove peeling, hardneck varieties are best because they have larger cloves with fewer wrappers that come off very easily.
However, the thinner papers also mean that hardneck types don’t store as long. It is important to preserve as many paper wrappers as possible on these cloves to ensure they don’t rot in the ground or in storage. Hardnecks have fewer cloves per bulb, but each individual clove is usually larger. Those big cloves are evenly arranged around the stiff central stalk.
In contrast, softneck types have more wrappers, which is why they can store so much longer. Supermarkets sell softneck varieties because they are most suited to transport and long-term storage. The cloves are much smaller but there is a higher quantity of cloves per head. The cloves are arranged in a spiralized pattern around the soft stem.
Elephant Garlic
 Elephant garlic produces exceptionally large cloves.
It is worth mentioning that elephant garlic (Allium ampeloprasum) has the largest cloves, but it is not technically a garlic. It is more closely related to leeks. These gigantic cloves are sometimes larger than an entire head of a regular variety. You can plant them in the same bed as your garlic, but take note that elephant garlic is grown slightly differently than its cousins.
Understanding Vernalization
 Softneck varieties thrive in warm climates like zones 9-12.
Vernalization is a fancy word for a plant’s chilling requirement. A cold period is required for hardneck varieties to produce proper bulbs. This is why hardneck types are best suited to northern regions with frigid winters. The cloves go dormant in the winter and enjoy a nice freeze underground, which stimulates them to produce bigger bulbs the following spring.
In contrast, softneck types need little to no chill exposure. This is why they are most commonly grown in warm southern regions like USDA zones 9-12. Fortunately, you can still grow hardneck cloves in the South by using a refrigerator. This “hacks” the plant’s biology by making it think it has gone through a long winter.
Cold Stratifying Seed Garlic
 Store whole hardneck bulbs in a paper bag in the refrigerator to vernalize.
Gardeners who receive at least six weeks of temperatures consistently below 40°F can easily grow hardneck varieties without any modifications. The plants can handle down to a whopping -30°F while in their dormant state! But if you’re growing hardnecks in a warm climate, you must place hardneck cloves in the refrigerator for six weeks to three months before planting. Longer periods of chilling are ideal for mimicking the natural vernalization process that these plants would experience outdoors in a cold area.
To vernalize, place your whole hardneck bulbs (saved from last season or ordered from a seed company) in a folded brown paper bag. You don’t need to separate the cloves until later. Keep the paper bag in the refrigerator with the initial date of chilling listed on the side. The paper bag protects the cloves from drying out but also ensures breathability so they don’t succumb to mold or mildew. Moderate humidity is OK, but you should not wet the cloves.
Ideally, you can refrigerate seed garlic throughout the spring or summer to prepare for fall planting. Mark your calendar with a reminder to bring the cloves out of the fridge and start planting.
Top-Rated Garlic Varieties
 Experimenting with various cultivars mixed in the same bed requires careful labeling.
The cool thing about growing this plant is you can plant as many varieties as you want in the same raised bed. You don’t have to worry about cross-pollination because you aren’t actually growing this crop for its fruit. Instead, you are vegetatively propagating (cloning) the root structure to produce large bulbous heads underground.
It’s best to experiment with several different varieties to find which ones you like best. You can easily mix hardneck and softneck types in the same bed. Just be sure you label which plants are which.
Best Hardneck Varieties:
- ‘Music’: Richly flavored, high-yielding, cold tolerant plants with easy-to-peel large cloves
- ‘Spanish Roja’: A large bulb with reddish hues, easy-to-peel cloves, and hot spicy flavor.
- ‘Thai Purple’: Supremely flavorful with purple striping on the exterior; pungent, bold aroma.
- ‘Shandong’: Early harvest, consistent production, and fiery flavor.
- ‘Georgia Crystal’: One of the best-tasting porcelain garlics with consistent size and yield.
- ‘Lorz Italian’: Classic Italian mid-season type with extra heat and spice.
- ‘Xian’: A deep purple-skinned variety with rich, earthy flavor and depth.
Best Softneck Varieties:
- ‘California Early’: A fail-safe variety adapted to warm regions.
- ‘Inchelium Red’: Fantastic producer with mild flavor and medium spice.
- Elephant Garlic: Not technically a softneck; produces ultra-large bulbs.
Growing gets extra exciting when you start saving your own seed garlic year after year. You can keep the cloves of your favorite types and replant them to slowly create your own population of regionally-adapted varieties. Since you’ll naturally choose the biggest, best cloves for replanting, you technically “breed” your own backyard-specific variety over time by selecting the best genetics.
When to Plant Garlic (By Zone)
These spicy bulbs operate on an opposite schedule from most vegetable crops. In most regions, this bulb is planted in the fall and harvested in the summer. September through November is a general planting window, but here is more specific guidance by zone:
Frigid Zones 0-4
 Plant hardneck cloves between September, just before the ground begins to freeze.
The coldest northern parts of the U.S., including the Northeast, Rocky Mountains, and Alaska, have extremely short growing seasons. Fortunately, hardneck varieties have no problem braving the cold. Cloves can be planted throughout September. Aim for four to six weeks before the ground starts to freeze or close to your first light frost of autumn.
Milder Zones 5-8
 Planting too early can lead to premature sprouting.
In mild temperate climates throughout the middle of the U.S., you can safely plant bulbs two to three weeks before your estimated first fall frost date. Late September and October are common; if the weather is unusually warm, plants can be planted later in autumn.
Planting too early can cause the plant to sprout its fragile green shoots prematurely. The green sprouts will die in a hard frost and potentially use up all the storage energy from the cloves. This means the plants won’t be able to regrow in the spring.
This plant is meant to establish some roots in the autumn and then go dormant throughout the winter. In the spring, the cold-weather root growth will fuel sprouting and vegetative growth until the plant starts to form a bulb. This means that you want root growth in the fall and sprouting in the spring. If your fall is unseasonably warm, wait until the first frost to plant garlic.
Southern Zones 9-12
 Hardneck garlic requires a longer chilling period in the refrigerator.
Warm climate growers can plant softneck varieties throughout the fall and winter months, while hardneck types should be planted in the coldest season. If you don’t receive any frosts in your region, it’s very important to cold-stratify (refrigerate) your seed cloves before planting. Longer refrigeration times are usually best, aiming for six to ten weeks. Both softnecks and hardnecks need a chill period, but hardnecks should stay in the refrigerator for longer.
Sourcing Seed Garlic
 Vegetatively propagated plants like garlic and potatoes reproduce asexually.
This crop is not technically grown from true seeds. True seeds are produced from pollinated flowers that form into fruits, which develop seeds. The term “seed garlic” describes the high-grade cloves used to grow plants. These cloves are technically clones of the mother plant. In order to ensure the cloves are disease-free and selected from quality mother plants, you must find a reputable producer to order your cloves.
This plant is vegetatively (asexually) propagated. Other vegetatively propagated plants include potatoes, sweet potatoes, and flowering bulbs like daffodils. Most vegetable crops like kale, lettuce, and tomatoes are sexually propagated, which means they are grown from true seeds.
Of course, these plants can produce flowers and seeds, but we don’t want them to do that if we are growing them for bulbs. As I’ll describe later, you actually have to remove the flowering stalk (called the scape on hardneck types) if you want the plant to produce a hefty bulb. Otherwise, the plant will channel all of its energy into growing flowers rather than funneling it downward into the bulbous roots. Fortunately, the scapes are extraordinarily delicious to eat and easy to remove.
Seed vs. Cooking Garlic
 Culinary garlic sourced from stores often lacks diversity.
Since garlic is not grown from true seeds, you may wonder if you can just plant any clove you buy from the store. Technically, organic store-bought bulbs can be planted in your garden. Organic cloves have not been sprayed with sprout inhibitors, whereas conventional (non-organic) ones are typically treated to prevent them from sprouting on the shelves. However, there are a few reasons why I don’t plant store-bought cooking garlic.
Firstly, cooking garlic is a lower grade than seed garlic. As a commercial organic garlic farmer, we always sorted through or “graded” our crop. The highest quality, largest, fattest bulbs with the most wrappers were set aside for replanting. Seed garlic is the cream of the crop. It has the best genetics and the most rot resistance to ensure an abundant crop the following year.
Generally, the mid-grade bulbs are slightly smaller, with fewer wrappers and maybe a few knicks or damaged parts. These are the bulbs sold for culinary use.
The other reason why I don’t plant store-bought bulbs is due to varietal selection. Supermarkets are just lacking in diversity! If you want the coolest, best-tasting varieties, you almost always have to order them online from a reputable supplier. Here at Epic Gardening, we even offer selected seed garlic varieties on our online shop in the fall. Subscribe to our mailing list to be notified.
Separate and Pre-Soak the Cloves
 Soaking seed garlic is a common practice among organic growers to prevent fungal infections.
Once you’ve received your seed garlic and determined your planting date, soaking is the next step. This step is optional, but it can make a huge difference in your overall yields. Here are some of the benefits of soaking cloves before planting:
- Jumpstart plant growth
- Prevent diseases and clove rot
- Adding nutrients and fertility
- Grow garlic organically without fungicides or fumigants
Most professional organic growers soak their seed garlic because it reduces the risk of fungal infections. I never wanted to spray my fields with fungicides (not even organically approved ones), so I soaked my cloves to ensure that the plants had a robust defense against infections.

The process is straightforward:
- Start 8-12 hours before planting.
- Separate your bulbs into individual cloves.
- Set aside ultra-tiny cloves for eating. Plant the biggest, best cloves.
- Take care to conserve as many wrappers as possible. Do NOT peel the cloves.
- Fill a bucket or container with clean, filtered water or well water.
- Choose a soaking technique from the list below. You can combine two substances if desired, as long as they are diluted.
- As a general guideline, add one to two tablespoons of soaking additives per gallon of water. This soaks about 30-40 cloves.
- NEVER soak cloves in pure vinegar, alcohol, or fertilizer!
- Mix the ingredients together and add your cloves.
- Soak for eight to twelve hours.
- Pour out the water and plant the unpeeled cloves into your garden immediately.
Soaking Additives
 Always dilute fertilizers and sterilizers to prevent harm to plants.
When choosing a substance to add to your clove-soaking bucket, consider your goals. Most of us want vigorous growth and disease prevention. If you really trust your seed source, you may not have to worry about plant diseases because the cloves will arrive super clean and mold-free. If you saved your own seed from last season and you fear there might be some fungal spores mixed in, consider adding a fungal-prevention tactic.
The most popular organic soaking additives for disease prevention are:
- Warm water
- Apple cider vinegar
- Sterile alcohol
- Hydrogen peroxide
- Baking soda
- Compost tea (properly aerated and full of beneficial microbes)
- Horsetail extract (Equisetum has natural antifungal properties)
The best fertilizer soaks for growth stimulation include:
- Diluted liquid kelp
- Liquid fish
- Compost tea extract
- Organic all-purpose liquid fertilizer
Use what you have on hand, and don’t forget to dilute! Never soak your cloves in a pure sterilizer or fertilizer, as this can kill the plants. When in doubt, dilute more than you think. On my organic farm, I used a combination of two tablespoons of organic apple cider vinegar and two tablespoons of diluted kelp solution per gallon of water! This gave my cloves the best of both worlds.
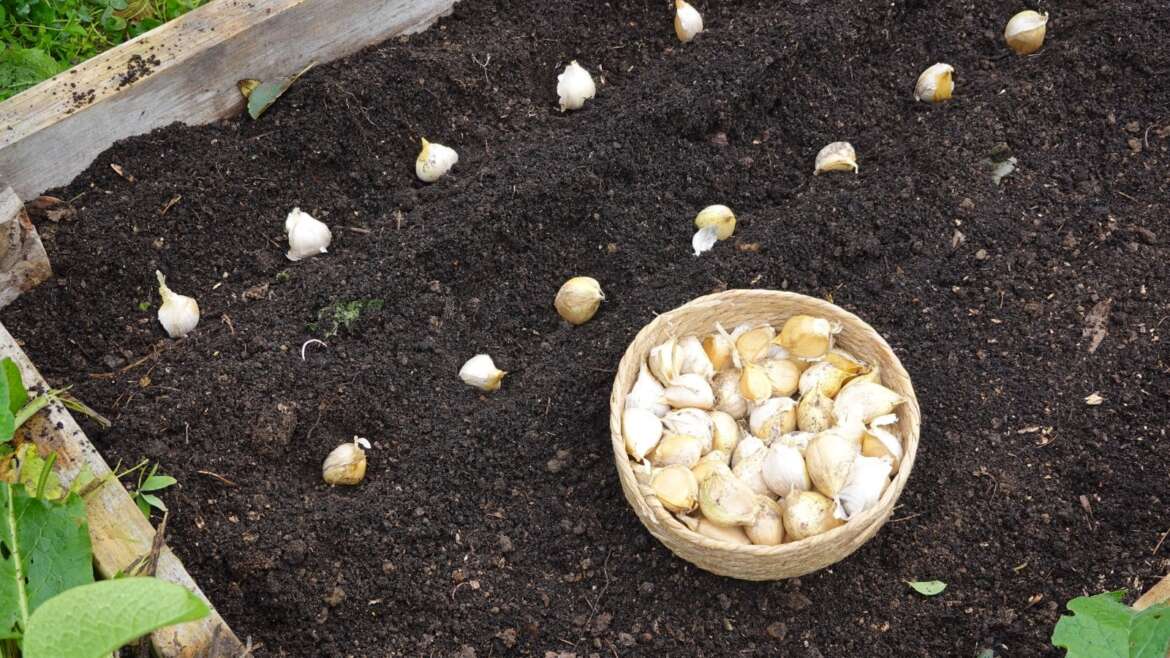
Plant Spacing and Depth
 Dig holes according to your garlic variety’s recommended depths and spacing.
For quick reference, remember these numbers:
- Six inches between plants
- Eight to twelve inches between rows
- Two to five inches deep in the soil (plant elephant garlic and larger cloves extra deep)
Planning and preparation are the hardest parts, but planting is super simple! This process is ideal for gardeners who struggle to handle the tiny seeds of other vegetables. Kids and elderly gardeners are particularly adept at planting cloves!
Once your beds are prepared and your cloves are soaked, rake the soil surface flat. Use the back of the rake (the handle) to make long, thin furrows about two to five inches deep in the soil. Each furrow should be eight to twelve inches apart. You can also use a cylindrical tool like a dibbler or a marker to create small holes at the proper depth. Check your variety recommendations for exact spacing.
Butts Down, Sprouts Up
Plant each soaked bulb with the roots down and the pointy side up. Try not to scratch or remove the papers. More “wrapping paper” means more protection from rot. The flattened “butt” side of the clove should be pressed into the soil. The pointed sprouting side should face up. Clove orientation is the most important part of the process!
I once knew a farmer who let volunteers plant his garlic crop, only to discover that they put thousands of cloves in the ground upside-down! The plants cannot grow with their butts up to the sky, so be sure to check that the roots are in the soil.
The most common spacing between each clove is six inches. Backfill the furrows so the cloves are buried two to five inches deep in the soil. You can use your hands or a rake to backfill. Water deeply after planting to signal to the plant to start growing roots!
Add Mulch
 Mulching with straw protects garlic from temperature extremes.
Straw mulch is a key secret to abundant harvests! It insulates the soil from cold and heat and conserves moisture. I love GardenStraw because I know it is clean, finely shredded, and herbicide-free. I once knew a gardener who accidentally sourced hay bales filled with grass seeds and weeds. When they spread these on their crop, they literally grew a new lawn! It was a sad day for garlic. Moral of the story? Source quality straw.
Layer straw two to four inches deep over the top of garlic right after planting. If you’re using soaker hoses or drip irrigation, layer those underneath the mulch.
Mulch is intriguing because it buffers against all temperature extremes, whether hot or cold. If your plants accidentally sprout prematurely in an unseasonable warm autumn season, the straw can usually keep them safe from hard frosts until spring.
In hot climates, straw mulch is also beneficial for insulating the soil against extreme summer temperatures. Remember, this crop prefers chilly weather during its leafy growth stage. Elevated soil temperatures can hinder bulb formation. If it’s hot outside, the soil is probably heating up too. Mulch blocks the UV rays from directly hitting the soil, which keeps the root zone cooler.
Wait for Emergence, Then Feed With Balanced Fertilizer
 Use a balanced fertilizer like Espoma Garden-tone for optimal growth.
If you added compost to your raised bed and soaked your cloves with fertilizer before planting, you won’t need to fertilize again until the spring! Once the soil thaws and the plants send up their sprouts in the spring, it’s time to give them a boost. The best time to fertilize is when the plants are about 6” tall.
These plants do best with a balanced fertilizer. Balanced means that the ratio of nitrogen, phosphorus, and potassium is relatively equal. For example, Espoma Garden-tone has an NPK analysis of 3-4-4. The Espoma Organic Liquid All-Purpose is also awesome. Side-dress the plants with a granular fertilizer or fertilize with a liquid fertilizer through a watering can or hose. Don’t forget to dilute liquid fertilizers with water before applying.
Repeat your fertilizing process three to four times throughout spring and early summer.
Stop fertilizing once bulbing begins. As bulbs start forming, the stalk of the plants will start thickening and grow over ten to twelve inches tall. At this point, the plants should only be irrigated and monitored throughout until harvest.
Irrigate Regularly
 Amending soil with compost improves its water retention.
This is a shallow-rooted plant that needs consistent moisture. If the plants don’t get enough water in the upper inches of soil, the cloves will struggle to develop into large bulbs. Fortunately, deep planting and thick mulching conserve tremendous amounts of water.
Amending with compost also enhances the soil’s water-holding capacity, which means it will stay moist for longer. These methods will keep your plants consistently moist, so you don’t have to water as often.
When should you water your crop, and how often should you irrigate? Both of these answers depend on your soil type, weather, and mulching method. Generally, the plants need about one inch of rainfall or irrigation per week. The best thing you can do is check the soil about once or twice per week:
- Stick your finger three to six inches into the soil.
- If it feels powdery or chalky and the soil does not stick to your skin, the bed is probably too dry, and you should water immediately.
- If the soil feels soggy like brownie batter and sticks heavily to your skin, let it dry out.
- The ideal moisture level feels about the consistency of a wrung-out sponge.
You should also check for above-ground signs of underwatering or overwatering. If the leaves appear wilted and the soil is chalky, give them a deep drink. If the plants are yellowing and droopy, it could be a sign of overwatering. Check that the soil is draining properly and cut back on irrigation if needed.
Add Shade Cloth in Hot Climates
 Using shade cloth helps regulate sun exposure.
The ideal growing temperature for these plants is between 30-90°F. However, the soil may be warmer in raised beds than in-ground beds, so it is important to mulch and use other temperature-lowering techniques, such as shade cloth.
Shade cloth is a finely perforated agricultural fabric that reduces the amount of intense sun rays that hit your plants. This plant loves full sun, but it can also overheat in southern regions. 50% shade cloth will allow only 50% of the sun rays in. While this can reduce overall photosynthesis, it keeps the plants cooler so the bulbs can develop larger.
This fabric is easy to “float” directly over the crop. You can also build a low-tunnel with metal hoops. Attach the hoops to the side of your raised bed and arch them over the top, securing them with brackets or screws. Drape the shade cloth on the hoops and weigh it down with clips or clamps. You may need to remove the cloth when irrigating with a hose.
Weed Regularly
 Be cautious not to disrupt roots when eliminating competing plants.
Raised beds are advantageous because they tend to be less weedy. However, it’s still important to monitor for weed development. This plant is very bad at competing with grass and other weeds. Fortunately, deep mulching should do most of the work for you. Pull weeds out as regularly as possible.
If large grasses or perennial weeds develop, it’s important to protect your crop when pulling out competitors. You don’t want to disturb the garlic roots! Use one hand to hold the crop in place and the other hand to gently yank out the weed.
Remove Scapes (Hardnecks Only)
 Scapes can be easily harvested by snapping them off.
Garlic scapes are one of the most delectable treats for gardeners! These richly flavored curly stems are actually the stalks of the flowers. Only hardneck varieties grow scapes. Ideally, you want to remove the scapes before they form flowers. If the scapes are left on the plant, the plant will not form proper bulbs.
Scape removal is super simple! You will know they are ready to harvest when the stalks begin curling. The adorable curly spirals are beautiful to look at and fun to pick. They have unique pointy tips that hold the precursors to big, rounded flowers. Each scape snaps off the plant with a quick flick of the wrist. At this stage, some of the plant’s foliage may begin yellowing at the tips. This is completely normal as it funnels its energy down into bulb production.
You can gather a bundle of scapes and grill them for a delicious side dish. Scape pesto, pickled scapes, and roasted scapes are also delightful!

Harvest Bulbs
 Dig carefully around the stalk when harvesting.
This plant is typically harvested in the middle of summer, around June or July. Don’t worry if your raised bed looks a little sad—it is normal for these plants to look yellowish-golden colored when it’s time to harvest. If you don’t want to pull out bulbs prematurely to check their size, here are the two key above-ground signs that it is time to harvest:
- The top leaves look yellow or brown at the tips.
- The necks begin flopping over.
Harvesting is exciting and simple. The only mistake you can make is accidentally knicking or stabbing the bulbs. To avoid this, always insert your trowel or shovel at least 6” away from where you think the bulb is in the ground. Imagine a three to four-inch circle around the center of the stalk. This is the “danger zone” where you should avoid digging. If your shovel hits the bulb, it could prevent it from storing properly. Luckily, that means you’ll just have to eat it right away!
Lift the soil upwards and grasp the plant from its stalk. Pull upward to unearth the bulbs. Lay the plants with their intact stems out on the soil surface. Do not cut the stems off! They will cure with the stems on. It helps to make piles of each variety next to their label to ensure you keep the varieties separate.
If the weather is warm and dry, some gardeners prefer to leave the bulbs to “sun cure” for a few days out in the garden. This allows the bulbs to pull the last of the sugars and energy from the stems and stalks. However, it is very important to protect the garlic from rain or water at this stage. You want the bulbs to stay as dry as possible once they are harvested.
Curing and Storage
 Maintaining soil on bulbs aids in beneficial microbe retention.
Many gardeners are intimidated by curing garlic and other crops like potatoes or squash. Thankfully, this process is simpler than it sounds. Curing just means leaving the plant alone to dry and prepare for storage.
It’s very important that you leave the soil intact on your bulbs. You can shake the plants off or hand-wipe away some dirt, but avoid overly cleaning the bulbs. As my farmer friend used to say, “A little dirt never hurts!” In fact, the beneficial microbes from the attached soil can help enhance curing and prevent attack from “bad guy” microbes that could cause rot.
How to Cure
 Use a fan to prevent mold without disturbing the curing process.
Lay the whole plant out in an aerated location, like a wooden slat box or a wire mesh table. Place them in a shady place that is fairly warm and has good airflow, like a shed. Don’t cure in full sunlight or hot areas. Space the plants apart to allow ample airflow between them.
Leave the plants alone to dry for two to three weeks. In cold or humid areas, curing can take over a month. You may need to add a fan to prevent mold from forming, but you don’t need to clean or move them. As the Beatles said, “Let it be, let it be!”
You will know your bulbs are done curing when:
- Leaves and necks are fully brown and dry
- Outer bulb wrappers feel dry and papery
- Roots are brown and very dry
Preparing for Storage
 Ensure the plant is stored in a cool, dry place away from sunlight.
Cutting and cleaning are the final steps on your raised bed garlic growing journey. Use sanitized, sharp pruners to prune the dried roots back, leaving just a quarter to a half inch of roots attached to each bulb.
Next, take off the neck about one inch above the bulb. Your bulb will finally look like what you see at the grocery store! The center stalk of the neck should be white and dry. If the inside of the stalk still looks green, the plants need to dry and cure longer.
The final step is brushing away dirt or residues. NEVER wash your bulbs with water. Instead, slightly rub the plants by hand or with a dry towel. The skin should feel papery and brittle. You want to retain as many layers of the bulb wrappers as possible. The papery skin is key for a long storage life. Do not peel your garlic until you are ready to eat it!
Store bulbs in a cool, dry place out of direct sunlight. Use your hardnecks in the kitchen first because they do not store as long as softnecks.
Last but not least, remember to replant your raised bed! A fall crop of lettuce, kale, broccoli, cauliflower, or cabbage is a great follow-up to your crop rotation.
Final Thoughts
Raised beds are the ideal location for growing an abundance of garlic. Be sure to amend with compost, grow in full sunlight, pre-soak cloves, plant the cloves deep, mulch with straw, and remove scapes in mid-summer. Don’t forget to plant cloves with the butts down, and keep as many papery wrappers in place as possible.