Garlic is one of my favorite crops to grow. I look forward to seeing pre-order emails and selecting varieties to try. Here in zone 5b, we successfully produce large quantities of hardneck garlic, enjoying young, green garlic in the spring, scapes in early summer, and fresh garlic a few months later.
Each year in late summer, our seed garlic’s arrival signals the season’s closing. We start to clean out summer crops and amend garden beds, making way for garlic, which grows seemingly magically underneath the thick layer of mulch, compost, and usually around here, snow!
If you’re a cold region grower like me and are looking for a new variety of garlic to grow, look no further than ‘Montana Zemo,’ bred for its large, deliciously spicy bulbs.
Garlic Bulbs & Seeds
Garlic is an aromatic superfood that no cook should be without! Grow one of our varieties to experience delectable flavors unlike any garlic you can find at a grocery store.
Buy at Epic Gardening Shop
‘Montana Zemo’ Hardneck Garlic Overview

| | |
What Is ‘Montana Zemo’ Hardneck Garlic?
 Its flavor is mildly spicy, robust, and complex, and it is equally enjoyed raw and cooked.
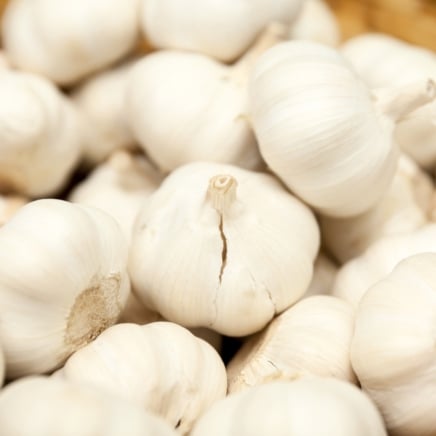
‘Montana Zemo’ is an organic hardneck garlic bred to produce large, porcelain-white bulbs. It is highly versatile in the kitchen. Its flavor is mildly spicy, robust, and complex, and it is equally enjoyed raw and cooked.
Each bulb contains an average of four to seven cloves, about 25 to 30 cloves per pound. You can store cured bulbs for up to six months in ideal conditions.
This extremely hardy variety is perfect for cold-region growers in USDA zones 4 to 9. It’s a great alternative to ‘Music’ if it’s unavailable.
Characteristics
 The cloves are easy to peel, making this variety an excellent choice for chefs.
Robust and complex, ‘Montana Zemo’ produces large, porcelain-white bulbs wrapped in pink paper. With little heat, it’s delicious when raw, with no bitter aftertaste. Some describe the cooked flavor as sweet and nutty.
Panelists at America’s Test Kitchen chose ‘Montana Zemo’ as a top favorite for its teardrop-shaped bulb, perfectly balanced spice, and high allicin content. The cloves are easy to peel, making this variety an excellent choice for chefs.
Native Area
 ‘Montana Zemo’ was developed from ‘Zemo,’ which originated in the Republic of Georgia.
‘Montana Zemo’ was developed from ‘Zemo,’ which originated in the village of Zemo Surebi in the Republic of Georgia. Breeders at the base of the Mission Mountains in Northwestern Montana developed ‘Montana Zemo’ specifically for cold region growers.
Planting
 It’s essential to get the garlic planted before the first hard frost so they can set roots.
Plant in September, October, or very early November. The exact timeframe will depend on your region and the forecasted weather. It’s essential to get the cloves planted before the first hard frost so they can set roots. But be sure not to jump the gun and get them in too early, or they could sprout, leaving them vulnerable to frost damage or death.
Growers in warmer regions can safely wait until later in the fall. Garlic requires a vernalization period of around eight weeks to form a bulb properly. Growers may be resting indoors, but throughout the winter, but this crop grows vegetatively and may sprout above ground a bit before you uncover it in the spring. That’s why mulching is so vital.

Preparing Your Seeds (Cloves)
 Sterilize to avoid transferring pests, mold, or disease pathogens into your soil.
Ordering seed garlic in the fall is critical, as it often sells out. Look for pre-order sales from your seed supplier of choice to ensure you get the type and varieties you want.
Properly cured cloves will have intact, thick papers and shouldn’t need sterilization before planting. However, if you’d like to be safe and avoid transferring pests, mold, or disease pathogens into your soil, sterilize the cloves with 70%+ isopropyl alcohol, 3%+ hydrogen peroxide, bleach water, or baking soda.
- Soak cloves in alcohol or vodka to destroy mites for 10 to 20 minutes.
- Soak cloves in a mix of peroxide and water for 15 minutes.
- Create a bleach-to-water ratio of 1:9 and dip cloves. Plan to plant cloves dipped in bleach water immediately after sterilization before they dry out.
- Make a baking soda and water solution and soak cloves for up to 24 hours.
After sterilization, you can soak the cloves overnight in fish emulsion or your garlic fertilizer of choice. Now, your cloves are ready for planting.
Transplanting
 Create a trench with a hoe, or use a gridding tool to mark out your bed.
Sow winter-hardy ‘Montana Zemo’ cloves with the pointed side up four to six weeks before the first frost to allow the roots to form correctly in the soil, facing the right direction.
Timing is crucial. Too early, the garlic could prematurely sprout above the surface, becoming vulnerable to the frost. Too late, the cloves may not have enough time to develop strong roots that will allow them to survive winter. Mild winter growers may sow cloves in January for a harvest seven to nine months later. You may need to vernalize them in the refrigerator.
Create a trench with a hoe, or use a gridding tool to mark out your bed. Place one clove two to three inches deep every six to eight inches. Cover the trench or cloves with soil. Mulch according to your region’s first frost date. Rows should be 6 to 18 inches apart to give bulbs enough space to grow large. When spaced out properly, no thinning is necessary.
How to Grow
 This cultivar will produce delicious, large bulbs with proper treatment before planting and hard frosts.
‘Montana Zemo’ will perform like most other hardneck garlic varieties, maturing in 250 to 270 days when planted in the fall. This cultivar will produce delicious, large bulbs with proper treatment before planting and hard frosts.
Sunlight
 Plant it in a flat, sunny spot in the garden for the highest yields and largest bulbs.
This allium-family crop requires full sun to partial shade for the best results. Plant it in a flat, sunny spot in the garden for the highest yields and largest bulbs. Ensure it receives at least six hours of direct sunlight daily.
Water
 Water consistently in the fall to ensure the cloves have enough moisture to set roots.
Well-draining, composted soil is crucial to garlic staying fresh in the ground without rotting. Torrential rains and soggy soil can cause rotting and disappointed gardeners. Water consistently in the fall to ensure the cloves have enough moisture to set roots. They need about an inch weekly. Once you mulch and put them to bed for the winter, fall rain and winter snow should supply them with what they need.
They should only need supplemental watering if there are drought conditions. Do not water when rains are plentiful.
Soil
 It is in the ground for most of the year and appreciates organic matter.
Preparing beds for garlic is critical to its success, but spending the time upfront will make all the difference. This crop is in the ground for most of the year and appreciates organic matter. Add a good amount of compost and allow it to work into the soil for a few weeks before planting.
To prepare the soil for planting, base your amendments on soil test results. If your gardens have poor soil fertility or heavy clay, consider growing garlic in raised beds.
Mulch
 You can place up to six inches over the top of the beds.
Mulching pathways and over the top of buried cloves using organic straw or seedless mulch hay will protect the new root system through the cold of winter, which is especially important in areas where frost occurs. You can place up to six inches over the top of the beds. Heavy mulch may create too much warmth if a sudden temperature spike occurs in the fall, so be prepared to remove and reapply if necessary.
Climate and Temperature Requirements
 It will begin to sprout when temperatures are consistently between 40 and 50°F.
This crop has been grown worldwide for thousands of years. Selecting a variety that is suitable for your region is crucial for success. ‘Montana Zemo’ garlic will grow successfully in USDA zones 4 to 9, even when springs are particularly dry. It will begin to sprout when temperatures are consistently between 40 and 50°F (4 and 10°C).
Once your bulbs have been harvested and cured, store them in a dark, dry place with low relative humidity. For proper, long-term storage, temperatures should be between 35 and 55°F (2 and 13°C). A root cellar or dry, climate-controlled basement will work well. Anything much warmer, and you’ll risk them sprouting.
Fertilizing
 Fertilize using a general feed or fish emulsion before the scapes appear.
When planting, work a 5-10-10 general fertilizer into the top layer of soil to encourage the plant to focus on the bulb rather than above-ground growth, which you want it to save for the spring. When temperatures warm in the spring, temporarily remove the mulch and side dress with a balanced organic fertilizer.
Fertilize using a general feed or fish emulsion before the scapes appear, then pull back nitrogen once summer is in full swing and lots of above-ground growth is happening. Ensure timely snapping of the scapes to send energy to form a large, beautiful bulb. Simply snip or snap them off when they appear and begin to curl.
Maintenance
 Removing the scape will signal the plant to focus on the bulb.
As mentioned, preparing your garlic plot before sowing cloves is the most crucial step, as this crop is a heavy feeder. After you properly sow, water, fertilize, and mulch, there isn’t much maintenance until spring, when you should uncover your sprouting bulbs and check their progress.
No pruning is necessary. Keeping weed pressure down is essential, as garlic won’t compete well and needs all the nutrients it can get. Since ‘Montana Zemo’ is a hardneck garlic, it will produce scapes around June. Pay close attention to when they start to form and snap them when they each transition into a goose-neck shape. Removing the scape will signal the plant to focus on the bulb.
Propagation
 Like your other seeds, storage is essential to maintaining long-term health and vitality.
Each clove creates an exact clone of the mother plant. So, when you successfully grow full bulbs, you have grown your garlic seeds! That’s cool.
Like your other seeds, storage is essential to maintaining long-term health and vitality. Store them in a dark, dry place with low relative humidity. Moisture invites mold, which leads to poor-quality cloves.

Harvesting and Storage
 Provide good air circulation out of direct sunlight and low relative humidity.
Generally, once about six leaves down the plant are browned and dying back, the bulbs may be ready for harvest. Some growers intentionally leave a few scapes on the plant to use as an indicator for harvest. Once they stick straight up towards the sky, the bulbs are ready!
Hang to dry by bunching eight to ten plants with the attached stems, or lay them on a drying rack in a single layer. Provide good air circulation out of direct sunlight and low relative humidity. They should cure in about four weeks, although it may take longer in humid conditions.
Curing is complete when no moisture remains in the stem and it’s hard to the touch. Cut the stems off and discard them. Store in baskets in a cool, dark place for the long term.
Common Problems
 It is easy to grow and maintain.
Garlic is easy to grow and maintain, but a few cultural and IPM practices will help you develop the most healthy garlic possible.
Pests
 Armyworms may cause cosmetic damage to leaves but can quickly defoliate them.
Onion thrips, garlic bloat nematode, armyworms, and bulb mites are possible mites you might encounter.
Onion thrips (Thrips tabaci) cause white striping, browning, and blotches on leaves, which may eventually die. These pests can carry diseases, including the Iris yellow spot virus, tomato spotted wilt virus, and impatiens necrotic spot virus. Scout for thrips for July, August, and September. Control by removing debris from all fields that may harbor eggs and larvae. Spinosad and neem oil may reduce thrip populations.
Reputable seed companies should be testing for garlic bloat nematodes and may state they are “certified nematode-free.” Garlic bloat nematodes (Ditylenchus dipsaci) (GBN) bloat, soften, and distort bulbs as they grow, and the disease can travel to your garden via skins, roots, or soil of infected seed. If you suspect GBN, try incorporating proven biofumigant cover crops. Studies show promising effects of working this debris into infected fields. Prevent this issue by purchasing quality seed from reputable sources.
Armyworms may cause cosmetic damage to leaves but can quickly defoliate them if populations are large enough. Hand pick them first. Then try to control them with beneficial nematodes, predatory wasps, or neem oil treatments. Spray early or late at night when they are most active.
Bulb mites may stunt bulb growth and cause damage during storage. You may have bulb mites if you notice varying or funky-shaped bulbs, yellowing, or twisted leaves. Remove infected plants immediately, and always purchase seed from reputable sources to avoid this issue.
Diseases
 Sterilization will help ease your mind if you purchase your seed from an online supplier.
Growing your own is a sure way to ensure that your seed garlic doesn’t have disease. Sterilization will help ease your mind if you purchase your seed from an online supplier. Here are a few diseases to look out for:
- The fungus Stromatinia cepivorum Berk causes white rot. The sclerotia are activated when temperatures above 75°F (24°C) combine with the sulfuric compound alliums emit. Sclerotia are the structures storing the fungus on the bulb. This disease is common among commercially grown garlic, so it’s best to look for signs before purchasing and sowing cloves.
When you pull back the mulch in the spring, look for white fluff on the stem and base of the plant. Pull up a bulb to inspect further. No treatment is known for white rot. Practice crop rotation to avoid multiple years of infection.
- Don’t confuse downy mildew symptoms with the natural dying back of leaves as they mature. Peronospora destructor infects alliums, reducing yields and quality, and it becomes worse in humid conditions. In addition to dying back and browning, a purplish fuzzy growth will present, indicating disease.
Oospores carrying downy mildew can survive in soil for up to five years. Avoid overhead watering, only sow healthy cloves, don’t overfeed nitrogen, rotate crops, and ensure well-draining soil.
- Fusarium basal rot (FBR) may cause damping off when plants are young but will primarily affect near-mature plants, replacing the bulb with a soft, rotting mass. Cut vertically into the bulb if you see neck wounds and suspect disease. If there is brown tissue, they may be infected.
- Botrytis neck rot symptoms include water-soaked, yellow lesions that appear in storage after excessive nitrogen application. The pathogen Botrytis allii is soil—and seed-borne.
- Rust is a problem in plants that aren’t spaced properly, and have consistently wet leaves. Removing foliage with rust colored patches is enough to control this disease.
Overwatering
 Monitor growth weekly and scout for any signs of disease or rotting.
Soggy, poor-draining soil and too much rainfall can cause garlic cloves to rot in the ground. If your region is receiving ample rainfall, irrigation may not be necessary. Monitor growth weekly and scout for any signs of disease or rotting. Remove mulch during these times to allow the soil to dry out in between rainfall if you’re experiencing more than usual.
Frequently Asked Questions
Garlic has a strong, spicy aroma that may help deter curious critters like deer, rabbits, squirrels, and skunks, especially when planted in mass. Try planting rows of garlic around leafy greens, fruit trees, and brassicas to help ward off cabbage loopers and Japanese beetles. It makes an excellent companion to many plants.
Since each garlic clove only requires about six inches on each side to form correctly, growing them in containers and raised beds is easy.