Garden irrigation has many nuances, but this comparison guide can save you a lot of time, money, and headaches. Whether you’re prone to overwatering or underwatering, finding the proper balance of soil moisture is not always easy. You don’t want to spend all day walking around with a hose, but you don’t want to turn on sprinklers and leave the scene, either.
Before you install a new irrigation system, consider the key pros and cons of each type of watering. Let’s compare and contrast the 7 most common irrigation systems to figure out which one is best for your garden.
What is the Best Type of Garden Irrigation?
The most common is drip irrigation – an efficient and widely recommended type of irrigation.
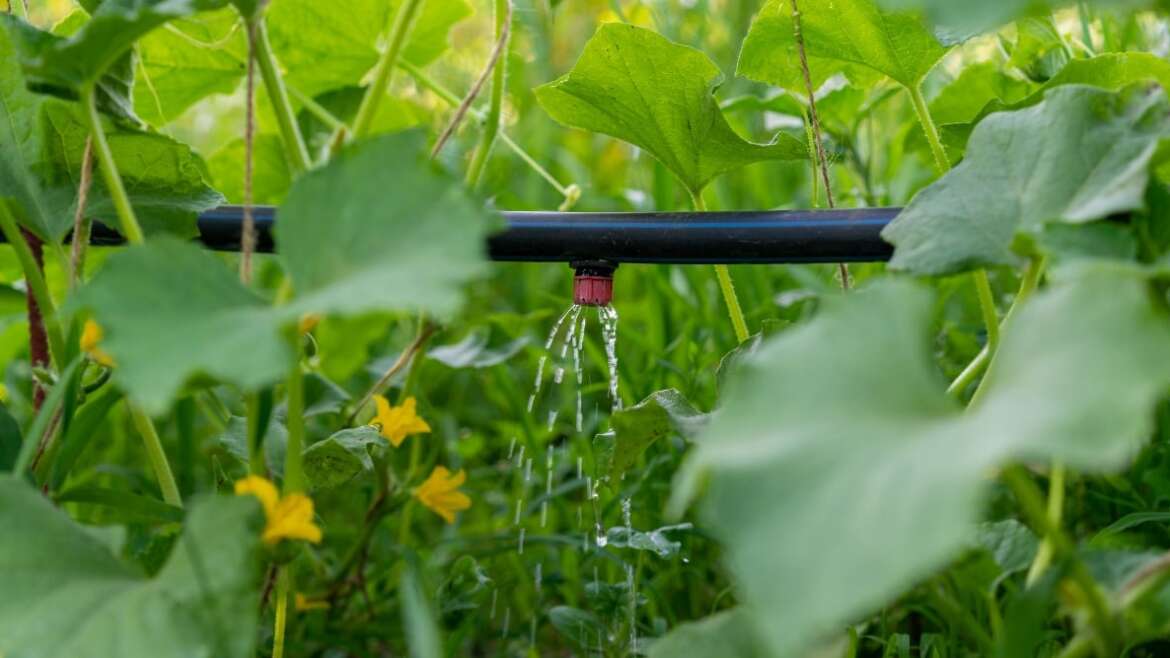
Drip irrigation is the most common, efficient, and widely recommended type of irrigation for gardeners and farmers alike. A properly designed drip irrigation system is proven to save up to 80% more water than other types of irrigation. It works by using drip lines to deliver moisture directly to the root zones, dramatically reducing the risk of evaporation, runoff, water waste, and weed growth. Root zone watering can also prevent foliar diseases caused by overhead irrigation.
Modern drip lines are typically made of flexible plastic tubing with differently spaced emitters. For a plastic-free option, some gardeners use copper tubing to permanently install drip lines around trees and perennial plants. Drip irrigation is a form of subsurface irrigation that waters your plants from the ground level or just below a layer of soil or mulch. It is particularly suitable for arid climates where water is scarce, and temperatures are warm.
7 Types of Garden Irrigation: Pros and Cons
 Deliver water to plants in different growth stages and environments.
Most gardens use a combination of different irrigation styles to deliver water to plants in different growth stages and environments. For example, you may water your potted plants with a watering can but use a hose for newly transplanted seedlings. Established vegetable beds can be watered with drip irrigation, but perennial borders may have soaker hoses that you run less often.
If you want to keep things simple, you can also opt for an old-fashioned hose with a quality nozzle. Whether you choose one or all of these methods, it’s helpful to understand the pros and cons of each. Combining them allows the most flexibility, and you can often control multiple types of irrigation from one central spigot.
Best Overall: Drip Irrigation
 Drip irrigation is the most popular and well-known type of garden irrigation.
| Pros | Cons |
| Extremely water efficient | Emitters can become clogged if your water is high in minerals |
| Reduced weed pressure due to water delivery directly at crop base | Drip emitters must be properly distributed based on crop spacing |
| Reduced foliar disease risk because water does not soak the leaves | Pressure regulation is required to ensure proper flow |
| Prevents drought stress if buried under mulch | Burying drip lines too deep can cause premature degradation of the material |
| Affordable tubing | Insects and rodents can cause leaks if they chew on the lines |
| Properly cared for drip tape can be used for 3-5 seasons | Most drip tape and emitter parts are plastic; copper tubing is an option, but significantly more expensive |
| Great for irregularly shaped beds or fields | Trimmers, mowers, and shovels can accidentally slice the tubing |
| Reduces erosion and runoff from slightly sloped areas | Highly sloped yards may have uneven watering because water rushes down to the base of the hillside |
| Cost ranges from $100-$300 for a medium-sized raised bed garden setup (in Kevin’s video below, he spent about $250 total but had many fittings leftover for troubleshooting) | A water filter and pressure regulator are needed at the source water spigot; these are typically one-time investments, but they can add more expenses, especially if your water source has a lot of sediment |
Drip irrigation is the most popular and well-known type of garden irrigation. It is widely available and highly efficient, reducing evaporation by up to 80% compared to overhead sprinklers. Since the water is delivered directly to the base of your plants, you don’t have to worry as much about fungal diseases caused by overhead irrigation. Better yet, drip lines help reduce overall weed pressure because they only water near the root zone of your desired crops instead of saturating the entire bed.
Drip lines (or drip tape) can be laid out in any orientation across a garden bed. Each line comes from a larger main line that can be run across the entire garden. Couplers, fittings, and connectors allow you to create distinguished main lines and side lines in the necessary shapes for your plants and bed layout.
Overall, drip is extremely versatile. The lines can be lifted above the ground level to enter raised beds and containers. The flexible plastic tubing has varying spacing of emitters where water comes out of the line, and “butts” to mark the end of each line.
You can adapt a drip system to a vegetable garden, orchard, flower garden, or perennial landscaping. Some gardeners put drip lines on timers so you can turn them on and off from one centralized location. Advanced timers and “smart irrigation” allow you to control the system while away.
The main issues with drip irrigation arise with improper setup and maintenance. Luckily, DIY irrigation kits often come with all the fittings you need and can be assembled sort of like Legos. While this system is quite affordable and forgiving of mistakes, it is also plastic-heavy. If you want to reduce your plastic use in the garden, copper tubing irrigation is available but significantly more expensive.
Most irrigation systems require a sediment filter and pressure regulator. Drip irrigation is no different! Whether from city water or a well, you must have a hose spigot where your main drip line is fed from. Proper filtration is especially important with this system because the emitters are small and can be clogged by excess sediment.
Clogged drip emitters are a real pain in the butt. Additionally, rodents sometimes munch into drip lines in a search for water. This can cause annoying “blow outs” where water sprays up like a geyser. Fortunately, troubleshooting drip irrigation is fairly easy as long as you stay on top of maintenance and monitoring.
This video includes excellent visuals and quick setup instructions for a simple raised bed irrigation system:

Best for Perennials: Soaker Hoses
 This allows the hose to gradually release water into the surrounding soil.
| Pros | Cons |
| Affordable and widely available at garden stores | Water delivery is less precise than drip lines |
| Easier and less complex installation (fewer fittings or elaborate connectors, compared to drip) | Small hose pores are easily clogged by minerals and debris |
| Delivers water straight to root zone (less weed and disease pressure) | High pressure can cause leaks and splits |
| No specialized tools or knowledge; only a garden hose, spigot, and soaker hose needed | Less effective on slopes |
| Easy to wind around shrubs and trees where sprinklers don’t reach | Underwatering and overwatering are risks due to less focused monitoring |
| Awesome for perennial beds, ornamentals, and trees | Not ideal for containers or large gardens |
| If covered with mulch, soaker hoses can last several seasons | If left exposed to the elements, hoses break down from UV rays and need regular replacement |
| Ideal for less-straight beds | Cannot be branched or split as elaborately as drip lines |
Soaker hoses are flexible porous hoses with tiny (sometimes barely visible) holes around the entire surface. This allows the hose to gradually release water into the surrounding soil, slowly soaking a plant’s root zone. These hoses work excellently for perennial and ornamental beds. They are also a cheaper and simpler alternative for vegetable gardens.
If you don’t want to mess around with complex connectors and fittings, soaker hoses are one of the most beginner-friendly options. You can find them at most garden stores and easily install in less than 10 minutes. The soaker hose simply hooks to a regular garden hose and then lays on the soil surface. However, multiple hose lines will require a splitter at your hose faucet.
Soaker hoses work best when they are buried under a layer of compost or mulch. This allows them to gradually drench the soil root zone. This is highly beneficial for preventing disease and drought issues. Since the water is delivered right at the base of your crops, shrubs, or trees, it is less likely to lead to fungal pathogens developing on the leaves.
Pressure is often an issue with soaker hoses. Too much pressure can cause the hoses to burst or overwater, while too little pressure can lead to uneven or failed watering. This is particularly problematic on slopes and hillsides, so soaker shoes are not recommended for uneven ground. The water tends to puddle at the lower end of the hose, resulting in even distribution of moisture.
Soaker hoses are less efficient and less precise than drip irrigation. Since they don’t have individual emitters, the water soaks out in every direction around the hose. In contrast, drip lines have different emitter spacings that only let water out at certain intervals. This means that soaker hoses can lead to more weed growth than drip lines, but less weed issues than overhead sprinklers.
Filtration is necessary for these hoses because the tiny pores can easily get clogged by debris or sediments in your water. Monitoring is also crucial because it is easy to overwater with a soaker hose. If you turn your irrigation system on and walk away, these hoses could oversaturate your beds in an hour or so, depending on the pressure.
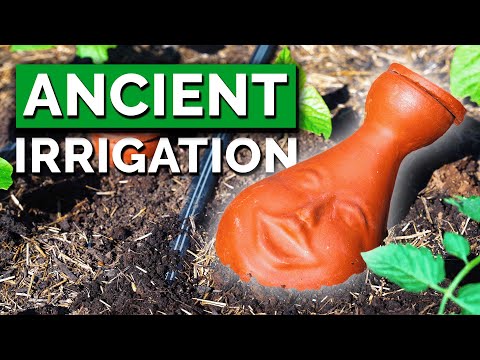
Best for Preventing Overwatering: Olla (Clay Pot Irrigation)
 When the surrounding soil is dry, more water comes out of the olla.
| Pros | Cons |
| Highly efficient (little to no water waste) | More expensive for a large garden |
| Reduces irrigation needs by up to 70% | Requires refilling from the top |
| Very low maintenance and passive | Not suitable for very small containers |
| Reduces risk of overwatering because water is only released when soil is dry | Must purchase multiple ollas for each container or bed |
| Naturally wicks water out of the clay pores | Pores can become clogged after 3-4 seasons |
| Plastic-free design (made of unglazed earthen clay) | Breakable, especially if frozen or dropped |
| Less risk of plant diseases due to root-level watering | Ollas take up space in the root zone |
| More consistent soil moisture (less fluctuations and less risk of blossom end rot) | You must remember to check and refill the pot |
| No need to worry about water filters or rodent damage | Must use a watering can or hose to fill |
If you are prone to overwatering your plants, clay pot irrigation with an olla is the most reliable solution. An olla (pronounced “oya”) is an open-topped unglazed clay pot used since ancient times for low-tech irrigation. The terra-cotta style containers are buried in the soil where they can slowly wick water out of the small pores whenever plant roots need moisture. Our favorite brand, GrowOya, offers three sizes for versatile use in different containers and raised beds.
This process works via natural phenomenons called moisture tension and capillary force, which explain how water molecules are attracted to soil molecules. When the surrounding soil is dry, more water comes out of the olla. If the soil is moist, water stays inside the olla until the moisture tension changes and soil particles wick more water out of the clay pot.
Research proves that buried clay pot irrigation is up to ten times more efficient than sprinkler irrigation. They can even be more efficient than drip lines if they’re used correctly. In addition to saving water, ollas ensure more consistent irrigation. The soil won’t fluctuate from super dry to super wet, which means your plants are less likely to succumb to problems like root rot or blossom end rot. This ancient irrigation method is especially useful in arid drought-prone areas like the Southwest.
The biggest drawback of an olla is the amount of space it takes up in the root zone of your planter or raised bed. These pots aren’t usually suitable for small containers, but they work great in large beds. There must be enough depth in the soil to fully bury the bottom of the olla, leaving only the cap exposed above the surface.
Ollas are also problematic for forgetful gardeners. This irrigation can be “out of sight, out of mind,” which means many people forget to refill the olla when it’s empty. While ollas solve the problem of daily irrigation, they still require a little bit of maintenance. The amount of time that it takes for an olla to empty varies dramatically based on soil conditions, crop needs, and the weather.
Best for Lawns and Groundcover: Sprinklers
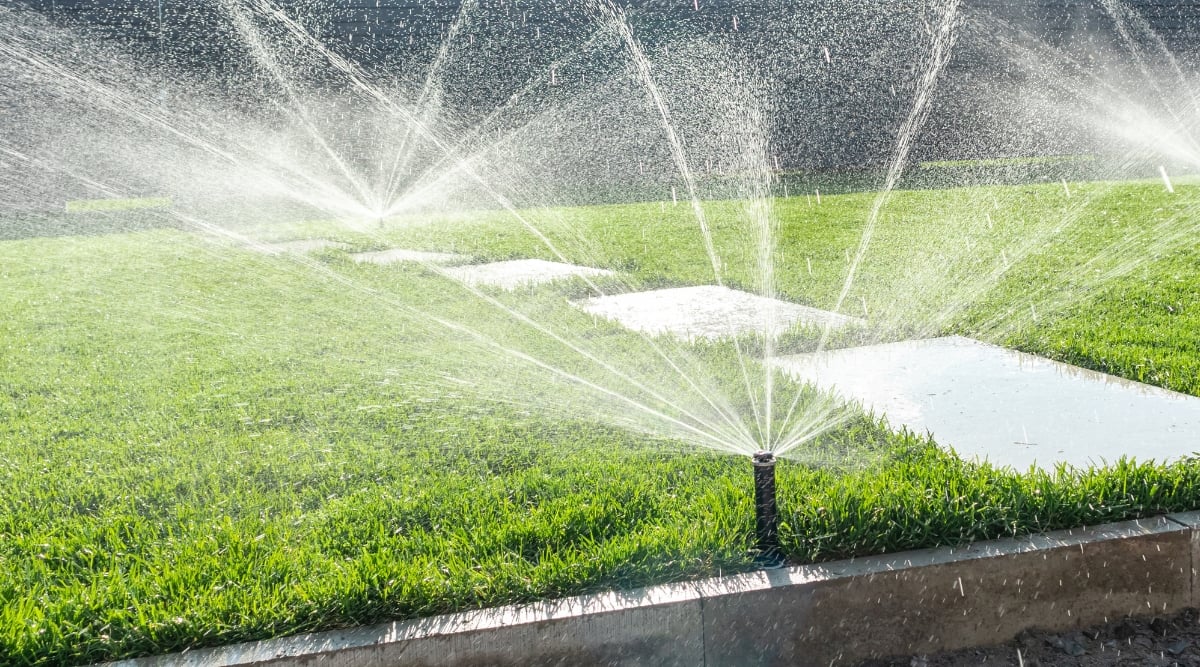 These pivoting emitters spray water up in the air as overhead irrigation.
| Pros | Cons |
| Cheap and readily available | The most wasteful form of irrigation due to evaporation and watering non-target plants |
| Easy setup and little manual labor required | Higher risk of foliar disease due to overhead watering |
| Timers and pivot systems make programming easy | Major risk of weed infestations due to soaking the entire soil surface |
| Can help cool off lawns or trees in hot weather, potentially reducing wildfire risk | Very imprecise water delivery (water is sprayed all over rather than directly where it is needed) |
| Great for lawns, pastures, or groundcover areas | Not recommended for vegetable gardens or fruit orchards |
| Suitable for very large-scale watering needs | Sprinkler nozzles easily clog from debris and sediment |
| Helpful for germinating large amounts of seeds | High pressure can damage plants and cause soil compaction |
Most gardeners are familiar with sprinkler systems since they are ubiquitous in residential lawn care. However, sprinklers are not recommended for vegetable gardens or orchards. These pivoting emitters spray water up in the air as overhead irrigation. This is awesome for watering large open areas like lawns or lawn alternatives, but it can create a lot of unnecessary issues for edible and ornamental crops.
Although sprinklers have a lot of haters, they are still very useful in some settings. Large pastures and lawns need an even delivery of moisture. If you run sprinklers in the morning or evening, you can reduce the rates of evaporation. Sprinklers are also essential for germinating seeds over large barren areas. If your yard already has sprinklers, you don’t necessarily need to rip them out, but it is helpful to use them wisely.
Sprinklers are the least efficient form of irrigation. They waste a lot of water due to evaporation. Up to 50% of the water from a sprinkler is lost before the plant can even absorb it. This is because the moisture sits on the plant surface for long periods before it trickles down to the roots.
For short plants like grass, this isn’t as big of a deal. But for crops like tomatoes and squash, the water may fail to reach the soil surface where roots can uptake it. This creates even more issues because the soil may be dry, but the leaves remain wet. Wet foliage is an invitation for fungal diseases like powdery mildew and blight to take hold. On cool, cloudy, humid days, disease risk from overhead irrigation is even more amplified.
Another annoying thing about sprinklers is their non-target water delivery. In other words, they often spray a lot of areas that don’t need to be sprayed. While you can angle and pivot different sprinkler heads, they are still highly imprecise. This leads to saturating large areas of soil where weeds and unwanted plants can grow. It is very difficult to get sprinklers to deliver water only in the place where you want them.
Best for Maintenance: Watering Hose
 A standard watering hose is essential in any garden.
| Pros | Cons |
| Quick, easy, and affordable | Manual labor of hauling a hose around |
| Great for watering in transplants and seedlings | Must stand in place for a long time (not automated) |
| Ideal for watering containers | Requires a quality nozzle to ensure even distribution |
| Great for watering bare soil to germinate seeds | Must take extra steps to avoid watering weeds or crop foliage |
| Easily adjustable to different pressures and spray shapes | Requires bending over if you don’t have the proper nozzle |
| Ideal for small to medium gardens | Requires storage area to roll up the hose and easily move it |
A standard watering hose is essential in any garden. Even if you have other types of irrigation, the classic hose can’t really be replicated. This cheap, easy, and widely available irrigation is essential for watering in transplants, tending containers, and germinating seed beds. Whenever you want a lot of water in a targeted area, a hose and nozzle are your best friends.
Hoses beat watering cans in almost every competition, but especially when tending greenhouses, newly seeded beds, or newly transplanted seedlings. These are three situations where a hose is actually better than drip irrigation. Sometimes drip lines don’t deliver enough water at once to properly germinate seeds or water-in new transplants. This is where a properly aimed hose (and some patience) can dramatically improve your results!
Hauling a long garden hose around the garden isn’t always fun. A proper hose storage housing is extremely useful, especially if it rolls up the hose and pivots around as you move. This setup also requires the proper nozzles and wands. Nobody wants to bend over to water for long periods of time, so it is essential to invest in an elongated nozzle that allows you to easily water at the ground level.
Watering level is another crucial consideration for using a hose. This form of garden irrigation can be very ineffective if you spray your hose willy-nilly over the top of your plants. This essentially creates the same imprecise, disease-promoting, and water-wasteful effect of a sprinkler. Instead, a hose must be strategically aimed at the soil to saturate the root zone or seedbed of the targeted plants.
Best for Small Gardens: Watering Can
 Watering cans are great for small-scale container gardens and indoor plants.
| Pros | Cons |
| Great for small patios, balconies, indoor plants, and container gardens | Very inefficient for watering large beds or numerous plants |
| Very cheap and widely available | Often requires walking back and forth to a sink or spigot |
| Easy to use and low-tech | Can spill or puddle water on the soil surface |
The good old-fashioned watering can is not completely obsolete. This option is great for small scale container gardens and indoor plants. It is the cheapest and most low-tech option on this list. If you have a very tiny garden and no access to a hose, then a watering can will suffice. Be sure to aim the tip of the can at the base of your plants and water until moisture flows out of the bottom drainage hole.
Watering cans are obviously the most inefficient form of irrigation in regards to human labor. You could spend hours walking back and forth from a sink or faucet to refill your watering can. These cute little cans also are linked to underwatering because many gardeners assume that a simple dump of the can is enough moisture for the plants.
Watering cans usually deliver all the water at once, which can create a puddle on the soil surface. This makes it look like you’ve properly moistened the soil, but the lower layers could still be dry. A hose makes more sense in most settings.
Best for Wet Areas: Dry Farming (Rainwater)
 Method for growing plants without additional water.
| Pros | Cons |
| No irrigation needed | Lots of soil amendments and mulching necessary to ensure sufficient soil organic matter and water retention |
| Perfect for areas with consistent summer rainfall, like the Northeast | Not ideal for arid regions prone to prolonged drought |
| Ideal for native, drought-tolerant crops | Risky for water-thirsty, non-native crops |
| Often produces more flavorful crops (like tomatoes, melons, and garlic) | Heavy mulching and deeper planting require |
| Little to no labor once the season begins | Preparation, planning, and proper varietal selection are crucial |
Dry farming is not technically a type of irrigation, but it is a real method for growing plants without additional water. If you love native species or ultra-flavorful fruits, you can try growing without any irrigation. Dry farming is a method of crop production that relies on moisture stored in the soil during the rainy seasons. If you amend the soil with lots of compost and organic matter, then plant your crops very deeply, they can thrive with no additional irrigation.
This method is the most reliable in areas with some summer rains, like the Northeast and East coast of the United States. It can be used strategically in areas with dry summers and wet winters, such as the Pacific Northwest, as long as steps are taken to prepare the soil in advance. Deep soil amendment, furrows, and other ground-storage of excess water ensures that crops can access moisture deep in their root zones whenever no irrigation is available.
Dry farming is especially useful for gardeners without access to irrigation or with limitations on water use. In these cases, you should prioritize native species that are naturally accustomed to the dry season in your region. Mulching is very important for retaining soil moisture through droughts.
When dry farming goes wrong, it’s pretty sad. It is mostly recommended for native landscaping (called xeriscaping), rather than vegetable production. While vegetable growers can pull this off, it requires much more planning, research, and preparation.
Improperly prepared soil will not be able to hold enough moisture throughout the season to fuel plant growth. It could require significant investments in compost or amendments to increase the organic matter and water holding capacity of your garden soil.
Key Takeaways
In summary, the best overall watering system is drip irrigation. It is highly efficient and lasts for many seasons to come. Drip lines prevent disease and weed problems caused by overhead irrigation because they deliver water via emitters straight at the base of the plant.
Soaker hoses are a cheaper option with less infrastructure and setup requirements. A garden hose remains ubiquitous and helpful for any gardener as long as you have the proper nozzles, wands, and hose storage equipment.
Sprinklers and watering cans are the least efficient forms of irrigation, but they will suffice for extra large or extra small gardens, respectively. Lastly, dry farming is a reliable option for native plant aficionados, xeriscapes, and regions with reliable summer rainfall.