From homemade french fries to buttery mash to sour-cream-smothered baked potatoes, spuds are a staple crop in the kitchen. You may wonder, what’s the point of growing potatoes in your raised garden beds if they are so cheap and readily available in stores? The answer lies in diversity, color, texture, and flavor!
Most specialty spuds are not available in supermarkets, and growing them yourself offers far more culinary exploration. Better yet, growing this crop produces a lot of cheap, calorie-rich food in a small space. If you’ve struggled to harvest abundant high-quality tubers in the past, I’ve got some valuable trade secrets that I learned as a commercial organic potato farmer.
Let’s dig into the best tips for growing spuds in your garden!
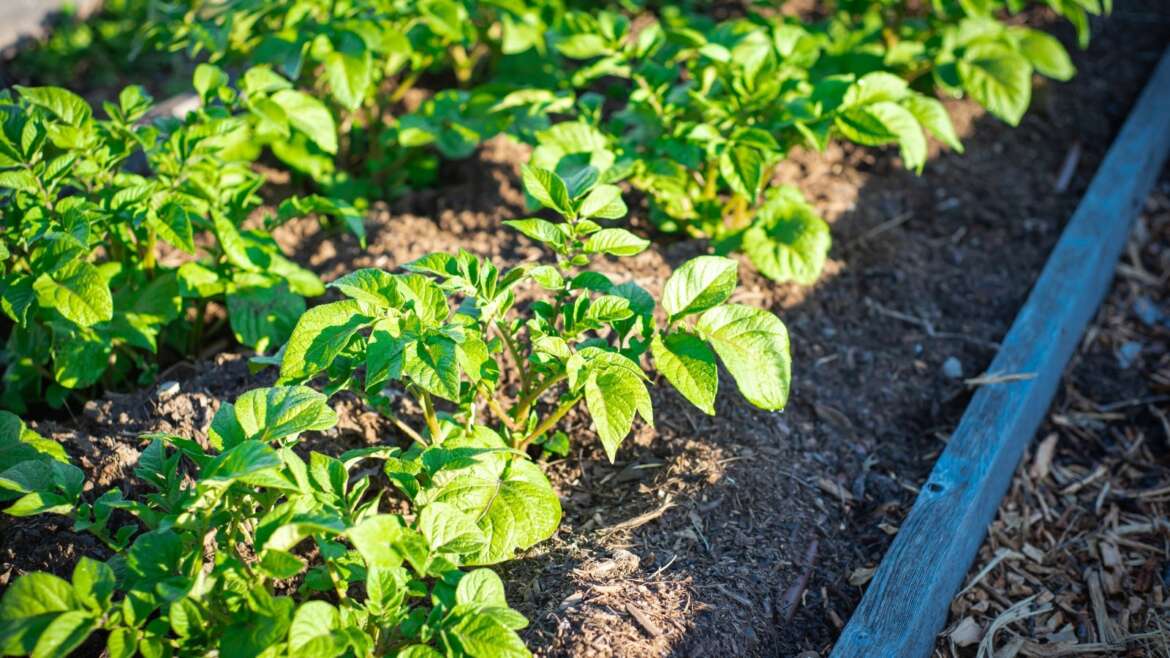
How Do You Grow Potatoes in Raised Beds?
Grow potatoes in raised beds or containers for a successful harvest.
These tubers thrive in the deep soil of a raised bed or container. Choose an early, midseason, or late variety and “chit” the tubers by leaving them in a cool, openly lit area to sprout. Plant three to four inches deep with the eyes or sprouts facing upward. Provide consistent moisture and begin hilling soil over the plants when they are six inches tall. Unless you’re working with a determinate variety, hill regularly to ensure that all the tubers remain buried.
Track the planting date in your calendar and pull up a test plant after the estimated days to maturity have passed. Early and new potatoes can be harvested when they start flowering. For main crop and storage varieties, the leaves may turn from green to yellowish-brown in the fall, indicating that the tubers are ready to harvest.
9 Tips for Prolific Potatoes
Potatoes are very easygoing crops that don’t ask for nearly as much maintenance as their tomato relatives. However, pulling up a big leafy plant to find pathetic little tubers can be pretty disappointing. These tips will ensure prolific spud harvests with big, starchy (or waxy) tubers that put grocery store potatoes to shame!
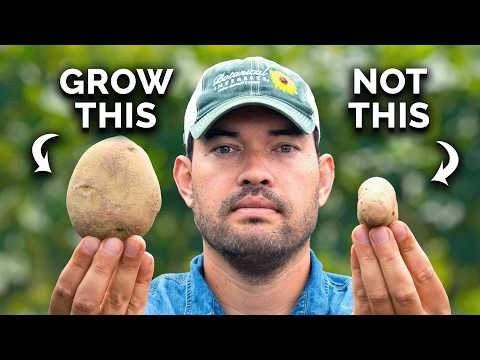
Pick the Best Varieties
 Choosing the right potato variety ensures optimal yield and culinary delight.
Like most veggie crops, every potato variety has its own functionality. There are over 4,000 varieties grown worldwide, much of the diversity concentrated in the Andean mountains of South America. Choosing the right cultivar is the most important first step to abundant yields and delicious meals. The genetics of a variety determine how it will perform in the garden, how long it will take to harvest, and what it will taste like in the kitchen.
If you love big baked potatoes smothered in fillings, you don’t want to grow tiny round spuds. But if you crave mini potato roasts or potato salad, you shouldn’t plant a variety that yields massive starchy tubers.
Determinate vs. Indeterminate
 In potatoes, determinate vs. indeterminate defines growth habits and harvest times.
We’ve heard of determinate and indeterminate tomatoes, but did you know that these categories apply to potatoes, too? Tomatoes and potatoes are closely related cousins, both belonging to the Solanaceae (nightshade) family. But in the potato world, determinate vs. indeterminate doesn’t mean bush versus vine. It actually refers to seasonality, underground growth habit, tuber size, and days to maturity.
Here’s a quick chart comparing the two:
| Determinate | Indeterminate |
| 1st early or 2nd early | Main crop |
| 10-12 weeks (1st early) or 13-15 weeks (2nd early) to mature | 16-22 weeks to mature |
| Smaller tubers | Larger tubers |
| Rich flavor, perfect for roasting and salad potatoes | More versatile, perfect for baking, mashing, and making french fries |
| Grow tubers at single layer in the root zone | Produce tubers at multiple levels in the root system |
| Quicker yields for short seasons | Highest yielding in raised beds and containers |
Early Varieties
 1st and 2nd early potatoes offer quick maturity and uniform tuber size.
Determinate potatoes are also known as “1st early” or “2nd early” varieties. 1st early varieties typically take 10 to 12 weeks to mature. They are smaller in size and perfect for roasting. ‘Red Pontiac’ is a popular 1st early variety with exceptional flavor and bright red skins.
2nd early varieties are also determinate, but they grow slightly larger and take 13 to 15 weeks to mature. The ‘Charlotte’ variety is golden, rich, and buttery. These determinate plants only produce tubers at a single level in the soil. In other words, the root system will produce one layer of harvestable spuds.
Main Crop Varieties
 Main crop potatoes produce large tubers for versatile culinary uses.
Indeterminate varieties are also known as “main crop” spuds. These varieties yield the largest, most versatile tubers. They are best for baked potatoes, french fries, potato wedges, and mashing. They have a longer growth period, typically taking 16 to 22 weeks to mature.
The great thing about main crop varieties is they grow on multiple levels throughout the root system. In contrast to determinate varieties’ single layer, indeterminates grow tubers at multiple levels in the soil.
When choosing a cultivar, check which category it fits into. Early varieties will yield earlier in the season, and main crop varieties are usually better for storage.
Experiment with Multiple Varieties
 Potatoes allow for diverse planting without worrying about cross-pollination.
Texture and color are the other key characteristics to consider before you pick your varieties. Luckily, you can grow as many different types as you’d like in a single bed. Unlike corn or squash, there is no need to worry about cross-pollination. Potatoes are vegetatively propagated (cloned) with their tubers, so a great diversity of plants can grow in the same area without issue.
Waxy Types
 ‘Yukon Gold’ potatoes are prized for their buttery texture and golden flesh.
Waxy varieties have higher moisture content and a “glossy” feel in your mouth. They are great for boiling or roasting and adding to a salad. Most waxy-textured varieties are determinate types, but there are some exceptions.
Some excellent waxy varieties include:
- ‘Norland Red’: Pretty burgundy skins with yellow, waxy flesh, great for salads and boiling
- ‘Adirondack Blue’: Bright bluish-purple skins with waxy, firm texture
- ‘French Fingerling’: Buttery, earthy flavor with knobby, waxy texture and indeterminate growth.
- ‘Yukon Gold’: Semi-starch, semi-wax type is very versatile and ideal for roasting.
- ‘Superior’: Oblong rubbers with flaky skin, golden flesh, and 85-90 days to mature
Starchy Types
 ‘Russian Blue’ potatoes are known for their striking blue-purple skin and creamy texture when cooked.
Starchy style spuds, like the classic ‘Russet,’ are ideal for french fries, baking, and mashing. The tubers are fluffier and higher in starch, making them more amenable to soaking up fats and oils. These spuds are usually “main crop” indeterminate types with longer days to maturity. They are typically larger in size and harvested later in the season.
The best starchy varieties include:
- ‘German Butterball’: Late-yielding yellow starchy spuds with superior flavor and longer storage time.
- ‘Russian Blue’: Heritage variety with vibrant blue skins and high-starch flesh for baking or mashing, high-yielding and indeterminate.
- ‘Amaraosa’: Fingerling-style oblong spuds with mid-to-late season harvest.
- ‘Russet Burbank’: The iconic roasting potato with extra starchy flesh and neutral flavor.
Pre-Sprout (Chit) Your Tubers
 Chitting potatoes can jumpstart growth, yielding an earlier harvest advantage.
To chit or not to chit? That is the question! Chitting is a weird word for pre-sprouting potatoes. Many gardeners insist that you need to sprout seed potatoes before they go into the ground. While it isn’t absolutely necessary, it is the best way to speed up growth and ensure a strong crop. Chitted spuds can yield up to two weeks earlier!
Whether you’re starting from an organic grocery store tuber or purchased seed potatoes (which were specifically grown for planting), chitting is great for boosting vigor and productivity. Pre-sprouting is particularly advantageous for cold-climate growers with a short growing season.
The benefits of pre-sprouting include:
Chitted potatoes are often ready to harvest 1 to 2 weeks earlier.
Chitting the tubers gives them a head start indoors so they can take off more quickly once the spring frost risk has passed.
The sprouted buds are less likely to decay once in the soil.
How to Chit Potatoes
 Pre-sprouting in egg cartons protects potato sprouts during transplanting.
Pre-sprouting spuds is very simple and quick. The most important part is the transport and transplanting process. Once the tubers have sprouted, you must be very careful not to knock the sprouts off because the tuber just used a lot of its energy to produce them. The best way to avoid knocking off sprouts is to chit your potatoes in egg cartons or another easily portable container.
Every potato has multiple “eyes,” which are the buds that grow on the skin. If you leave a potato on the kitchen counter for too long and it starts sprouting, those sprouts are growing from the eyes. Each eye will produce a sprout.
You can chit all of your potato varieties at once, but be sure to label them if they look similar. To start the process:
- Start chitting 4 to 6 weeks before you plan to plant in your raised beds.
- Spread newspaper over a tray or box, or gather old empty egg cartons.
- Spread the potatoes an inch or so apart, or place one potato in each carton hole.
- Keep the side with the most eyes facing upward.
- Place them in a relatively cool area with dappled light, like a kitchen counter or patio.
- Wait until sprouts appear and grow several inches long.
Remember, you don’t have to chit your potatoes! They will still sprout if you plant them directly in the ground! This tip is most valuable for cold-climate gardeners who want to speed up the process.
Cut Larger Seed Potatoes in Chunks
 Cutting seed potatoes into chunks boosts yields and saves money.
If you want to make the most of your seed potato budget, cut larger tubers into chunks before planting! Cutting the seed tubers will multiply your yields and the overall amount of plants. Any chunk of potato can grow into a plant as long as it has several eyes (buds) and it’s at least the size of a golf ball. This tip is great for gardeners on a budget.
About two to three days before planting, cut your larger seed potatoes with a sharp, sanitized knife. First, check that each side has a minimum of two to three eyes. If they’ve already sprouted, handle them very carefully.
Cut the tuber into chunks, ensuring each chunk is larger than a golf ball. Most seed potatoes should just be cut in half. Remember, if there aren’t any eyes, the chunk will not grow into a plant.
Callousing
 Cutting and callousing seed potato chunks before planting ensures success.
Leave the chunks in the chitting trays to callous over for a few days before planting. This mini-curing process promotes the cut portion to form a protective skin coating that makes it less likely to rot once you put it in the soil. Callousing isn’t always necessary, but it is the most helpful way to prevent rotting. Once the seed potatoes are properly cut and calloused, you are ready to plant!
You may worry that cutting the seed potatoes could lead to smaller harvests. Fortunately, this is not true! Sometimes, an oversized seed tuber actually bears tons of tiny spuds. Creating more uniform chunky starter potatoes ensures that the plant funnels its energy into an abundance of new tubers later in the season.
Save Your Best Beds for Other Crops
 Potatoes thrive in diverse soils with minimal fuss and care.
One great thing about this staple crop is that it’s not super picky about soil. For limited-space gardeners, it’s best to save your best beds for other crops. There is no need to plant them in your highest-quality soil. The tubers will grow abundantly in medium to poor soil, and they don’t need a ton of compost to do it. As long as there is proper drainage and moisture, the plants will yield without a ton of extra fertility or organic matter. You can even grow some varieties in grow bags or containers.
These tubers are an iconic staple crop for a reason: They are super resilient and rugged! This is why they’ve fed everyone from peasant farmers to kingly rulers for thousands of years. Save your best soil for crops like tomatoes, peppers, salad greens, and strawberries.
Don’t Top Off the Raised Bed With Soil
 Planting tubers in settled soil simplifies the hilling process.
It is a common practice to add a layer of compost or topsoil to our raised beds in the spring. This helps refill the bed after some soil settles through the winter. But topping off the soil level is not necessary for potatoes! It’s actually easier to plant the tubers in a bed with a lower soil level, which makes the hilling process even quicker.
This crop is commercially grown in mounds. Hilling or mounding the soil ensures that the tubers stay buried underground for the entirety of their growth cycle. Only the leaves and stems should emerge above the surface. Any portion of a potato tuber exposed to the sun will turn green and produce solanine, which compromises the flavor and safety of the root.
If you leave your raised bed soil settled, it will be very easy to mound the plants a few weeks after they start growing. You can add soil to the top of the bed, then rake it out to keep the tubers buried.
Make Furrows and Plant Deep
 Use the furrow method for planting.
When preparing to plant your potatoes in raised beds, the furrow method is the quickest and easiest way to ensure the proper depth. Obviously, most of the magic of this crop happens deep below the surface. Your potato plants will produce a lot of above-ground foliage, but they prefer to get established in the darkness of the soil.
In fact, deep planting is important because spuds exposed to the sunlight can form green spots. As we’ll explain below, hilling ensures that all the tuberous roots stay below ground at all times. Green spots on potatoes develop a small amount of a compound called solanine, which is toxic at high levels. Avoid eating green or raw potatoes, and plant deep to keep the roots underground where they belong.
A 15 to 24-inch-deep raised bed is ideal for growing spuds. Use a shovel or a planting auger to create furrows or holes about three to four inches deep. A furrow is just a long valley in the soil that makes it easier to hill them. An auger is a drill attachment that rapidly digs a hole in poorer soil with minimum effort. Both work as long as there is plenty of room for the potato to enjoy a cozy, well-buried start to life.
Point Eyes Upward When Planting
 Positioning potato eyes upward ensures quicker plant establishment and growth.
This very simple tip can help your plants establish more quickly. A potato can technically grow if it is just tossed in deep soil. But if you orient the eyes or sprouts upward, it helps the plant take off more rapidly. Less energy is required to funnel the sprout up to the surface. It takes an extra half-second to point the eyes upward, so you might as well give your plants an easier start!
Hill Regularly
 Hilling potatoes in raised beds ensures tubers stay covered for growth.
The only major maintenance that potatoes require is hilling, but this step is crucial to success. As we mentioned above, planting in a raised bed with a lower soil level makes things even easier. When the plant foliage is six to eight inches tall, begin layering soil about four inches up the plant base.
Some leaves and stems should still be visible up top, but the bottom half of the plant should be covered. You can use a shovel to layer more soil. Repeat the process in a few weeks when the plants are 10 to 12 inches tall. By this time, your plants will have nice mounds of protection to keep the tubers underground, protecting them from greening.
While most in-ground growers pull soil from the ground between soil rows, raised bed gardeners should source the soil from outside the bed. You can use compost or old potting mix from another container.
Check for Signs of Harvest
 To ensure a successful harvest, monitor potato plants for flowering.
This final tip will help prevent some major mistakes beginners often make with potatoes. You want to harvest at the right time; otherwise, all your growing efforts will be wasted. The best way to properly time your harvest is by setting a reminder in your calendar and observing the plants. If your variety takes 70-80 days to mature, place an alert in your calendar about 70 days after planting to remind you to check the spuds.
Clearly, it’s hard to know how big the tubers will be until you dig them up. The most reliable above-ground signs of harvestability are:
Potatoes produce white or pink flowers that resemble tomato blossoms. When the blooms appear, it is a sign that you should harvest “new” or “spring” potatoes. These tubers are softer with very tender skin, ideal for eating immediately as they will not store.
You know main crop potatoes are ready when the leaves turn from dark green to yellowish-brown (as long as there is not any disease). In autumn, the tubers will start dying back as the nights cool. You must harvest before it frosts!
Once you see the foliage drying, you can use pruners to cut back the above-ground foliage. Leave the storage potatoes in the ground for another week or so to allow their skins to thicken. This “field-curing” enhances the tubers’ storability. If the weather gets too cold, pull them and cure them indoors instead.
Final Thoughts
Backyard potatoes are a super rewarding, calorie-rich, and easygoing crop. Variety selection, planting, and hilling are the most major parts of the process. For the rest of the season, the plants grow vigorously with regular moisture and plenty of sunlight. When growing in raised beds, save your best beds for other crops that demand quality soil. These tubers don’t mind rugged conditions as long as they have water and they remain buried underground.