When planting a vegetable garden, growers often opt for peppers. They are prolific, compact, and easy to manage, and their beloved fruits have many uses in the kitchen. Grow chiles alongside tomatoes, onions, and garlic, and you’ll have all the ingredients for homemade salsa.
‘Anaheim’ peppers are a special choice as they offer versatility in flavor. Milder than jalapeños, this variety ranges in Scoville units from 500 to 5,000, although most will be between 500 and 2,500 units. For context, jalapeños range from 2,500 to 8,000. As ‘Anaheim’ fruits ripen, they produce more capsaicin and gain spiciness.
Whether you love heat or prefer mild varieties, this type is the right one for you. Grow it alongside bell and sweet peppers for a full range of chile flavors. Learn how to grow ‘Anaheim’ pepper plants and how to preserve their fruits with this comprehensive guide.
Overview
These belong to the Capsicum annuum species within the Solanaceae family.
| | |
What Is It?
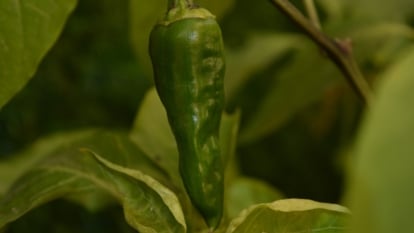
‘Anaheim’ peppers are of the species Capsicum annuum and have close relations to bell peppers, jalapeños, and serranos. Their fruits are green at first and ripen with deep red patches. Over time, they become bright red all over. At each stage, ‘Anaheim’ chiles gain considerable flavor,
Chile Colorado, a popular Mexican dish, uses dried red ‘Anaheim’ peppers in a stew. The immature green chiles are available at most grocery stores. Use them as a seasoning base in salsas or roasts. Their mild heat and complex flavor add a delicate touch to any dish that needs spiciness.
‘Anaheim’ peppers also have the name Hatch chiles, after the Hatch region in New Mexico, where farmers cultivate them. Nowadays, the original ‘Anaheim’ variety has tons of cultivars. ‘NuMex Joe E. Parker’ is a fine one, with six to eight-inch-long fruits!
Native Area
 Emilio Ortega commercialized and popularized ‘Anaheim’ chiles globally.
Species of Capsicum anuum are native to large swaths of Central and South America. The ‘Anaheim’ cultivars originated in New Mexico and spread to Anaheim, California, by growers. ‘Anaheim’ peppers are now available at nurseries, seed retailers, and online.
The story goes that Emilio Ortega, the founder of the Ortega Chile Packaging Company, brought these chiles to Anaheim. From there, he packaged the peppers and sold them, making them a global hit.
Characteristics
 Green ‘Anaheim’ chiles have a mild flavor that becomes spicier as they ripen.
Like most other peppers, ‘Anaheim’ plants grow in full sun, warm temperatures, and with regular water. They sprout long green leaves on thin stems. They sprout white flowers that morph into skinny green chiles. The fruits sometimes grow wrinkles on top, and each differs in taste and size.
‘Anaheim’ chiles grow as annuals where the weather dips below freezing in the winter. They function as perennials where winter weather is mild and warm and survive year to year with ease. This variety also works well in a container, and you can bring it inside when fall frost arrives.
Green ‘Anaheim’ chiles enjoy a wide range of uses, like canned and preserved salsas, sauces, and chile mixes. They have a mild, sweet flavor, although they can get pretty spicy as they ripen red. Smoke and dry red ‘Anaheim’ peppers for a Chile Colorado dish, or for fermented sauces.
Propagation
Multiply pepper plants with seeds or stem cuttings. Seeds are the most reliable method, and growing them is a fun process. Sprout peppers indoors two months before your last frost and you’ll have an indoor garden while it’s winter outside!
After your seeds sprout, take cuttings of overgrown plants and root them to further multiply your crop. Read on and discover easy ways to grow your peppers.
Seeds
 Keep pepper seedlings indoors at night until temperatures stay above 55°F.
Find seeds online or at a local nursery. Two months before your last average frost date, sow them in five-inch pots with potting soil. Water the pots and place them under a brightly lit windowsill or grow lights. If the seeds aren’t germinating, try using a seed germination heat mat. Most homes are cool during the wintertime, and peppers need warmth to sprout.
If you’re using grow lights, keep them on from eight to sixteen hours. The more light peppers receive, the bigger they grow. They need a rest period and benefit from having the lights off for at least eight hours at night. By a windowsill, the stems naturally increase in size as the days get longer in spring.
Freezing weather occasionally lingers in spring. If it’s still below 55°F at night, you’ll want to keep your seedlings inside where they’re safe and warm. Kept indoors too long, and your peppers may outgrow their pots. Fix this and transplant overgrown chiles into larger containers like a quart or gallon size.
Cuttings
 Use humidity domes and dappled shade for newly potted cuttings.
Take six-inch cuttings off of overgrown ‘Anaheim’ plants in spring or summer. Strip the cuttings off their lower leaves, but keep the top leaves. Using herbal snips or scissors, snip the top leaves in half to prevent them from growing. This helps trick the plants into diverting their energy to root production.
Place the stripped cuttings in square pots with potting soil and water well. Without roots, your cuttings are susceptible to the elements. Add a humidity dome onto the plants to help speed up the process. The weak cuttings also need dappled shade, as direct sun can burn them.
Within a week to a month, your cuttings should sprout roots. Transplant them straight into the garden or into a container.
Planting
Now that you’ve sprouted seeds and cuttings, you’re ready to transplant. A bit of preparation of the soil and site will help ‘Anaheim’ chiles thrive throughout the growing season. Give them the care they need, and they’ll reward you with basketfuls of fruit!
Preparation
 Avoid root circling by removing chiles from shallow pots.
Prepare the site or container by amending the soil. Peppers appreciate well-draining and fertile soil and will struggle in hard clay or dry sand. If the site has too much clay or sand in the dirt, amend the area with compost. Add it on top and dig it in. Over time, compost breaks down and adds nutrients, bacteria, fungi, and bugs into the soil.
Get the chiles ready by taking them out of their pots. Shallow pots encourage root circling, and peppers that overgrow their pots are susceptible to this type of growth. Analyze the roots and cut any circling roots. Arrange the roots so they hang down, and they’ll anchor onto any new soil they touch.
Transplanting
 Some growers prune pepper plants by removing the top stem at transplanting.
Space plants a foot or two apart from each other. Start by digging a hole twice as deep and wide as the plant’s rootball—then backfill the hole with compost and loose soil until it is as deep as the rootball. Use manure, green plant clippings, or dried leaves if you don’t have access to fresh compost. If you’re using plant clippings or any other amendment with low levels of nutrients, innoculate the planting area with a dose of organic fertilizer.
Place the peppers in their holes and backfill the soil around them until it reaches the base of their trunks. Water the site and allow the soil to settle. If it settles below the trunk, simply add more soil so it’s level again.
Some growers opt to “top” their peppers at transplanting. “Topping” removes the top part of the stem so that the plants grow bushy and compact. The decision to chop the plants is up to you! If you have a short growing season, I recommend not topping the plants. They may not have enough time to recover from the pruning.
How to Grow
Peppers thrive during the summertime as they bask in the warmth the sun brings. Plant two or three, and you’ll have tons of fruit with little maintenance. Give them good soil, water, and nutrients, and they’ll perform endlessly until cold weather arrives.
Light
 Plant them in afternoon shade to shield them from intense summer heat waves.
‘Anaheim’ peppers need full sun to flower and fruit to their full capacity. Situate them where they’ll receive six to eight hours of direct sunlight a day. The direct sun hits the leaves of ‘Anaheim’ cultivars, where they convert the energy into nutrients. Place them in raised beds where there’s sufficient sunlight and situate containers in similar conditions.
In extremely hot areas with summer heat waves, plant ‘Anaheim’ peppers where they have afternoon shade. This protects them from the hottest parts of the day. In cool summer zones, situate chiles where they have at least six hours of direct sunlight.
Water
 Container-grown chiles require frequent watering, especially on hot days.
Peppers appreciate regular water while they blossom and fruit. They appreciate moist soil like a wrung-out sponge. Try not to overwater ‘Anaheim’ plants, as they are susceptible to root rot.
A good rule of thumb is to let the top of the soil dry out between waterings. You can test the dirt by sticking your finger or a stick into it and seeing if it has moisture. With spring rains, irrigation may not be necessary for young plants. Established plants need water when their soil dries out—this can be once a week to once a day, depending on the weather.
Container-grown chiles need more water than ones growing in the ground. On particularly hot days, they’ll need water twice a day to keep them cool. Use the finger test on the containers’ soil to know when to water.
Soil
 Promote healthy pepper growth by improving soil drainage with compost.
Amending the soil and keeping it happy throughout peppers’ lifetimes greatly increases fruit production. An active soil food web with worms, fungi, and bacteria encourages their roots to grow deep and long in the dirt. They appreciate soil with a pH level between six and a half and seven, from slightly acidic to neutral.
Peppers also appreciate good drainage so they don’t receive root diseases. Amend clay or sandy soil with an organic amendment like compost. Mix it into the site’s soil, and add it to the planting holes at the time of transplanting. Then, add more of it onto the top of the soil. A top layer of mulch conserves water moisture, and it regulates the soil’s temperature.
Temperature and Humidity
 ‘Anaheim’ chiles thrive in sunny, well-ventilated areas.
Hot temperatures allow pepper plants to inject flavor and spice into their fruits. The more heat they receive, the hotter and more flavorful their fruits become. Situate specimens alongside a south-facing wall in cool summer zones with overcast skies. Consistent temperatures below 80°F make it difficult for ‘Anaheim’ chiles to ripen—this trick helps by capturing the heat that collects at the end of the day.
With consistent airflow, peppers are less susceptible to diseases and pests. Areas with direct sunlight are usually open enough for ‘Anaheim’ chiles to thrive. If winds are extreme in your area, your ‘Anaheim’ chiles will benefit from protection along a fence or building.
Fertilizing
 Apply organic fertilizer before blooming to boost growth.
‘Anaheim’ chiles don’t need fertilizer if the site has fertile soil. Where fertility is low, apply one to two doses of organic fertilizer to the plants before they set blossoms. After blooms form, fertilizer encourages excess leaf growth at the expense of fruit and flowers.
Maintenance
 Prune plants heavily in autumn after the first frost.
Maintain this variety by removing diseased or dead parts of the plant. If leaves crowd out peppers on the interior, snip a few to let sunlight pass through. The fruits need warmth and sunshine to change color and develop flavor.
‘Anaheim’ chiles reach heights of 24-30” and benefit from small stakes or cages. Although not that tall, their stems bend down under the weight of heavy fruits. Adding support gives your chiles an extra boost.
In autumn, as the first frost arrives, hard prune the plants so they divert their energy towards ripening. Remove stems without fruits, and cut off a third of the leaves. Cut off any new blossoms that are open or developing. This process may seem harsh, but it helps your plants focus their efforts on finishing the fruits they’ve already formed.
Harvesting
 Preserve fresh peppers by freezing or refrigerating them for shorter-term storage.
The best part of growing peppers is collecting them to eat! In midsummer and fall, plants have fruits ripe for the picking. Harvest green or red fruits when they’ve reached six to eight inches long and have thick walls.
Although this variety has less spice than jalapeños, the capsaicin can still irritate the skin. Wear gloves while harvesting, and wash your hands after cooking with them. To harvest, cut peppers off their stems with snips or pruners, leaving a bit of stem on their tops. With your fruits collected, you’re ready to mix them in your favorite recipes!
‘Anaheim’ chiles are incredibly versatile. Use green ones instead of bell peppers in recipes for a spicy kick. They also make excellent chili relleno, as they add spice to this cheesy traditional meal.
Red ‘Anaheim’ fruits are famous for their use in Chile Colorado. The red fruits have more spice than the green ones—they sometimes have as much heat as serranos! Smoke and dry red fruits for an additional touch of complex flavor. The smoked chiles work well in salsas, frittatas, and pickled goods.
Preserve fresh peppers in the freezer, or keep them for up to two weeks in the refrigerator. Dry fruits by hanging them up where there is airflow and indirect light, like next to a kitchen windowsill.
Common Problems
Peppers may experience pests or diseases during their lifetimes, especially when growing in harsh conditions. Healthy plants are strong and resilient to attacks from bugs, fungi, or viruses. If your plants are struggling, there are a few easy ways to fix it. Correct their conditions, and they’ll have speedy recoveries.
Yellow Leaves
 Prevent this by maintaining consistent watering throughout the growing season.
Peppers have yellow leaves normally when the weather cools. Frost and wet rains cause them to yellow and drop. Yellow leaves on the bottom of the plant are often a symptom of shade from the top leaves. Simply snip a few of the top ones to let light in.
If your peppers have yellow leaves in the spring or summer, the issue could lie in the soil and how much water it receives. Dense-clay and free-draining sand are tough on chiles. You can correct the soil by adding compost or a similar organic amendment.
If the soil is porous and there are yellow leaves, the plants are most likely experiencing a watering issue. Too little or too much water causes peppers to pull nutrients in from their leaves, turning them yellow. Ensure your plants receive regular water during the growing season, and avoid making the soil too wet and soggy.
Pests
 Protect young plants in early spring by using row covers.
A few bugs attack chiles, like aphids, whiteflies, and pepper weevils. Flea beetles sometimes attack plants in areas where they’re common. Spray down infested plants with water to remove them. Do this once a day for a week, and most pest issues will go away.
Row covers protect young plants and keep them warm during early spring. Make a row cover by adding hoops to an area and drape greenhouse plastic over them. Then, clamp it down so it stays secure.
Pepper weevils attack fruits as they’re forming. Prevent their population from spreading and harvest fruits continuously. This pest thrives where there is lots of rotting fruit, so be sure to clear the area of any chiles that dropped off the plant.
Diseases
 Amend plants with calcium fertilizer and ensure consistent watering.
A few diseases infect peppers like tobacco mosaic virus, blossom end rot, and powdery mildew. Avoid tobacco mosaic virus by not touching plants after handling tobacco.
Where pH levels are correct and water is regular, blossom end rot is typically from a calcium deficiency. Amend plants with a regular dose of calcium fertilizer and water it in.
This variety also experiences root rot and attacks from similar fungi. Avoid fungal issues by using proper soil and watering methods. Plants are more susceptible to these issues when they grow in packed clay dirt.
Prevent other viruses with clean cultivation methods. Ensure pruners are clean when you use them, and apply rubbing alcohol to them to kill any diseases.
Final Thoughts
‘Anaheim’ peppers are a superb choice for gardeners everywhere, not just those in Anaheim! Grow them alongside bell peppers and serranos for the ultimate range in spiciness. Add tomato vines, onion bulbs, and garlic to foster a salsa garden.
I love these chiles for their heat, flavor, and size. Green and red, they are a treat to cook with in the kitchen. Plant seeds this year and enjoy bushels of Anaheim fruit from spring until fall.