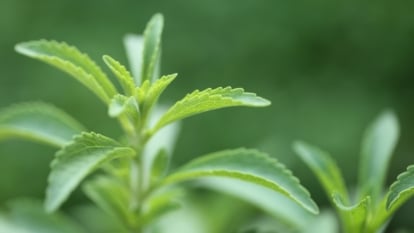
Stevia is an interesting plant that can be used as a natural sweetener for all sorts of things, from cakes to a cup of tea. Growing stevia requires little care, but the basics relate to their origins in South America.
It makes an excellent shrubby perennial bush and can be used to sweeten foods and drinks straight from the garden or processed for later use. It’s a fantastic addition to your herb garden, whether you grow it in a container or in the ground outdoors.
In this article, we offer some guidelines on how to grow the best stevia, harvest the leaves, and process them for your next baking day, or even just because they’re a pretty green plant in the herb garden.
Overview
The Stevia plant belongs to the genus Stevia and the Asteraceae family.
| | |
What Is It?
Stevia rebaudiana was described in 1899 by Mosè Giacomo Bertoni, a Swiss-born botanist who lived in Paraguay. He noticed its sweet taste and that the locals called it a ‘sweet herb’ and used it for medicine and as a culinary sweetener.
There are about 200 varieties of Stevia, but only two of them, Stevia rebaudiana and Stevia phlebophylla, produce the sweet compound in their leaves – steviol glycoside. Stevia phlebophylla is a rare species from Mexico. For the purposes of this article, when we refer to stevia, it will be the Stevia rebaudiana variety.
There are several common names for this plant, including candyleaf, sugarleaf, and sweetleaf.
Native Area
 Stevia prefers humid environments like those found in Southeast and West Central Brazil.
Naturally, stevia grows in Brazil and Paraguay. It prefers this region’s humid, damp environments, but mimicking the environment in a typical garden setting is easy.
Characteristics
 Stevia is popular among dieters and a healthier option for sugar enthusiasts.
Stevia is an herbaceous perennial shrub or sub-shrub with green leaves and a bushy appearance. It will grow about 18-24 inches high and wide in warm tropical climates similar to the environment at its origins. The shrubs will be smaller in colder areas.
Because of its value as a sweetener, it is often grown commercially. It also grows well in gardens and herb gardens. The natural leaves contain no calories or carbohydrates, making them a sought-after commodity for dieters. It is also a healthier alternative for sugar lovers and, in particular, a good option for people with diabetes.
Stevia produces small white flowers in autumn, but to get the most out of the leaves, these are cut or pinched back to ensure they are at their sweetest and don’t become bitter.
Planting
Stevia does well in warmer zones above 10, but they can be grown in cooler climates if you treat them as annuals or bring them in from the cold. They are not frost-hardy.
Just three to five plants will keep a family well-stocked with sugar substitutes.
Transplanting
 The plant thrives in containers with proper drainage for easy winter relocation.
Plant seedlings in the ground 8-10 inches apart well after the chance of frost has passed and when the soil temperatures warm up. The temperature should not be below 45°F (7°C) for the best results. They will form clumps, so remember to give them good airflow between plants.
They do well in containers planted in good potting soil with good drainage. In this way, the pots can be moved indoors when the cold of winter sets in.
How to Grow
Light
 Stevia thrives in full sun but prefers dappled shade in hot regions.
Full sun is best for growing stevia. In very hot regions, it grows best in dappled shade. It prefers cooler summers. Growing stevia in regions with hot summers is possible, but provide morning sun with afternoon shade in hot seasons.
Water
 Maintain consistent moisture through regular watering for optimal growth of the stevia plant.
These plants need regular watering. Keep the soil evenly moist, especially when they are small and growing. In their native range, they prefer moist environments, so try to mimic those conditions when you grow at home. In hot areas, mulch will keep the soil moist.
Soil
 Ensure the soil for stevia plants is acidic and well-draining.
Stevia prefers acidic, well-draining, slightly sandy soil. Add plenty of compost to the soil before planting. The final result should be loamy and rich, and water should drain freely through the medium.
Keep the pH between 6.7 and 7.2, amending outdoor beds as needed.
Temperature and Humidity

In its natural area, stevia prefers a warm, humid environment. Therefore, developing a space with humid and warm conditions results in the best success growing this plant.
Fertilizing
 Promote summer growth of stevia plants with regular fish emulsion-based plant food.
Throughout the summer, give plants an extra boost with liquid plant food based on fish emulsion every few weeks. The plant does not require many nutrients, and your fertilizer should not be nitrogen-heavy, as this reduces the sweetness of the leaves.
Maintenance
 Maintain stevia plants by regularly pinching back stems to encourage bushiness.
Be aware that the stems of the stevia plants are very brittle and can easily be chopped off in error if brushing past the plants or weeding between them.
Pinch back the growing tips to keep them compact and bushy. Look out for flowers and pinch out just before harvesting the leaves.
Using Stevia as a Sugar Substitute
The interesting thing about commercial stevia is that it’s processed and has other compounds added (all FDA-approved, mind you) to make it white. In doing so, it is thought that people would use it more as a substitute for cane sugar. Some would agree that it is so processed that plain sugar may be more beneficial.
When using your homegrown stevia, harvest just before the plant blooms for the sweetest leaves. For a good harvest, pinch out the buds to prevent the plant from flowering and the leaves from becoming bitter. In the cooler autumn temperatures, the leaves are also sweetest.
Harvest the leaves or whole stems and then process. Two ways to do this are drying the leaves or making an extract or tincture.
Drying
 Methods of drying stevia plants include using a dehydrator or microwaving on kitchen paper.
To dry the leaves – you will only use the leaves, not the stems – you can tie them in bunches and hang them in a cool, dry area for a few days to dry naturally. Alternatively, place individual leaves on baking paper on a baking tray and oven-bake them at a low temperature (280°F or 138°C) for about 20 minutes until dried.
There are other methods, like using a dehydrator, or the quickest for me is to lay them on kitchen paper and microwave them for two to three minutes. That makes them dry, crispy, and ready to be crushed into powder.
You can grind the dried leaves into a powder by hand with a pestle and mortar, but a spice grinder works its magic fast. The powder can be stored for up to two years if bottled in clean, sterilized jars.
You can measure sweetness for about an eighth of a teaspoon to 1 teaspoon of granulated sugar.
 Stevia leaves can be used to make sweeteners through either water or alcohol methods.
The other method of preserving stevia is to make a tincture with either water or alcohol as a carrier.
For the water method, use 1 cup of boiling water to ½ cup of crushed fresh leaves and let it steep for 40 minutes. Strain and pour the liquid into a sterilized glass jar. Kept in the fridge, it will last one to two weeks. A cup of water will give you about three-quarters of a cup, the sweetness of three cups of sugar.
For the alcohol method, take one cup of fresh leaves and bruise them in a sterilized glass jar. Pour in 100 percent proof vodka or rum to cover the leaves and tighten the lid. Keep in a dark place for 36 hours, shaking the jar occasionally. Use a coffee filter or cheesecloth to strain the mixture into a saucepan. Heat gently without letting it boil to burn off the alcohol. Stir slowly for 15 minutes or so until it’s a thin brown syrup. Pour into a dark sterilized glass container and store for up to three months. Just a few drops will make your next cup of tea sweet.
The one thing to remember is that, unlike sugar, stevia will not caramelize.
Propagation
There are two tried and tested methods of propagating stevia: the more reliable leaf cuttings or sowing seed. The latter has hit-and-miss results. We will, however, discuss both because you may not find seedlings in your nursery but a packet of seeds is easy to order online!
Seed Sowing
 Grow stevia plants by starting seeds indoors in trays 6-8 weeks before the last frost.
Stevia is quite challenging to grow from seed, needing extra light to germinate, and often, not all the seeds will prove viable. Grow lights are best for this task.
Start seed in trays six to eight weeks indoors before the last frost day. Depending on the conditions, germinating will take about one to three weeks. They will prefer a temperature of around 71°F (22°C) to germinate well. Keep the soil evenly moist throughout this time.
Once you have harvested all the leaves you need, you can leave the plants to go to seed to collect them for yourself. They should be dark brown or black to be fully mature. If they are lighter beige, they may not germinate. Cut the dried tips of the flower stems and shake them into a bag to detach the seeds. Label and date, ready for planting the following season.
Tip Cuttings
 Propagate stevia plants by inserting tip cuttings approximately one inch into the soil.
Take cuttings of a healthy plant in lengths four to six inches long. Remove the lower leaves, dip the ends in water, and then into hormone rooting powder. Fill trays or pots with moistened potting soil or sand and make holes in the mix with a pencil or dowel. Pop in the cuttings about an inch into the soil and press them in. Use a propagator or a plastic bag to cover and place in a warm position to root.
They should have rooted in about four weeks and can then be planted in the garden or into pots.
Common Problems
 Growing stevia is relatively problem-free, with minimal risks from pests and diseases.
Few problems are associated with growing stevia, and few pests and diseases will harm them. If you notice a small population of aphids or thrips, simply blast them off the plant with a strong stream of water. Be careful not to break the brittle stems of the plant in the process, though.
Frequently Asked Questions
Even though the stevia plant has been used for centuries by the locals where it originates, the FDA initially banned the use of stevia, claiming there were links to cancer. In 2008, it was approved as a food additive and no longer banned outright. There is always the chance that a herb may affect people differently, so it’s always wise to consult a doctor before relying on stevia as a supplement.
It can return every year in the proper zones or be protected in pots indoors. However, most agree that it’s best replanted each year for fresh leaves to harvest.
Stevia is around 200-400 times sweeter than regular cane sugar. It has a distinctive taste that is somewhat licorice-like and slightly bitter.
Final Thoughts
I think a natural sweetener is always better than the renowned cane sugar, but I would hesitate to use commercially processed stevia and instead grow my own.