As winter gives way to warmer weather, February presents a crucial window of opportunity for garden tasks that will lay the groundwork for a flourishing spring. This month is the perfect time to prepare for the upcoming growing season by pruning perennial plants, nourishing your soil, and preparing vegetable seeds.
Even if most of the landscape still seems to be asleep, February garden chores can make or break your spring success. It’s a great time to take hardwood cuttings while trees are still dormant. The absence of leaves also allows you to clearly see where to prune to encourage strong flower and fruit production. At the same time, it’s important to clean garden debris to prevent disease and thoroughly mulch your pathways and beds to prevent early spring weeds.
Grab your best mud boots, and let’s dig into 15 garden tasks you won’t want to skip this February.
What Garden Chores Should I Do In February?
February is a pivotal month for gardeners to prepare for spring by pruning fruit trees, propagating perennials, transplanting bare root plants, starting seeds indoors, sharpening garden tools, cleaning plant debris, and preventing issues with weeds and diseases.
The most important garden chores are the ones that directly impact your yields. For example, if you forget to prune dormant fruit trees or protect early blossoms, you may miss out on your favorite apples, cherries, or plums. Similarly, if you neglect to clean up withered plant debris, fungal pathogens may cause disease issues later in the season.
15 Important Tasks for a Thriving Spring Garden
Spring gardening doesn’t actually begin on your last frost date; it starts many weeks before when the weather is still cold, and there may still be snow on the ground. The timing of these tasks will vary based on your growing zone and the whims of this year’s weather.
It may take a bit more effort to put on your winter garden gear. However, skipping these chores in late winter and early spring may cause more problems when spring comes around.
Prune Fruit Trees
Always prune fruit trees for shaping and stronger yields.
The most essential task for February gardeners is fruit tree pruning. If you didn’t prune your trees in January, you absolutely need to get it done this month. February is an ideal time for shaping fruit trees and promoting stronger yields because the trees are still dormant and leafless. However, if your fruit trees haven’t yet produced buds, it can be difficult to tell where to cut them for the most benefits. Check with your local extension office for regional and varietal-specific pruning information.
This is the prime time to shape your trees and train them if you are growing an espalier, for example. Since the harshest part of winter is over, pruning at this time ensures that the tree can quickly heal the pruning wound using its early spring surge of energy.
It’s also important to remove dead or diseased branches to prevent the spread of pathogens in the warm, moist weather of spring. February is usually still cold enough to minimize disease spread while pruning. The trees are thoroughly “hardened” and likely healed any open wounds, making it more difficult for pathogens to enter the bark.
Remember to use sharp, sanitized tools. Long-handled loppers, pruning saws, and a pair of hand pruners are ideal candidates for the job.
Protect Fruit Blossoms
 Early blooming in February can lead to fruit loss from late frost.
In areas with unpredictable spring weather, sometimes a burst of unexpected warmth can trigger fruit trees to flower as early as February. This may seem exciting, but it can actually be devastating to fruit yields if a late frost occurs in the weeks after blooming begins.
Citrus trees are particularly fragile, but this can also be a major issue with peaches, cherries, apples, plums, blueberries, pears, and even strawberries.
If flower buds or open flowers are exposed to freezing temperatures, they may wither and fall from the plant, which means they will produce little to no fruit.
To protect fruit blossoms from late spring freezes, you can:
- Make a protective A-frame tent or low-tunnel with wood or PVC and a plastic greenhouse cover
- Wrap multiple layers of row cover around the budding stems
- Use a large frost protection cover for a whole shrub or young tree
- Use burlap to cover the tree and trap warm air
- Place a cloche or critter cover frost blanket over low-growing plants like strawberries
If this is a regular problem in your area, consider planting more late-blooming varieties and growing your fruiting plants close to a building or sun-facing brick wall that can trap more radiant heat.
In a last-ditch effort to save fruit buds and blooms from a late frost, you can turn on your sprinklers overnight and wet the tree. This can warm the area and potentially create an insulative layer of ice (seriously!) over the flower buds. The thin film of ice will keep the tree right at 32°F (0°C) so the frigid temperatures outside don’t damage the blossoms. You can turn the sprinklers off at sunrise as the temperatures rise.
Prune Perennial Ornamentals
 Pruning ornamentals and herbaceous perennials promotes new growth and flowering.
In addition to fruit tree pruning, this is an important time to cut back ornamentals to promote new bushy growth and stimulate more flower production. Woody and semi-woody shrubs like rosemary, lavender, hydrangeas, ceanothus, and roses benefit from February pruning, depending on your climate. For shrubs that flower in the summer, it’s important to cut them back before new growth begins.
Herbaceous perennials and ornamental grasses also need pruning at this time. If you didn’t cut back dead foliage in the autumn, be sure to give your plants a nice haircut close to the ground to stimulate new growth when the temperatures warm. This is helpful for preventing diseases and reducing the amount of hiding places for slugs or rabbits.
Remove Dead Debris from the Garden
 Clean garden debris to prevent plant disease spread before spring warmth.
Speaking of pruning, it is very helpful to remove plant debris from the garden while everything is still dormant. Fallen fruit tree leaves, old stems, withered flowers, rotten tomato suckers, and leftover dead foliage are often breeding grounds for plant diseases as the spring weather warms and rain begins to fall. It can be nice to leave some withered plant residues in the garden as mulch or for wildlife value over winter, but cleaning the debris in very early spring helps prevent pest or disease issues.
Remember, the most aggressive plant diseases typically overwinter in the fallen leaves and debris of their host plants. If there are no signs of disease, you can take dead plant residues to your compost pile. If you notice molds, spores, or spots on fallen plant residues, take them to a burn pile or throw them in the trash. Sanitize your gloves, boots, and wheelbarrows afterward.
Any gardener who has struggled with aggressive pathogens like late blight, powdery mildew, or scab knows how devastating these issues can be. A proper February clean-up can prevent major headaches and crop loss down the line.
Transplant Dormant Perennial Shrubs and Trees
 Transplanting dormant perennials in cool, moist soil enables easier settling.
If your garden soil is workable, this month is a great time to transplant dormant and bare-root perennials. Whether you purchased them at a nursery or propagated them yourself, perennial plants are likely still dormant in their pots. This means there is no visible growth on the plant.
For herbaceous plants, they may look dead because their growth is concentrated in the roots. Semi-woody and woody plants may look like bare twigs. Either way, dormant transplants have a much easier time settling into their new home while the weather is still cool and moist.
With so many different types of perennial garden plants, these general rules of thumb are helpful for determining the best planting time:
- Spring-blooming and summer-blooming perennials should be transplanted in the fall.
- If the plant blooms in late summer or fall, transplant it in the spring.
Any time you are transplanting a perennial, remember that it needs at least 4-6 weeks of growth before any major stress event, such as intense summer heat or the first fall frost. A generous layer of mulch and ample water will help plants adjust quickly.
Sometimes, the length of the growing season in your region is a better indicator of when to plant than the bloom time. If you know your fall is longer and milder than spring, plant then.
Take Hardwood Cuttings
 Use hardwood cuttings of dormant plants for propagation before spring growth.
Propagation is one more task to consider before your perennial trees and shrubs burst their buds in spring. When plants are still dormant, you can take hardwood cuttings to root in your greenhouse and grow new plants. This is an excellent way to propagate your favorite varieties of fruit trees and woody vines like kiwi or grape.
To propagate a plant with hardwood cuttings:
- Find twigs that are about pencil thickness
- Ensure the stems are from the current season’s wood (one-year-old growth)
- Find the junction where one-year-old growth joins the two-year-old wood
- The base of the stem will have a node and more dormant buds to develop into roots
- Use sharp, sanitized pruners to take cuttings 6-10” long, leaving at least ¼” below the base bud
- Use a sharp knife to scrape off the bark of the bottom end of the bud
- Dip the bottom of each cutting in a rooting hormone to stimulate quicker root growth
- Insert cuttings into a potting mix or a 50/50 blend of peat moss and sand
- Leave ¼ to ⅓ of the cutting exposed above the soil line
- Maintain continuous dampness, but don’t overwater
- Place cuttings in a greenhouse, cold frame, or bright windowsill
- Wait several weeks to months until you see visible growth, then up-pot or transplant
Fortunately, if you don’t have time to propagate in February, you can always wait to take softwood cuttings once new growth emerges in March and April.
Clean, Repair, and Sharpen Garden Tools
 Sanitize and sharpen gardening tools for spring season preparation.
All this pruning and cutting should be a poignant reminder of the importance of sharp, clean tools. As your garden slowly wakes up from winter, it’s a great time to clean out your tool shed and prepare your tools for a long season of use. You can:
- Use a sharpening stone to sharpen pruners, scissors, and knives
- Check that the blades of your hoes and shovels are sharp and clear of debris
- Repair any broken handles, hardware, or wheelbarrows
- Sanitize your propagation materials, including seed starting pots and domes, with a diluted bleach spray
- Clean your greenhouse or grow light tables
- Organize potting mixes and soil blends in containers
- Check that fertilizer and compost bins are sealed and safe from pests
- Repair any broken raised beds or build new raised beds
These tasks are much easier to do in late winter before your plants start growing and require much more attention.
Start Cold-Season Vegetables Indoors
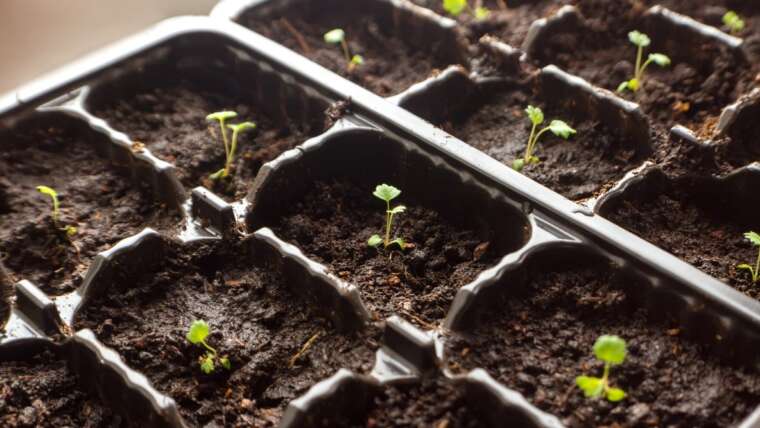
 Sow seeds indoors in February for early vegetable planting outdoors.
Even if your last frost date is a couple of months away, several vegetables benefit from a head start indoors around February. Sowing these seeds in cell trays will ensure you have healthy, thriving seedlings to transplant outdoors around your last frost date. This can save you a lot of money at the nursery and save you a lot of time in the garden.
Be sure to create a proper seed-starting setup before you plant all your favorite varieties in their containers. If you don’t have a greenhouse, a bright south-facing window or a shelf with grow lights will do. Don’t forget the well-drained seed starting mix and durable seed starting trays with drainage holes. A germination heating mat is a bonus for warm-weather crops.
Here are some seeds to start indoors this month:
- Onions
- Leeks
- Kale
- Broccoli
- Cauliflower
- Cabbage
- Tomatoes (zones 7 and warmer)
- Peppers (zones 7 and warmer)
- Perennial herbs
Starting seeds indoors is particularly important for gardeners with short growing seasons where some crops struggle to yield before fall’s frosts arrive. Be sure to check your seed packets and count backward from your last frost date to get the timing right.
For example, most brassicas (cabbage-family crops) should be sown indoors 6-8 weeks before the last frost date. If you garden in zone 6 and your last frost date is around the first week of April, early February is the perfect time to seed kale, cauliflower, cabbage, and broccoli in your greenhouse or under grow lights.
If Soil is Workable, Direct Seed Cold-Hardy Crops
 Thawed soil means it’s time to sow cold-hardy crops outdoors.
In some zones, your garden soil may already be thawed out and ready to go! The term “workable soil” simply means that you can put your hands in your garden beds because the ground is no longer frozen. If this is the case, you are all set to direct sow cold-hardy crops for extra early harvests of delicious roots and greens.
Here are some cold-hardy crops that can germinate in soils as cool as 40°F (4°C):
- Mache (corn salad)
- Arugula
- Spinach
- Kale
- Mustard greens
- Claytonia
- Watercress
- Radish
- Beets
- Parsnips
- Rhubarb (crowns)
Use a soil thermometer probe to check the soil temperatures before sowing. If you want to warm the soil faster, consider using a black plastic tarp to attract more late winter sun rays. You can also grow in raised beds with a cloche, low tunnel, row cover, or a cold frame to trap extra warmth.
Plan Your Vegetable Garden Calendar
 Draft your garden with a seed-sowing spreadsheet for optimal success.
If there is still a layer of bright white snow covering your garden, don’t fret! You can still get your gardening fix by planning your vegetable growth calendar. Whether you’re a hobby gardener or commercial-scale organic farmer (like I was), crop planning is an absolute game changer for maximizing your vegetable yields. It’s much easier to stay organized and track your seed-sowing dates if you have a roadmap for your garden’s success.
One of my favorite ways to plan the garden is to create a seed-sowing spreadsheet. This will help you keep track of basic dates and calculations to ensure you sow seeds and transplant seedlings at the proper time. It can also help you reference your failures and successes to make next season even better.
Here is an example of what to include on a garden planning spreadsheet:
| Crop Type | Variety | Days to Maturity | Recommended Seeding Before Last Frost | Indoor Seeding Date | Transplanting Date |
| Peppers | ‘Megatron Jalapeno’ | 65 | 6-8 weeks | February 10 | April 7 |
| Leek | ‘King Richard’’ | 75 | 8-10 weeks | February 4 | April 1 |
Clean Houseplant Leaves and Check for Pests
 Wipe off houseplant leaves to enhance photosynthesis and check for pests.
When it’s still too cold to go outside, there are plenty of gardening tasks you can do from the coziness of your house. Houseplant leaves usually need a nice, gentle cleaning after accumulating dust over the winter. You can wipe them with a soft cloth and water to help them regain their shine. This will enhance photosynthesis as they move out of dormancy and soak up more sunlight through the windows.
This is also a vital time to check for pests like thrips, aphids, or mites. Inspect under the leaves and around the soil surface for signs of houseplant bugs and identify them before taking any action. Once you know the exact insect you’re dealing with, you can quickly remedy the situation and prevent issues as you move into spring.
Install Cold Frames
 Cold frames are essential for maximizing yields in colder seasons.
If you don’t have space for a greenhouse but you still want to maximize your yields in the colder seasons, a cold frame is a must! These simple contraptions upgrade your raised beds into easily accessible mini greenhouses. Most of them are made with wood and glass or greenhouse plastic.
They include a hinging mechanism to raise them up for ventilation when the weather starts to warm. You can easily close the frames at night or in the event of an unexpected late frost. We have 20 DIY cold frame plans that you can build in your garage in late winter to prepare for an extra early spring start to the garden season.
Spread Compost and Mulch
 Add compost and mulch in February to prevent spring weeds and nourish crops.
Once snow and ice have melted, February is an awesome time to spread compost and mulch. This is a crucial step in weed prevention because most spring weeds have yet to germinate. A thick 4-6” layer of compost over your raised garden beds will suppress weed growth and nourish early spring crops. Heavy mulch like wood chips, leaves, straw, or pine needles is perfect for pathways where you want to prevent grass and perennial weeds from taking over.
Take advantage of this dormant buffer season to roll your wheelbarrow around, warm up those winter muscles, and rake mulch over any bare garden surfaces. As a bonus, this will nurture your soil and prevent erosion or mud during wet spring weather.
Fill Bird Feeders
 Welcome local creatures by filling bird feeders near trees or porches.
Wildlife-friendly gardeners should certainly consider how they will welcome local creatures as they emerge from dormancy or migration. Filling your bird feeders can welcome the earliest species back into your garden for a vibrant feathery show.
I like to keep bird feeders near the porch or back in taller trees to ensure I’m not attracting birds straight to my vegetable beds. If there are any leftover seed heads or berries on my garden perennials, you can leave them in place or rake them up to add to your feeders.
Chit Your Potatoes
 “Chitting” seed potatoes encourages early sprouting for quicker yields and emergence.
The term “chitting” is colloquial for pre-sprouting your seed potatoes. This process encourages the tubers to send out their stubby green shoots to prepare for planting. Pre-sprouting potatoes helps them take off more quickly once they’re in the ground.
It breaks their dormancy to encourage faster plant emergence and earlier potato yields in the spring. This can jumpstart your potato harvest by up to 2 weeks! It also reduces the risk of rotting your seed potatoes in the ground.
To pre-sprout seed potatoes:
- Start chitting potatoes 1 to 3 weeks before planting.
- First, check that each seed potato or chunk of potato has 2-10 buds or “eyes” where they can sprout. This is where the shoots will grow.
- Arrange the seed potatoes in a flat single layer over newspaper in a ventilated tray.
- Put the potatoes in a warm area with light, such as a windowsill or porch.
- Leave them in place for a few weeks until the soots are ½” to 1” long.
- Lanky white shoots are often an indication that there isn’t enough light. The shoots should be deep green or purple (for red and purple potato varieties).
- Gently handle chitted potatoes when planting to avoid breaking off the sprouts.
- Plant the seed potatoes with the sprouts facing upwards.
Final Thoughts
Take advantage of the dormant limbo land between winter and spring by pruning, cleaning, and preparing your garden for an abundant season. Tasks like fruit tree pruning, debris removal, and hardwood cutting propagation are ideal while plants are still dormant. Cleaning and sanitizing your tools will prevent disease spread and frustrations later in the spring.
You can sow many seeds indoors and, if your soil is workable, direct sow outdoors, as long as you properly time your plantings based on your estimated last frost date. Don’t forget to create a garden calendar to keep track of your planting dates and reference your successes for next year!