Reaching heights of up to 8 feet and producing up to 40 flowers per plant, ‘Turk’s cap’ lilies are a giant in the landscape. On sturdy stems with whorled foliage, 4-inch orange blooms droop downward like pendants and have petals that curl upward to give the species (Lilium superbum) its ‘Turk’s cap’ nickname.
Often mistaken for ‘tiger lilies’ (Lilium lancifolium) because of their orange coloring and spotted petals, these plants are much larger and have a penchant for rich, swampy soil. They’re easy to grow and make a bold statement wherever they’re planted. Read on for more information about their history, growing preferences, maintenance requirements, and potential problems.
Characteristics
 ‘Turk’s cap’ lilies are Martagon lilies with reflexive orange-yellow flowers.
This lily species is hardy in zones 4-9 and blooms in early to mid-summer. Categorized as a Martagon lily by the North American Lily Society, ‘Turk’s cap’ is botanically named Lilium superbum and is part of the Liliaceae family.
The flowers have six reflexive petals, long stamens, large anthers, and freckles on their throats. The official flower is orange-yellow with a green stamen, rust-colored anthers, and maroon freckles, but the species has been hybridized to include some additional cultivars with broader color options (see Varieties below).
These lilies will flower best in full sun, but the species tolerates shade better than other groups and can be planted in locations with dappled light. Plant size and bloom intensity may be compromised, but they will still grow and be healthy.
They are set apart from other lily species by their tolerance for wet or loamy soil. Nicknamed the swamp lily, they grow well next to creeks and in lowland areas but will not tolerate standing water. They’re heavily featured in gardens up and down the Atlantic coast and are a magnet for bees, hummingbirds, and butterflies.
History & Cultivation
 This species is native to North America’s wetlands and has historical roots in colonial gardens.
While the overarching Lilium genus dates back to ancient Greece, the Lilium superbum species is native to the eastern meadows and wetlands of North America. Historical accounts of Colonial America reference its inclusion in formal and informal gardens.
Throughout the centuries, botanists crossed superbum with other lily species to create a handful of hybrid cultivars. Although popular and much-coveted for their large size and colorful variations, these cultivars are not as hardy or long-living as the original superbum natives.
Planting
Lilies can be planted at any time during the growing season if you’re willing to give them a little extra attention, but spring and fall are the best times to install perennials. This gives roots time to establish before plants are exposed to extreme temperatures during the peak season. You can grow them from seeds or bulbs; alternatively, purchase established plants. Here’s a look at the process for each:
Established Plants
 Planting ‘Turk’s cap’ lilies acquired from your garden center is straightforward.
Lilies purchased from a garden center, divided from an overgrown cluster, or gifted from a neighbor will require a little more sweat equity than bulbs or seeds, but planting them is pretty straightforward.
Here are the steps:
- Dig a hole that’s twice the width and equal to the height of the root mass.
- Remove your ‘Turk’s cap’ from its growing container if it has one, and loosen any roots that are circling or compacted under the bulb.
- Set the root mass in the hole, so your lily’s crown sits just above soil level.
- Backfill loosely with soil and water regularly until roots are established.
Bulbs
To plant its bulbs successfully, choose a sunny spot with good soil.
The bulbs are easy to plant and grow in a bed with sufficient sun exposure and optimal soil. For a natural look, plant lily bulbs in odd-numbered groups or clusters rather than rows.
Here are the steps for planting Lilium superbum bulbs:
- Loosen the soil to a depth of about twelve inches.
- Use a hand trowel or bulb digger to create holes that are roughly six inches deep.
- Space bulbs 12 to 18 inches apart.
- Place one ‘Turk’s cap’ bulb in each hole with the flat side down and the pointy end up.
- Cover loosely with dirt and water evenly.
Seeds
 They can be grown from seed, but flowering may take up to seven years.
‘Turk’s cap’ lilies can also be planted from seed, although it may be up to seven years before they flower. Lily seeds require a period of cold stratification to germinate.
To grow ‘Turk’s cap’ from seed, follow these steps:
- Fill a shallow, well-draining container with seed starting mix.
- Sprinkle ‘Turk’s cap’ seeds on the soil surface and press in gently with the tip of your finger.
- Cover loosely with plastic and store in a cool, dark place for 8-12 weeks. Aim for soil temperatures that are around 40-45 degrees.
- Mist soil occasionally to keep moist, but not wet.
- After stratification, move the tray to a location with indirect light and temperatures that are at least 60 degrees.
- Keep moist until sprouts appear.
- Transplant outside when all danger of frost has passed.
How to Grow
These lilies can be a little persnickety in their first few seasons, but they’re easy to grow once established. Get to know their basic preferences and maintenance requirements, and you’ll enjoy a tall patch of cheerful, nodding ‘Turk’s cap’ lilies in no time.
Light
 This plant thrives in full sun, yielding robust stems, vibrant flowers, and healthy foliage.
They will live their largest, most colorful lives in locations with full sun, which means at least six hours of direct light each day. In these locations, stems will be strong and tall, flowers will be bright and plentiful, and foliage will be firm and green.
They can, however, live in partial shade, which means 4-6 hours of direct light per day. Their size and flower totals may be smaller, but they usually do just fine in slightly less than full sun conditions.
Water
 The flowers prefer consistent moisture but dislike standing water.
Provide regular moisture, but don’t leave them in standing water. While these are the natural conditions in a creekside or water’s edge location, they can be difficult to simulate in a backyard.
Water at the soil level with a soaker hose or a slow nozzle setting. Aim for an inch of water per week, using a moisture sensor or finger poke to determine if supplemental irrigation is needed.
Yellow, drooping leaves indicate that your lilies may be getting too much water, while brown, curling leaves indicate that they may need more. Adjust as needed, and do not flood or puddle the area around their stems, as this will cause health problems.
Soil
 The ideal soil for ‘Turk’s cap’ lilies should be loose, fertile, and slightly acidic.
If you’re not sure, a soil test can tell you if the conditions are ideal for planting. Soil should be loose, fertile, and loamy for best results. PH levels should be slightly acidic and somewhere in the neighborhood of 6.0. Soil should drain well and be rich in organic material.
Fertilizing
 Apply a balanced or slightly phosphorus-rich fertilizer in early spring to support robust flower production.
Use a balanced fertilizer with an even ratio of nitrogen to phosphorus to potassium (an NPK ratio of 10-10-10) or a fertilizer with a slightly higher phosphorous content (10-15-10), which may boost flower production.
Following the manufacturer’s directions, apply a slow-release, granular, or liquid product in early spring as soon as green shoots are present. Water immediately and keep the soil moist until the flowers begin to open.
Organic fertilizer options like fish meal or bone meal can be applied in early spring. Follow product directions for application. Typically, a ratio of five pounds per 100 square feet is recommended.
Maintenance
Although superbum is considered a relatively low-maintenance lily species, your plants will benefit from routine maintenance. Perform the following garden chores on your lilies regularly, and you’ll be rewarded with big, beautiful plants that return year after year.
Mulch
 Mulch with two to three inches of hardwood chips.
These lilies like to have their feet in the shade and their heads in the sun. The best way to make this happen is by mulching your beds. A two-to-three-inch layer of hardwood chips, pine straw, compost, hay, or mulched leaves will help insulate the soil, suppress weeds, and keep moisture from evaporating too quickly.
Stake
 Lilies growing in less sunlight may benefit from gentle support using a cane and ties.
Lilies in full sun will have strong stems and a sturdy, upright habit. Unless they are planted in a location where they may be vulnerable to high winds, ‘Turk’s cap’ lilies should not need staking. However, plants located in partial or dappled shade might have stems that are a little less firm and may benefit from a little structure.
To keep your lily upright in less-than-ideal locations, insert a straight cane a few inches from its central stem and tie it loosely with twine or elastic. Monitor regularly for signs of scraping or stress and adjust ties with new growth.
Deadhead
 Trim the spent flowers just above healthy leaves for prolonged blooming.
To encourage the fullest and longest bloom cycle, deadhead as soon as the flowers begin to droop and fade. If you perform this maintenance task before the flowers go to seed, plants will be tricked into thinking the reproductive process has not been completed, and they will form more beautiful blooms.
To deadhead, use a clean, sharp hand pruner to snip off spent flowers at a point just above a healthy set of leaves. Repeat as necessary throughout the bloom cycle, and flowers will keep coming for several weeks.
Cut Back
 The lilies are best when cut back to three inches above soil level after the first frost.
At the end of the growing season, look for brown or yellow leaves and drooping stems to indicate that plants are ready to be cut back for winter.
This will occur just after your region’s first frost or when your perennials are about to enter dormancy. Using a clean, sharp pruner or garden sheers, cut plants down to about three inches above soil level and remove plant debris from the garden.
Propagation
There are quite a few ways to propagate. Members of the Lilium genus reproduce rapidly underground through bulblets, and within a few years of planting, you will notice three or four plants where there once was one.
Above ground, they also produce bulbils along the plants’ stems and seed pods after flowering concludes. All of these natural offshoots can be used to expand your bounty. Here’s a look at the process for each.
Division
 Divide these lilies every few years to prevent overcrowding and maintain healthy flower production.
By far, the easiest way to propagate lilies is division. Plan to perform this task every three or four years or when they start showing signs of crowding (diminished flower production and/or a dead spot in the plant’s center).
Here are the steps:
- Begin in fall or spring, when plants have no foliage or flowers.
- Dig up the entire plant using a careful pitchfork or shovel.
- Lay the root ball sideways on a tarp or hard surface.
- Look for bulblets around the perimeter of the mother bulb. They will be longer and thinner than the original.
- Using your hands or a sharp knife, slice or twist off as many new bulblets as you can without compromising the central bulb.
- Look for root hairs to indicate the bottom of the bulblet and a point or maybe even stem tissue to indicate the top.
- Plant as you would a new ‘Turk’s cap’ bulb (see Planting above)
Bulbils
 After flowering, harvest bulbils from ‘Turk’s cap’ lilies when they turn black or brown.
Lilies also produce ‘bulbils’ that can be harvested to create more plants. After flowering is complete and seed pods have formed, look for small, black ‘mini bulbs’ at the leaf axils. This is the point where the leaves connect to the main plant stems. Bulbils will turn black or brown when they are ready to be plucked.
Here are the steps for planting them:
- Use your finger to pick or twist off bulbils.
- Fill a well-draining container with potting soil or seed starting medium.
- Examine bulbils for an upside, which may be pointy or have a small sprout.
- Poke bulbils into the soil with your fingers or dig a trough that’s roughly two inches deep.
- Cover bulbils lightly with soil and keep them moist until they’ve entered dormancy.
- Insulate containers with mulch and look for shoots next spring.
- Separate and transplant your bulbils to the garden when the ground is workable.
Seeds
 After flowering, dry and stratify the lily pods for planting.
After your plants have finished flowering, they will produce seed pods to initiate reproduction. Seed pods will be green and oblong with a multi-sectioned body (like a pumpkin). Many pods will rupture and spread seed to the surrounding area if left in place. Depending on where you live, these seeds may self-sow, but their viability will be limited.
You’ll need to coax them along a bit to increase the likelihood of reproducing from seed. When seed pods are ripe, they will crack open slightly. This is your indication that they’re ready to be harvested. Remove and separate the seeds, leaving them dry for a few days in a cool, dark, well-aerated location. Then, cold-stratify and plant!
Varieties
While Lilium superbum is the only true ‘Turk’s cap’ lily, a few Martagon hybrids blend this species with other varieties to create desirable cultivars.
If you like the size, form, and personality of the original orange ‘Turk’s cap’ lily but would prefer a broader range of color and scent options, here are some cultivar relatives to consider:
Black Beauty
Lilium ‘Black Beauty’
 This species produces fuchsia petals outlined in white, crimson midribs, and golden yellow throats.
Slightly shorter than traditional ‘Turk’s cap’ plants, ‘Black Beauty’ maxes out between 3 and 5 feet. Blooms have the traditional Martagon lily flower, recurved petals, and a down-drooping, pendant-style habit.
The petals are predominantly fuchsia and rimmed with white. Midribs are crimson with monochrome freckling, and throats are a deep, golden yellow.
Lady Alice
Lilium ‘Lady Alice’
 Standing at 3-5 feet tall, ‘Lady Alice’ boasts large seven-inch-wide white flowers.
The flowers can be up to seven inches wide on this Martagon-Trumpet hybrid, which reaches heights of up to 5 feet. Petals are snow white with orange-yellow centers and raised maroon freckles.
‘Lady Alice’ produces around 20 flowers per plant and has slightly more substantial leaves than your typical lily. The stamens are bright green and extra-long with rust-colored anthers.
Claude Shride
Lilium ‘Claude Shride’
 This variety boasts 3-4 feet tall stems bearing deep burgundy Turk’s cap flowers.
Averaging between three and four feet tall, ‘Claude Shride’ offers classic ‘Turk’s cap’ flowers in a rich shade of burgundy. The petals and freckles are rimmed with bright orange and recurved in classic Martagon lily fashion.
Flowers hang down from sturdy stems with whorled, waxy green foliage. The stamens are burgundy red with bright orange anthers.
Common Problems
Properly planted ‘Turk’s cap’ lilies are highly resistant to diseases and pests. Give them full sun, generous spacing, well-drained roots, and regular maintenance; they are typically quite resilient. There are a few things to watch out for, however. Here’s a quick look:
Insects
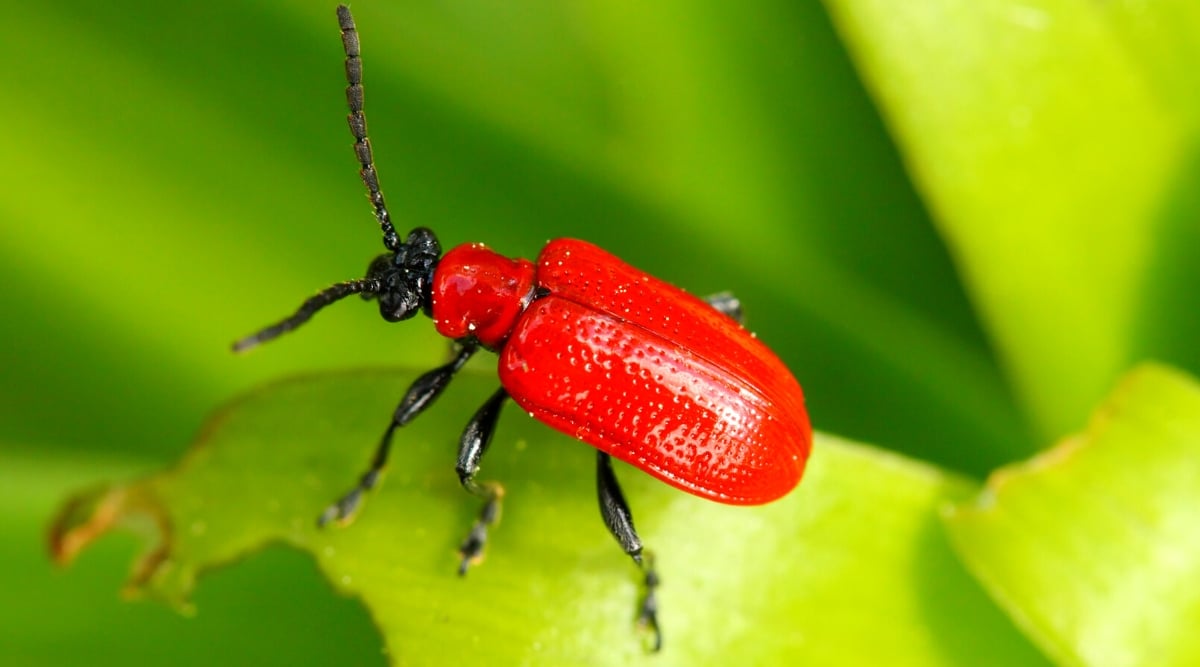 Manage lily pests through techniques like hand-picking and stem shaking.
The insects most likely to plague your lilies are aphids and lily leaf beetles. Aphids are usually the size of a pinhead with clear or white bodies and brown splotches on their bellies. If you see dark, streaky stains and tiny insects on your lily leaves, you probably have an aphid problem.
Lily leaf beetles are long and larger, at roughly a quarter-inch. They are orange-red with black heads, legs, and antennae. Look for them on the undersides of leaves and petals. They will leave irregular chew marks.
You can mitigate both aphid and lily leaf beetle problems by stem shaking, hand picking, and/or a hard blast from the hose. If you are concerned about either of these insects, visit the garden daily and use one of these techniques to keep them at bay. You can also apply Neem oil as a deterrent.
Disease
 Botrytis and root rot manifest as tan or reddish leaf spots.
Botrytis and root rot are the diseases most likely to affect ‘Turk’s cap’ lilies. These fungal conditions usually arise during periods of extremely high humidity or in overly wet soil.
Botrytis presents with tan or reddish leaf spots ringed with purple or gray. As the disease progresses, the entire leaf might become soft and gray. If you suspect a botrytis infection, prune off affected leaves promptly and monitor carefully. If more than half of the plant is affected, dig up and destroy your plant to prevent further spread.
Root rot will first be noticeable at your lily’s base, where stems turn gray or black and are often slimy. In the later stages of the disease, leaves and flowers will also be gray and weak.
This disease occurs when the soil does not drain adequately, and bulbs have become saturated with water.
To confirm a root rot diagnosis, dig your ‘Turk’s cap’ up and examine its root mass. If bulbs are mealy or squishy and roots are black and slippery, toss the entire plant and some of its surrounding soil in the garbage. Root rot is a fatal condition for lilies, and prevention is always your best weapon against it.
Frequently Asked Questions
Yes! ‘Turk’s cap’ bulbs may be cooked and eaten. They are said to be similar to a turnip in flavor. However, check with your nutritionist before consuming to ensure you don’t have sensitivities to this Lilium species.
Yes! Flowers, stems, and leaves are toxic to cats and may cause severe illness or death.
It has historically been used for diuretic and anti-inflammatory qualities. However, most Lilium species are not used in contemporary medicine. Always check with your physician before using an herbal treatment.
Final Thoughts
‘Turk’s cap’ lilies have a large, sunny presence in the landscape and resemble a loose shrub at maturity. They’re highly attractive to hummingbirds, caterpillars, and butterflies, which enjoy their prominent stamen and plentiful pollen. Plant them in full sun for a spectacular flower display, and keep their roots moist but not soaked. The species is particularly at home near the edge of a pond or creek.