You’re missing out if you haven’t tried drying your home-grown flowers yet. They may only last a week or two in a vase when cut fresh, but when dried and preserved, they can last months or even years, allowing you to enjoy the fruits of your labor well beyond the season.
Depending on your chosen flowers and what you want to use them for, there are several drying methods to try. Some are also more costly than others but often deliver better results. Weigh up your options to decide which of these methods works best for you, or better yet, try them all for yourself.
Once you’ve finished drying your flowers, you can use Modge Podge, spray sealant, or even hairspray to extend their lifespan or display or use them as they are.
Air Drying
 Air drying is a common method favored for its simplicity and efficiency.
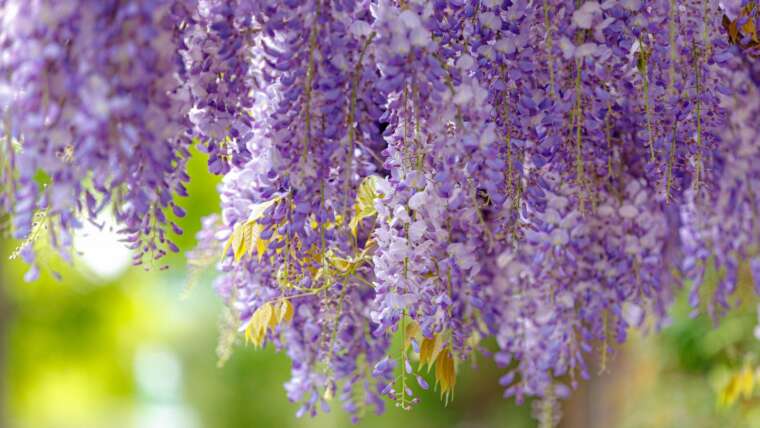
If you want to preserve your garden blooms to use in dried flower bouquets, air drying is the method to choose.
This is one of the most common drying methods for both effectiveness and accessibility. You don’t need fancy gadgets or expensive products – just a dry and dark room to hang your blooms.
Air drying keeps the stems intact, perfect for standing up in a vase or adding to other arrangements. It does take several weeks for the flowers to dry completely, but it preserves color and shape well, making it worth the wait compared to quicker but less effective methods.
It’s best to choose blooms with thin petals and low moisture content, including in the stems. Higher moisture levels mean they will take much longer to dry out and may rot before they can dry effectively.
Hydrangea, lavender, and strawflowers are great options for air drying. It’s also great for keeping more delicate types, like roses, intact if you don’t plan to remove the petals for things like potpourri.
How To Air Dry
 To achieve successful air drying, select the right time to harvest blooms.
Successful air drying starts with picking the flowers at the right time. Some are best picked early for the strongest color, while others must open fully to improve shape and drying time. It’s generally better to pick earlier rather than later to stop them from browning.
Trim a long enough section of the stem to make hanging a breeze. Bunch them together and tie the stems with string or a rubber band. Then, hang them upside down to keep the stems strong and the flowers upright.
The room you hang in should be dry and dark. This helps preserve color and speed up the drying process. Keep them far away from direct sunlight, which will quickly turn the petals brown.
The time it takes for the blooms to completely dry will depend on the types and the time you cut them. On average, you can take them down and use them after about two to four weeks.
Silica Gel
The most dependable results come from using silica gel.
Silica gel delivers even better results than air drying, with less loss of petals or entire blooms. It does require a few more tools to get started, but if you plan on regularly drying or are preserving a special bouquet (like your wedding bouquet), this is the route I would opt for.
Silica gel absorbs moisture from the petals over time, drying them with minimal color and shape change. It’s the same substance from the small packages used to keep items like bags or shoes dry during transportation and storage, just on a larger scale.
As long as you have enough silica gel to cover the flowers you want to dry, you can use this method with any blooms from the garden. It’s ideal for brighter blooms with vibrant colors you want to preserve.
Unfortunately, silica gel can be pricey. It’s one of the most expensive methods on this list (bar the appliances if you don’t have them already). You must also wear a mask when dealing with the gel to prevent inhalation. But it’s worth a try if you’re willing to get past those cons.
With the help of a microwave, you can also turn this into the fastest drying method available, but that step is optional.
How To Dry With Silica Gel
 Use an airtight container with silica gel, then microwave cautiously for 1-2 minutes.
To get started, you’ll need an airtight container, a mask and gloves, a paintbrush, and enough silica gel to cover your chosen blooms. Trim early in the morning to preserve the shape of the flowers, drying off any moisture gently with a paper towel.
Put your mask and gloves on before opening the silica gel packet. Fill the bottom of your container with a layer of silica gel, placing the flowers gently on top. Use a brush to dust more silica gel around the petals and in the center of the flower until it is lightly but completely covered.
Seal the container and leave for a few days to allow the petals to dry out. Thinner blooms will only take two or three days, while dense blooms like zinnias need a little more time to dry out completely. Pull them out when you’re done, and gently dust off any excess gel before displaying.
To reduce the drying time from a few days to minutes, you can also place the container in the microwave (as long as it is microwave-safe). Keep the lid off and heat in the microwave for one to two minutes. Be careful when removing as the silica gel will be hot. However, it’s best to err on the side of less time than more, as you’re not trying to cook your flowers!
Sand
 Drying with sand is cost-effective but may take longer.
For those who don’t want to fork out the money for pricey silica gel, you can also use sand to dry your flowers similarly. The sand absorbs some of the excess moisture in the petals, although it does take longer for them to dry this way. You can also use a clay-type kitty litter if you don’t have coarse sand.
While it is cheaper, drying in sand delivers mixed results. Sand is quite heavy and can damage the shape of the flower or remove some of the petals, especially when you’re trying to remove them from the sand.
The drying often turns out uneven, and the color isn’t as well-preserved as it would be with silica gel. But it is still slightly faster than air-drying and doesn’t cost much if you already have sand accessible to you.
Avoid using blooms with very delicate petals using this method, as they will be easily pulled off. Larger varieties with dense petals, like dahlias, work better than delicate ones like hydrangeas.
How To Dry With Sand
 Layer blooms in an airtight container with sand and wait several days before removing them.
The process is the same as drying in silica gel. Place a layer of sand in an airtight container and lay the flowers inside, carefully covering them with a layer of sand. Close the container and leave for several days before checking the drying progress.
You must carefully remove the flowers as sand is heavier than silica gel. Pull them out gently to keep the petals attached, brushing off any excess sand before use.
Book Press
 This is a traditional, low-cost drying method.
Pressing flowers between the pages of books is a traditional and classic drying method that comes with a touch of nostalgia. Pressed blooms are ideal for use in crafts, setting in resin, framing, or, my personal favorite – keeping in the books as a bookmark.
Depending on your chosen flowers, this method takes about a month to complete – possibly longer. It also requires plenty of patience and restraint, as you can’t check on them while they dry. If you open the book too early, you risk pulling off petals that haven’t completely dried yet.
A book is the cheapest method, using things you already have around your home. Your chosen book should be relatively heavy (like a textbook or dictionary) or weighed with other objects to close the pages effectively. Depending on the flower’s shape, you can also wrap a belt around the book to hold the pages in place.
Ink can transfer in some books, so it’s best to line the pages with watercolor paper to absorb moisture. This makes them easier to remove without damage, as pressed blooms are incredibly delicate.
How To Press Using Books
 Place thin-petaled flowers between book pages and then add weight.
When picking your flowers for pressing, choose ones with thin petals that will look good pressed flat. You can press a range of blooms successfully, but not all will look as pretty when flattened. Plants like cosmos or California poppies are ideal, or you can look for smaller blooms like forget-me-not.
Place them between the book’s pages, manipulating the petals into the desired shape when dried. Carefully close the pages and place heavy objects on top – perhaps more heavy books if you have them.
After about a month, remove the books, open the pages, and carefully slide the flowers out. Handle carefully after removal to keep the petals intact.
Flower Press
 Consider investing in a dedicated flower press for effortless flower pressing.
Those who dry regularly may want to consider investing in a flower press. The mechanism is the same as pressing with a book, but with a dedicated press, you don’t have to worry about weighing books down or accidentally breaking flowers when you pull them out.
There are many flower presses available to purchase online or at craft stores. Some use belts or straps to tighten and press, while others have bolts to screw in and keep the boards in place. Flower presses are also relatively easy to make using scrap wood, screws, and cardboard or felt.
Like book pressing, choose flowers that look good when pressed flat. Pale blue and violet daisy-like aster blooms are a good option. You must also consider whether the plants you want to dry will fit inside your press. Beyond those concerns, you can pick almost any plant to pop into your press.
How To Dry Using A Flower Press
 Arrange plants in the press and ensure they maintain some distance from one another.
Pick your chosen flowers early in the morning when the petals are still strong and upright. You can either trim the stem or leave it, depending on what you want to use them for. Strip the leaves or keep them on if you want a fuller look (when framing, for example).
Lay the plants inside your press, shifting until you have your desired shape. If you’re drying multiple flowers at once, leave a little space between them so they don’t stick together. Tighten the press and leave for about a month before removing your delicate creations.
Oven Drying
 This method is quick but less preferred because it negatively affects color and shape.
If you’re short on time and have limited supplies, oven-drying works in a pinch. It’s not a preferred method because of its impact on the flowers, but it’s worth a try if you’re just experimenting with blooms from your garden.
The problem with oven drying is the impact on color and shape. Oven-dried blooms do not retain their color well, and the petals often fall off without warning. It can be helpful for blooms where shape is not a concern – like drying lavender for potpourri – but isn’t ideal for displays.
How To Dry Using The Oven
 Bake at low temperature with the door cracked open for 6-8 hours.
To avoid burning, set your oven to the lowest possible temperature. Line a tray with baking paper to prevent sticking and lay the flowers on the tray, leaving a bit of space between each one.
Leave the tray in the oven for a couple of hours with the door open very slightly to allow the moisture to escape. Check on them often to ensure they don’t burn or turn too brown. Smaller types will take around six to eight hours to completely dry.
Dehydrating
 Use a food dehydrator to dry flowers efficiently while preserving their color and scent.
Finally, if you already have a food dehydrator, you can also use it to dry your flowers. This method preserves color much better than drying in the oven, but the plants become quite brittle and must be handled carefully.
You can dehydrate any type of flowers if they fit easily into your dehydrator. It works well for those with thinner petals, like carnations or daisies. You can also dry individual petals for crafts or potpourri since the flowers hold their scent relatively well.
How To Dry Using A Dehydrator
 Maintain adequate spacing when using a dehydrator.
Place your flowers in the dehydrator, leaving a bit of space between them to stop them from sticking together. Don’t overload the dehydrator – dry fewer at once rather than too many to ensure they keep their shape and don’t get damaged.
Set your dehydrator to 90F and dry for a couple of hours. You can go as high as 120F, but don’t go above this heat level as it can cause discoloration. Smaller flowers will dry quicker than larger ones, so times will vary. It may only take an hour or two for small and delicate blooms, but check progress regularly to determine the best time to remove them. Drying for too long will make the petals crisp.
Final Thoughts
Although air drying is the most commonly recommended method, it is certainly not the only one. Each of these methods works well for drying, and the one you choose should depend on how much time you have, what you want the flowers to look like, and what you want to use them for.