Conebush is a statement piece in any garden that draws attention from humans and pollinators alike. Some varieties grow tall and look like a tree rather than a shrub, while others stay on the smaller side.
While conebushes are native to tropical regions and look right at home in a lush, tropical garden, you can grow them almost anywhere. They can go directly in the ground in warm climates. In northern zones, they must be kept in containers and brought indoors once the temperatures cool.
Once a conebush is established, it’s low maintenance and easy to care for. You don’t need to water it often, and it doesn’t need fertilizer, so occasional pruning is all you need to worry about. Let’s talk about how to plant, grow, and care for the conebush so you can add one of these lovely plants to your collection.
Conebush Plant Overview
|
About
 The Leucadendron name implies a white tree, but it’s a colorful evergreen with red, orange, and pink hues.
Conebushes are native to South Africa, but have since spread worldwide, growing outdoors in regions with mild winters. The conebush is from the proteaceae plant family and is closely related to Protea, or the sugarbush.
The genus Leucadendron doesn’t quite match the plant’s description, making it a misleading name. The Greek word Leukos means white, and dendron means tree.
If you guessed this plant’s appearance on etymology alone, you’d think it’s a white tree! However, it’s an evergreen shrub that boasts bright and beautiful reds, oranges, and pinks throughout the year.
Cultivation
 They feature upright stems with inflorescences at the ends, creating the appearance of large flowers.
Conebushes have upright stems with bright flowers on the ends. The ends of the stems have inflorescences, which are groups of tiny flowers. They’re surrounded by bracts that look a lot like petals to create what looks like giant flowers.
There are over 80 varieties of Leucadendron, and they vary significanty in size and color. The flowers can be purple, red, pink, orange, yellow, or white, with many varieties sporting several colors simultaneously.
Some species lay low, reaching only 4 feet, while others tower up to 30 feet tall. The size of your conebush will depend on the variety, climate, and location. If you have to grow yours in a container due to cold winters, it will stay much smaller than the same species growing outside in southern Florida.
Propagation
The two main ways to propagate conebushes are by stem cuttings and seeds. Using a loose growing medium to start your new plants is important because they hate having wet feet.
They won’t survive if the medium retains moisture for too long, developing mushy roots and fungal diseases. Caring for persnickety starts might seem difficult initially, but once you know what makes them happy, you’ll see it’s not so bad.
Stem Cutting
 Quickly propagate this shrub through semi-ripe stem cuttings taken in the late growth season.
Stem cuttings are the easiest way to obtain a new conebush. You’ll need a flexible semi-ripe stem cut from the new growth toward the end of the growing season. Ensure the stem is several inches long, and remove the leaves from the bottom half.
Dip the bottom of the cutting into rooting hormone, then transfer the plant to a small pot filled with vermiculite, allowing water to drain easily. Ensure the pot has drainage holes so excess water won’t build up.
Place the pot on a heated growing mat to keep the soil warm but not hot. Heat and humidity are crucial for getting roots to develop. Mist the stem with water daily, or tie a plastic bag around the plant and pot to keep the air humid.
Once the plant has new growth, it should have a healthy root system, and you can remove the bag from the pot. You can allow the plant to continue growing in this pot or transfer it to a larger pot. Harden off the plant before moving it outdoors since it’s still young and tender at this stage of development.
Seed
 These bushes have male and female cones, with seeds harvested from females, dried, and opened if needed.
Conebushes have male and female cones. Seeds are harvested from female cones, and their size can vary between species. When you harvest the cones, place them in a dry area to allow them to dry out completely. If the cone doesn’t open independently, you can carefully break it open.
Fill a sturdy pot or tray with moist but well-draining seed starting mix. The seeds won’t survive in a soggy environment, so the growing medium musn’t hold any excess moisture.
Place small seeds on top of the seed starting mix and partially cover the larger seeds. Place the container in a sunny area, but avoid direct sunlight. Cover the seeds with a plastic lid or bag to maintain proper humidity.
If necessary, use a heated mat to keep the soil warm. Seeds will germinate the best when nighttime temperatures are 68-72°F, with daytime temperatures reaching up to 83°F. If the room your seeds are in can’t stay at these temperatures, a heated mat will help.
Once the seeds sprout and develop root systems, you can move them into larger pots. As I mentioned with stem cuttings, moving them outdoors too soon could result in them not surviving.
Have patience with young plants; it will be about three years before you see them develop flowers.
Planting
 Plant in well-draining, sunny spots with at least six hours of sunlight.
The best time to plant conebushes in the ground is in autumn or after the final frost in spring. Choose a location that receives as much direct sunlight as possible. Don’t pick a location that receives less than six hours because it won’t be enough sunlight to keep the plant happy.
Good drainage is necessary to grow a conebush successfully. Amend heavy clay soils with sand or perlite, and consider planting the conebush on a mound so excess water won’t puddle around the roots.
Once you have chosen the best location, dig a hole twice as deep and wide as the root ball. If you bought a plant from the nursery, use the entire nursery pot for sizing. The large hole will give the tender roots plenty of aerated soil to spread through, making it easier for the plant to get established in its new location.
After removing the soil, mix it with compost. If you need to amend the soil, now is the time. Add the soil back to the hole, only filling it about halfway.
Place the plant in the hole and make sure the top of the root ball lines up with the top of the hole unless you want to create a mound. For a mound, you can leave the top of the root ball higher than the soil line, but you’ll need extra soil to build up around it.
Once the plant is in the partially filled hole, continue backfilling it. Pack it down enough to remove air pockets but not so much that you compact the soil. Water the plant and add more soil if necessary.
Container Planting
 For container planting, ensure drainage holes, choose a larger pot for growth, and fill it with new soil.
Container planting uses a process similar to planting in the ground, but there are a few things to remember. Most importantly, ensure the container has drainage holes so excess water won’t stay in the soil. Use a pot bigger than the nursery pot your plant was previously in so it will have room to grow without the immediate need to re-pot it.
A pot with new soil allows you to get exactly what you need- no need to amend in-ground soil! Like in-ground planting, partially fill until the top of the root ball lines up with the edge of the pot. You don’t need to worry about mounding here since the pot will have drainage holes and well-draining soil.
Place the plant in the pot and fill it with more soil. Pack it down but don’t compact the soil, then water it. Add more soil if necessary to level it out.
Keep your pot in a sunny location. You can keep it outside during the warm months in most areas, but you’ll need to bring it indoors when the weather cools down. Keep it in a sunroom or greenhouse to keep ideal conditions year-round.
How to Grow
Conebushes may seem super picky initially, but they’re easy to care for once you get into the flow. They can even be a low-maintenance shrub, provided you have the right growing conditions. Let’s look at how to make this plant thrive.
Light
 They thrive in abundant sunlight.
Conebushes will thrive when given as much direct sunlight as possible. Grow them in a location not shaded by structures, fences, or other plants. Try to get at least six hours of direct light, but the more, the merrier!
They can grow in partial shade, but their colors won’t be as vibrant. If you can’t get your plant the light it needs in one spot, keep it in a pot so you can move it around as needed to test out different locations.
If you keep your conebush indoors through winter, grow it next to a window in a bright room. Since winter is its dormant season, the lack of light won’t bother it.
Water
 Seedlings and cuttings require initial humidity, while established plants should be watered when the soil is dry.
Conebushes are ideal for dry areas prone to drought because they don’t demand much water once they’ve matured and set down their deep roots. Newly planted seeds and stem cuttings require a lot of humidity when first starting, but established plants only need to be watered when the soil is dry.
The best way to water is at the base of the plant. Avoid getting the leaves wet if you can. If that’s not an option, water in the morning so the plant can have the whole day to dry out.
Water slowly and deeply. Let water trickle from the hose until several inches of soil are wet. Ensure the soil drains well so it doesn’t stay wet for too long. Wet feet will kill conebushes in a matter of days, which is why drainage is such an important factor.
Allow the soil to dry out completely between waterings. Established shrubs are forgiving of drought conditions so that they can handle dry soil for a short time.
Soil
 Light, sandy, or loamy soil with a slightly acidic pH of 6.0 or less is best.
Light, sandy soil is ideal because it allows water to drain well. Loamy soil will also work, but make sure it’s on the sandier side and amend it with compost or perlite to keep it aerated.
If you use clay soil, it will need to be heavily amended since clay retains a lot of water for a long time. Clay soil will be better suited for containers since they have drainage holes. The soil you use should be slightly acidic with a pH of 6.0 or less, though conebushes can tolerate a neutral pH.
Top the soil with mulch to reduce weeds. Don’t let the mulch touch the base of the shrub, and make sure it’s not too thick. Retaining moisture isn’t bad, but keeping the soil too wet can harm the plant.
Climate and Temperature
 They thrive in zones 9-11, favoring warmth and avoiding freezing temperatures.
Conebushes grow best in USDA hardiness zones 9-11. It likes warm weather without freezing temperatures, though some varieties can withstand short periods reaching down 20°F.
However, this will still cause some damage. Make sure you know which variety you have and the lowest temperatures it can withstand so you can prevent hurting your plant.
If you live in zones colder than 9, you can keep your plant in a container to overwinter it indoors. You can also grow it indoors as a houseplant, though it will be much smaller than if you were to grow it outdoors.
Fertilizer
 Conebushes are light feeders, usually not requiring fertilizer.
You likely won’t need to fertilize your conebush since it’s a light feeder and doesn’t demand many nutrients. Start your plant with a generous amount of compost; it should have enough nutrients for the rest of the year. Add more compost each spring to give a boost.
If your plant looks stunted, you can give it some fertilizer for shrubs. Look for something with little or no phosphorus, such as an NPK of 15-0-15.
Maintenance
 Conebushes are pruning-friendly, but avoid cutting new growth and trim spent blooms in season.
A little pruning goes a long way. These are forgiving plants that can handle a lot of pruning, but you need to know which stems to cut and which to avoid.
Blooms appear on new growth, so never prune the plant down to leafless, woody stems. However, trim off spent blooms during the growing season to promote more blooms. When it stops flowering at the end of the growing season, heavily prune it to encourage bushier growth next year.
When you prune, leave behind some recent growth to have flowers in the next season. Pruning down to the woody parts is an option if your plant has become leggy and you want to “start over,” but you’ll likely not see any blooms next year. But it should be much bushier by the time it does bloom again.
Varieties
 ‘Burgundy Blaze’ stands out with elegant and captivating deep purples and reds, offering a distinctive addition to any garden.
Here are some popular and notable varieties to check out:
- ‘Burgundy Blaze’: The deep purples and reds of the Leucadendron salignum x L. laureolum are elegant and eye-catching. It’s the perfect plant if you need something unique in your garden.
- ‘Galpins’: One of the more tame varieties, Leucadendron galpinii has silvery green foliage with silver cones on the end. The narrow leaves give it a pine cone tree look.
- ‘Safari Sunshine’: Sometimes called ‘Jester,’ this Leucadendron salignum x L. laureolum cultivar is a must-have if you love the color pink. The pink and purple foliage will grab your attention and take your breath away.
- ‘Spicy’: Leucadendron tinctum doesn’t have the red or orange coloration you’d expect but instead has a gorgeous variegated pink and cream color with a brown cone in the center.
- ‘Winter Red’: Leucadendron salignum is prized for its festive red and white flowers accented by green leaves that turn purple-ish in the cool months.
Pests
Conebushes are generally pest-free, but they aren’t immune to problems. Though you may only deal with some of these issues, these are common possibilities.
Beetles
 Control flea beetles by clearing leaves, using thin mulch, and applying kaolin clay.
A couple of different kinds of beetles can attack conebushes. Flea beetles hide out in leaf litter or tall, grassy areas in the winter. They lay eggs in the spring, which hatch into hungry larvae that eat plant roots. Adult beetles eat leaves and create several tiny holes.
Large flea beetle infestations can severely damage a plant. Prevent them by raking up fallen leaves and only using thin layers of mulch. Pay close attention to young conebush seedlings since flea beetles favor them.
Kaolin clay can prevent adults from munching on leaves, and lacewings are natural predators. Get ahead of the problem by attracting these and other beneficial predators to your garden.
Another beetle pest is stem borers, the larvae of slender-bodied beetles. The adults lay eggs by stems or under the bark. When the eggs hatch, the larvae eat their way into shrubs and eat the stems from the inside out for three years, taking a break each winter.
Insecticides aren’t recommended for stem borers since they’re inside the plant. Instead, remove infected branches to reduce the population, and look out for egg piles to prevent the next generation.
Termites
 Termites prefer moisture and wood, starting colonies in soil and damaging shrubs.
Termites like moist conditions and woody plants. The colonies start in moist soil and eat their way into shrubs. The best way to prevent them is to keep your conebush pruned to remove dead woody stems.
Apply beneficial nematodes to the soil to kill the colony, or you can use termite bait. Remove and replace the soil for container plants, and ensure it doesn’t stay moist for too long.
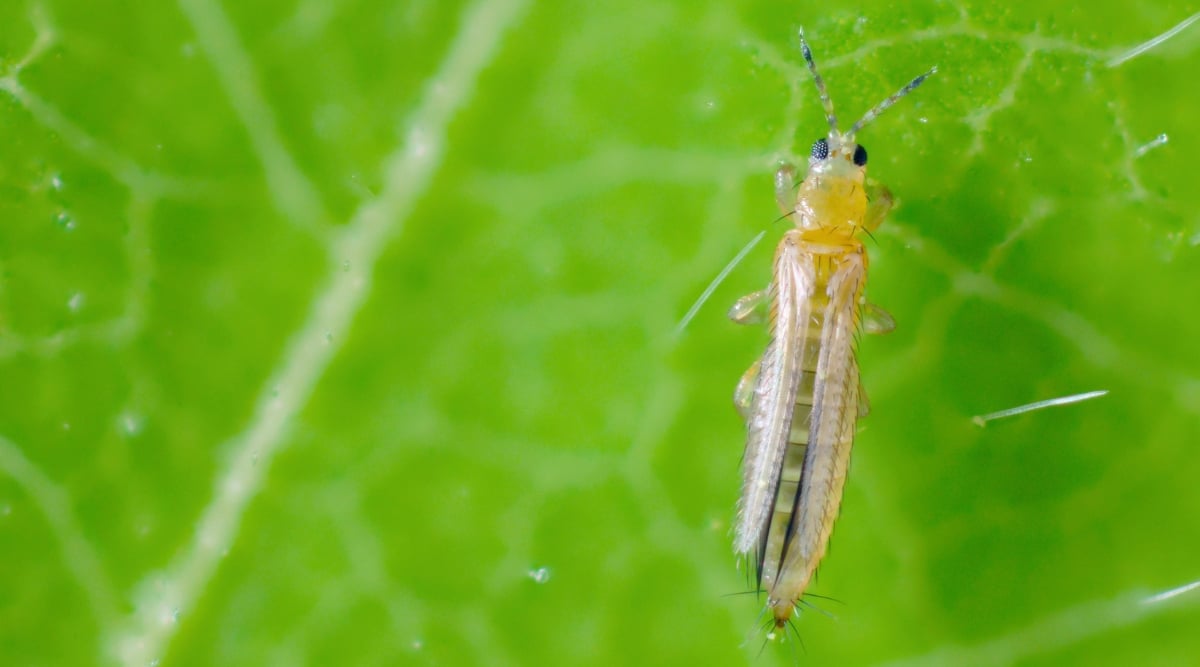
Thrips
 Tiny thrips suck sap, causing discoloration.
Thrips are tiny flying insects that suck sap out of plants. They most likely won’t kill conebushes, but they will cause discoloration and make your plant less than pretty if it’s a big infestation.
Fortunately, many predators will help you take care of thrips, including mites, parasitic wasps, and lacewings. Avoid using insecticides that will harm these beneficial insects. You can also keep thrips at bay by regularly pruning or using insecticidal soap.
Mites
 Beware of harmful spider mites, which damage plants.
Though there are beneficial predatory mites, some types, such as spider mites, will harm your plants. They suck up sap and cause discoloration, eventually leading to dried-up leaves that fall off the plant. Mites often appear on stressed plants, so make sure to water your conebush appropriately and that it gets enough sunlight.
Predatory mites can go after spider mites, thrips, some flies, and lacewings. Remove excessive dust from pathways, as this can attract bad mites. You can wash mites off with water, but do this in the morning so your conebush can dry out before nighttime.
Use insecticidal soap or neem oil, but avoid chemical insecticides as much as possible. They often kill mite predators, leaving you with a bigger mite problem than before.
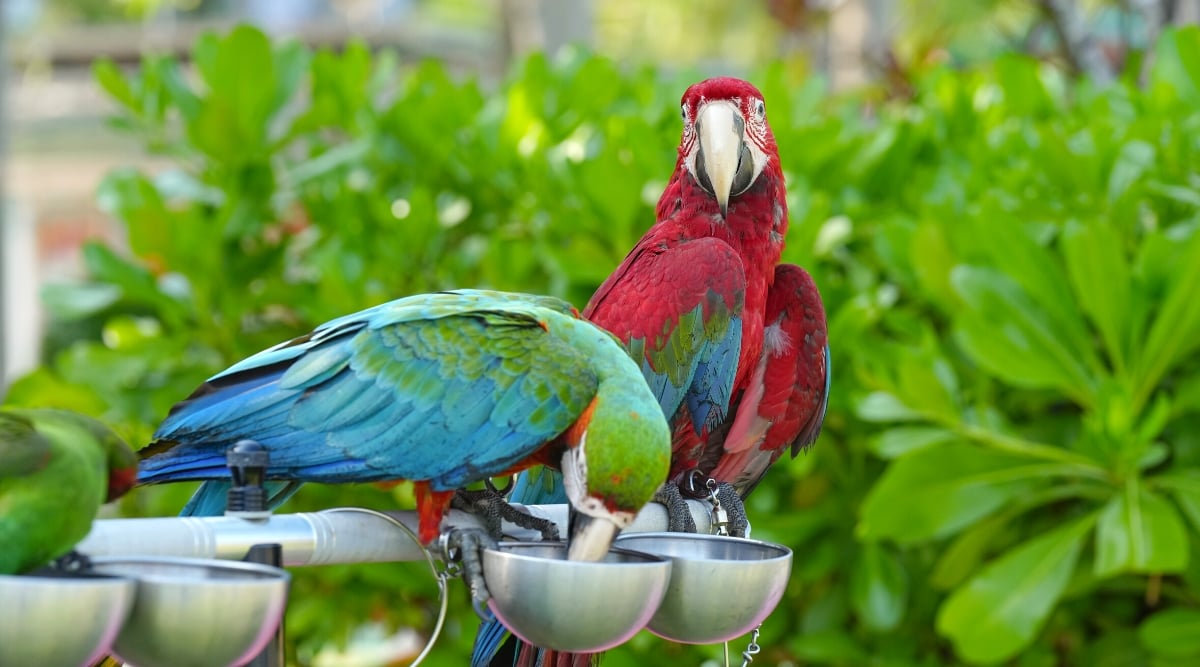
Parrots
 Parrots can be a pest where native, damaging by eating seeds.
You probably aren’t going to deal with parrots in most of the U.S. (except perhaps the Los Angeles area, which has a wild parrot population), but they can be a notable pest in areas where they’re native!
They like to eat the seeds, which can damage the plant. Remove spent flowers quickly to prevent the cones from drying on the plant, which will be enough to keep them off your shrub.
Diseases
You won’t deal with diseases too often, but if they’re near other diseased plants, they might also come down with an illness. Here are the most common diseases you might see in these shrubs.
Root Rot
 Prevent root rot by ensuring well-draining soil, especially in containers.
Root rot is the most likely problem, but it’s easily preventable. You can even reverse the damage. Wet soil conditions cause fungal development; the fungus will attack the plants, causing the roots to rot and eventually killing the plant.
You can prevent this by making sure in-ground plants have well-draining soil. Planting them on a slope will stop water from pooling by the roots. Make sure container plants have plenty of drainage holes along with sandy soil.
Tell-tale signs of root rot are yellowing leaves, stunted growth, and mushy stems. If your plant has root rot, dig it up, remove the soil from the roots, and trim any rotted roots. Plant it in a new area or container with ideal soil conditions and drainage. Only water the plant when the soil is dry.
Leaf Spot
 Prevent Anthracnose leaf spot with proper spacing, avoid wetting leaves during watering, and remove fallen leaves.
Leaf spotting is caused by various fungi that can spread between plants. One of the most common is Colletotrichum gloeosporioides, which causes Anthracnose leaf spot. This appears as reddish-brown spots on leaves and inhibits a plant’s ability to photosynthesize. The plant will only die if most leaves are affected and fall off.
Fungal diseases often can’t be fully controlled once a plant is infected, so the best method is prevention. Avoid getting leaves wet when watering, and don’t let plants touch each other. In the cold months, rake up and remove fallen leaves so existing diseases won’t spread to new growth when the weather warms up.
Copper fungicides can be applied in early spring before diseases infect the plant. Fungicides can only prevent diseases, so they won’t be very effective on already-infected plants. However, you can remove infected portions of the plant and spray the healthy parts with fungicide to slow or stop the disease’s spread.
Grey Mold
 Weak conebushes are susceptible to Botrytis.
Grey mold, or Botrytis, is another fungal disease that will go after weak plants. If your conebush suffered damage from weather or pruning, the open spots could become infected. Grey mold starts as a white or grey fungus at the damaged site and can spread to healthy parts of the plant if it’s not dealt with soon enough.
Remove all infected parts of the plant as soon as possible, making as few new wounds as possible. As with leaf spot diseases, grey mold can only be prevented and not treated. The disease thrives in moist, humid conditions, so allow your conebush to dry out completely to prevent the spread.
Final Thoughts
Conebushes are gorgeous plants whether you grow them indoors or outdoors. They’ll need extra care if grown in cool climates, but they’re ultimately an easy low maintenance option that typically won’t have pest or disease issues. With so many conebush varieties available, you may need help deciding which ones to choose!


